Egg White Breakfast Wrap With Spinach & Feta (High Protein, Low Cal)

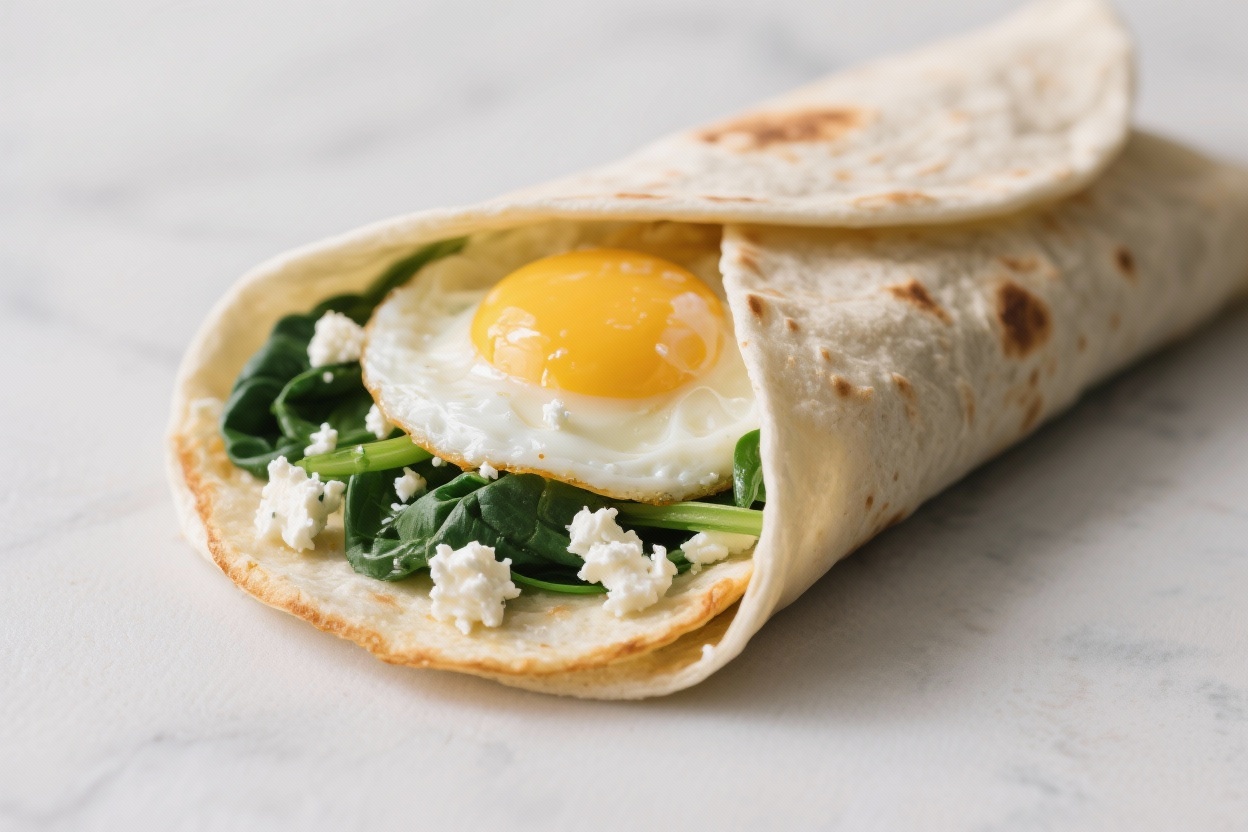
This breakfast wrap is light, savory, and ready in minutes. It’s the kind of morning meal that actually keeps you full without dragging you down. Tender egg whites, sautéed spinach, and creamy feta get tucked into a warm tortilla for a simple, balanced bite.

It’s great for busy weekdays, post-workout meals, or anyone looking to keep calories in check while hitting their protein goals.

What Makes This Special

Cooking process close-up: Soft-scrambled egg whites setting in a nonstick skillet with wilted spinac

This wrap leans on egg whites for lean protein with minimal fat, making it a smart choice if you want a filling breakfast without extra calories. Spinach brings a pop of color and a dose of iron and fiber, while feta adds a salty, tangy kick that makes the whole thing feel satisfying. It’s fast, budget-friendly, and easily customizable.

Plus, it wraps up neatly, so you can eat it on the go.

Shopping List

  • Egg whites (from a carton or 4–5 whites from whole eggs)
  • Fresh spinach (2 packed cups)
  • Feta cheese (about 2 tablespoons, crumbled)
  • Whole-wheat or low-carb tortilla (8–10 inch)
  • Olive oil or cooking spray (1 teaspoon or a light spray)
  • Salt and black pepper
  • Garlic powder or minced garlic (optional)
  • Red pepper flakes (optional, for heat)
  • Fresh herbs like dill or parsley (optional)
  • Cherry tomatoes or roasted red peppers (optional add-ins)

How to Make It

Final dish overhead: Overhead shot of a neatly toasted whole-wheat breakfast wrap, seam-side down an
  1. Warm the pan: Heat a nonstick skillet over medium heat. Add a teaspoon of olive oil or a quick spray to coat the surface.
  2. Sauté the spinach: Toss in the spinach with a pinch of salt. Stir for 1–2 minutes until wilted.

    Add a small pinch of garlic powder or minced garlic if you like.

  3. Cook the egg whites: Pour in the egg whites. Season with salt and pepper. Let them set slightly, then gently push the edges toward the center until they’re soft and just cooked, about 2–3 minutes.
  4. Add the feta: Sprinkle crumbled feta over the eggs.

    Turn off the heat and let the residual warmth soften the cheese.

  5. Warm the tortilla: In a separate pan or the microwave, warm your tortilla until pliable.
  6. Assemble: Spoon the egg white and spinach mixture onto the tortilla. Add any extras like herbs, tomatoes, or red pepper flakes.
  7. Wrap it up: Fold the sides in, then roll from the bottom into a snug wrap. Place seam-side down.
  8. Optional toast: For a crisp exterior, return the wrap to the skillet for 1–2 minutes per side.

How to Store

If you’re meal prepping, cook the egg whites and spinach ahead and store them separately from the tortilla.

Keep in an airtight container in the fridge for up to 3 days. Reheat the filling in a skillet or microwave, then assemble fresh. If storing a fully assembled wrap, wrap tightly in foil and reheat in a skillet or toaster oven to keep it from getting soggy.

Health Benefits

  • High protein, low fat: Egg whites deliver protein to support muscle recovery and satiety with minimal calories.
  • Greens you can taste: Spinach adds vitamins A, C, K, and folate, plus fiber for digestion.
  • Balanced carbs: A whole-wheat or low-carb tortilla gives steady energy without a crash.
  • Flavor with purpose: Feta brings calcium and bold taste, so you need less cheese overall.

Pitfalls to Watch Out For

  • Overcooking egg whites: They turn rubbery fast.

    Pull them off the heat when they’re just set.

  • Too much moisture: Wet spinach or juicy add-ins can make the wrap soggy. Pat veggies dry and don’t overfill.
  • Salty cheese + salt: Feta is naturally salty, so season lightly and adjust at the end.
  • Tortilla tearing: Cold tortillas crack. Warm them first for easy rolling.

Variations You Can Try

  • Mediterranean: Add roasted red peppers, olives, and a sprinkle of dried oregano.
  • Spicy: Mix in jalapeños, hot sauce, or harissa with the spinach.
  • Veg boost: Fold in sautéed mushrooms, onions, or zucchini for extra volume.
  • Herb-forward: Fresh dill, basil, or parsley brightens the flavor without extra calories.
  • Cheese swap: Try goat cheese or part-skim mozzarella for a different profile.
  • Gluten-free: Use a gluten-free tortilla or a chickpea wrap.

FAQ

Can I use whole eggs instead of egg whites?

Yes.

Two whole eggs will add richness and more nutrients, though the calories and fat will be higher. You can also do a mix: one whole egg plus extra whites for balance.

What’s the best tortilla for low calories?

Look for a high-fiber, low-carb whole-wheat tortilla in the 70–100 calorie range. Many brands offer wraps with added fiber that stay soft and fold well.

Can I make this dairy-free?

Absolutely.

Skip the feta or use a dairy-free feta-style crumble. Add a squeeze of lemon and a pinch of nutritional yeast to keep it flavorful.

How do I keep the wrap from getting soggy?

Pat spinach dry after washing, avoid watery add-ins, and assemble just before eating. If prepping ahead, store the filling separately and toast the wrap before serving.

Is this good for weight loss?

It can be.

It’s high in protein and relatively low in calories, which helps with fullness and portion control. Just watch add-ins like extra cheese or heavy sauces.

Can I bake these for a crowd?

Yes. Assemble wraps, place seam-side down on a sheet pan, and bake at 375°F (190°C) for 8–10 minutes to warm and crisp.

Serve with a light yogurt sauce if you like.

Final Thoughts

This Egg White Breakfast Wrap With Spinach & Feta is simple, fast, and genuinely satisfying. It’s easy to customize, packs in protein, and tastes great without weighing you down. Keep a bag of spinach, a carton of egg whites, and a few tortillas on hand, and you’ve got a reliable breakfast any day of the week.

Egg White Breakfast Wrap With Spinach & Feta (High Protein, Low Cal) - A Fresh, Satisfying Start

Prep Time 5 minutes
Cook Time 10 minutes
Total Time 15 minutes
Servings 2 servings

Ingredients
  

  • Egg whites (from a carton or 4–5 whites from whole eggs)
  • Fresh spinach (2 packed cups)
  • Feta cheese (about 2 tablespoons, crumbled)
  • Whole-wheat or low-carb tortilla (8–10 inch)
  • Olive oil or cooking spray (1 teaspoon or a light spray)
  • Salt and black pepper
  • Garlic powder or minced garlic (optional)
  • Red pepper flakes (optional, for heat)
  • Fresh herbs like dill or parsley (optional)
  • Cherry tomatoes or roasted red peppers (optional add-ins)

Instructions
 

  • Warm the pan: Heat a nonstick skillet over medium heat. Add a teaspoon of olive oil or a quick spray to coat the surface.
  • Sauté the spinach: Toss in the spinach with a pinch of salt. Stir for 1–2 minutes until wilted.Add a small pinch of garlic powder or minced garlic if you like.
  • Cook the egg whites: Pour in the egg whites. Season with salt and pepper. Let them set slightly, then gently push the edges toward the center until they’re soft and just cooked, about 2–3 minutes.
  • Add the feta: Sprinkle crumbled feta over the eggs.Turn off the heat and let the residual warmth soften the cheese.
  • Warm the tortilla: In a separate pan or the microwave, warm your tortilla until pliable.
  • Assemble: Spoon the egg white and spinach mixture onto the tortilla. Add any extras like herbs, tomatoes, or red pepper flakes.
  • Wrap it up: Fold the sides in, then roll from the bottom into a snug wrap. Place seam-side down.
  • Optional toast: For a crisp exterior, return the wrap to the skillet for 1–2 minutes per side.

Fluffy Greek Yogurt Protein Pancakes – Light, High-Protein, and Easy

These pancakes are soft, thick, and satisfying without feeling heavy. Greek yogurt gives them a protein boost and a tender texture, while a little baking powder keeps them fluffy. They cook up golden in minutes and taste just like classic pancakes, with a clean ingredient list you can feel good about.

Perfect for busy mornings, post-workout brunch, or a cozy weekend stack with berries and maple syrup.

What Makes This Special

  • High in protein: Greek yogurt and eggs add natural protein—no chalky protein powder needed.
  • Fluffy texture: The yogurt’s creaminess and baking powder create lift without dryness.
  • Simple ingredients: Pantry basics come together fast for a reliable, delicious stack.
  • Balanced sweetness: Lightly sweetened so you can add syrup, fruit, or nut butter as you like.
  • Kid-friendly and meal-prep friendly: Batter mixes quickly, and leftovers reheat well.

Shopping List

  • 1 cup plain Greek yogurt (2% or whole milk works best)
  • 2 large eggs
  • 1 teaspoon vanilla extract
  • 2 tablespoons maple syrup or honey (optional for a lightly sweet batter)
  • 3/4 cup all-purpose flour (or white whole wheat for extra fiber)
  • 1 teaspoon baking powder
  • 1/4 teaspoon baking soda
  • Pinch of salt
  • 2–4 tablespoons milk (as needed to thin batter)
  • Butter, ghee, or oil for the pan
  • Optional add-ins: blueberries, mini chocolate chips, cinnamon, lemon zest

Step-by-Step Instructions

Final plated overhead: A tall stack of golden Greek yogurt protein pancakes on a white ceramic plate
  1. Whisk the wet ingredients: In a medium bowl, whisk Greek yogurt, eggs, vanilla, and maple syrup until smooth.
  2. Combine the dry ingredients: In a separate bowl, mix flour, baking powder, baking soda, and salt.
  3. Bring it together: Add dry ingredients to wet and stir gently until just combined. If the batter is very thick, add milk 1 tablespoon at a time. Aim for a thick but spoonable batter.
  4. Rest the batter: Let it sit for 5 minutes.This helps the flour hydrate and boosts fluffiness.
  5. Preheat the pan: Heat a nonstick skillet or griddle over medium heat. Lightly grease with butter or oil.
  6. Portion and cook: Scoop about 1/4 cup batter per pancake. If using add-ins, sprinkle them on top now.Cook until bubbles form on the surface and edges look set, about 2–3 minutes.
  7. Flip and finish: Turn carefully and cook 1–2 more minutes until golden and cooked through. Reduce heat slightly if they brown too fast.
  8. Serve warm: Top with fresh berries, a pat of butter, maple syrup, or a dollop of yogurt and a drizzle of honey.

Storage Instructions

  • Refrigerate: Cool completely, then store in an airtight container for up to 4 days.
  • Freeze: Lay pancakes on a sheet pan to freeze, then transfer to a freezer bag for up to 2 months. Separate layers with parchment to prevent sticking.
  • Reheat: Toast in a toaster, warm in a skillet over low heat, or microwave in 15–20 second bursts until heated through.

Why This is Good for You

  • Protein-rich: Greek yogurt and eggs support muscle repair and keep you full longer.
  • Balanced carbs and fats: Provides steady energy without a sugar crash.
  • Customizable nutrients: Add berries for antioxidants, chia for fiber, or nuts for healthy fats.

What Not to Do

  • Don’t overmix: Stir until the flour just disappears.Overmixing leads to dense, tough pancakes.
  • Don’t cook on high heat: A medium heat prevents burning before the centers cook through.
  • Don’t skip the rest: A short 5-minute rest improves texture and rise.
  • Don’t use fat-free yogurt: It can make the batter gummy. Use 2% or whole milk yogurt for best results.

Recipe Variations

  • Lemon Blueberry: Add 1 teaspoon lemon zest and 1/2 cup fresh or frozen blueberries.
  • Cinnamon Banana:</-strong> Mash 1 small ripe banana into the wet ingredients and add 1/2 teaspoon cinnamon.
  • Chocolate Chip: Fold in 1/4 cup mini chocolate chips; serve with a light dusting of cocoa.
  • Whole Grain: Use white whole wheat flour and a splash more milk for a hearty texture.
  • Extra Protein:</-strong> Stir in 1 tablespoon nut butter or 1–2 tablespoons finely ground almond flour. If using protein powder, add 1–2 tablespoons and increase milk as needed.

FAQ

Can I make the batter ahead of time?

Yes, but for best rise, cook within 30 minutes.

If you must prep ahead, refrigerate up to 12 hours and stir in a splash of milk before cooking.

What if I only have fat-free Greek yogurt?

It will work, but the pancakes may be less tender. Add 1 tablespoon melted butter or oil to the batter to improve texture.

How do I know when to flip?

Look for small bubbles across the surface and slightly dry edges. The underside should be golden when you peek with a spatula.

Can I make them gluten-free?

Yes.

Use a 1:1 gluten-free all-purpose flour blend. You may need an extra tablespoon of milk for the right consistency.

Why are my pancakes gummy inside?

The heat is likely too high or the batter too thick. Lower the heat and thin the batter with a little milk.

Make sure you’re not overmixing.

In Conclusion

Fluffy Greek Yogurt Protein Pancakes deliver the best of both worlds: a soft, café-style stack with impressive staying power. They’re simple to make, easy to customize, and perfect for weekdays or a slow Sunday morning. Keep this recipe in your back pocket for a reliable, feel-good breakfast that tastes like a treat and fuels your day.

Fluffy Greek Yogurt Protein Pancakes - Light, High-Protein, and Easy

Prep Time 10 minutes
Cook Time 15 minutes
Total Time 25 minutes
Servings 4 servings

Ingredients
  

  • 1 cup plain Greek yogurt (2% or whole milk works best)
  • 2 large eggs
  • 1 teaspoon vanilla extract
  • 2 tablespoons maple syrup or honey (optional for a lightly sweet batter)
  • 3/4 cup all-purpose flour (or white whole wheat for extra fiber)
  • 1 teaspoon baking powder
  • 1/4 teaspoon baking soda
  • Pinch of salt
  • 2–4 tablespoons milk (as needed to thin batter)
  • Butter, ghee, or oil for the pan
  • Optional add-ins: blueberries, mini chocolate chips, cinnamon, lemon zest

Instructions
 

  • Whisk the wet ingredients: In a medium bowl, whisk Greek yogurt, eggs, vanilla, and maple syrup until smooth.
  • Combine the dry ingredients: In a separate bowl, mix flour, baking powder, baking soda, and salt.
  • Bring it together: Add dry ingredients to wet and stir gently until just combined. If the batter is very thick, add milk 1 tablespoon at a time. Aim for a thick but spoonable batter.
  • Rest the batter: Let it sit for 5 minutes.This helps the flour hydrate and boosts fluffiness.
  • Preheat the pan: Heat a nonstick skillet or griddle over medium heat. Lightly grease with butter or oil.
  • Portion and cook: Scoop about 1/4 cup batter per pancake. If using add-ins, sprinkle them on top now.Cook until bubbles form on the surface and edges look set, about 2–3 minutes.
  • Flip and finish: Turn carefully and cook 1–2 more minutes until golden and cooked through. Reduce heat slightly if they brown too fast.
  • Serve warm: Top with fresh berries, a pat of butter, maple syrup, or a dollop of yogurt and a drizzle of honey.

Ginger, Celery & Green Apple Anti-Bloat Juice – Light, Refreshing, and Easy

This crisp, cooling juice is made for those days when your stomach feels a little puffy and sluggish. It’s fresh, bright, and balanced with just the right hint of zing from ginger. Celery and cucumber bring hydration, while green apple adds a gentle sweetness without going overboard.

It comes together fast, tastes clean, and feels like a reset in a glass.

What Makes This Special

Close-up detail: A chilled glass of Ginger, Celery & Green Apple Anti-Bloat Juice just after straini

This juice combines hydrating, mineral-rich veggies with digestion-friendly ginger to support a calmer belly. Celery is naturally salty and packed with water, which may help reduce water retention. Cucumber keeps things light and refreshing.

Green apple brings fiber and tartness, while lemon lifts the flavor and can help cut through heaviness. The combo is simple, but it works beautifully for an easy, everyday bloat-friendly drink.

What You’ll Need

  • 4–5 celery stalks, leaves removed
  • 1 medium cucumber, peeled if waxed
  • 1 green apple, cored
  • 1-inch piece fresh ginger, peeled
  • 1/2 lemon, peeled (or juice of 1/2 lemon)
  • Optional: handful of fresh parsley or mint for extra freshness
  • Ice, to serve (optional)
  • Water or coconut water, as needed for blending (if using a blender instead of a juicer)

Instructions

Tasty top view (final presentation + process context): Overhead shot of the finished juice poured in
  1. Prep your produce: Wash everything well. Core the apple, trim the celery ends, peel ginger, and peel the lemon if you’re juicing the whole fruit.
  2. If using a juicer: Feed the celery, cucumber, apple, ginger, and lemon through the juicer.

    Stir to combine.

  3. If using a blender: Add chopped celery, cucumber, apple, ginger, and lemon juice with a splash of water. Blend until smooth. Strain through a fine mesh sieve or nut milk bag for a clearer juice.
  4. Taste and adjust: For more zing, add a bit more ginger.

    For more tartness, squeeze in extra lemon. For sweetness, add another half apple.

  5. Serve cold: Pour over ice if you like and sip slowly.

How to Store

Fresh juice tastes best right away. If you need to store it, keep it in an airtight glass jar in the fridge for up to 24 hours.

Fill the jar to the top to reduce air exposure. You can add a splash of lemon to help preserve color and flavor. Always shake or stir before drinking, as natural separation is normal.

Health Benefits

  • Hydration support: Celery and cucumber have high water content, which can help ease water retention and support digestion.
  • Digestive comfort: Ginger is known for easing nausea, gas, and general belly discomfort.
  • Light on sugar: Green apple keeps things crisp and mildly sweet without the sugar spike of sweeter fruits.
  • Alkaline-leaning ingredients: Lemon and leafy herbs may help balance heavy or salty meals.
  • Micronutrients: You’ll get potassium, vitamin C, and antioxidants that support overall wellness.

Pitfalls to Watch Out For

  • Too much ginger: A large chunk can overpower the drink and irritate sensitive stomachs.

    Start small.

  • Heavy on apple: More fruit equals more sugar. Keep it to one apple for bloat-friendly balance.
  • Not straining blender juice: Pulp can feel heavy. Strain for a lighter sip if you’re going for anti-bloat.
  • Drinking too fast: Gulping can introduce air and worsen bloating.

    Sip slowly.

  • Relying on juice alone: For ongoing bloating, look at salt intake, fiber balance, stress, and hydration, not just juice.

Recipe Variations

  • Mint Cooler: Add a handful of fresh mint for extra freshness and a soothing digestive boost.
  • Herb-Green: Toss in parsley or cilantro to increase diuretic and detox-like vibes.
  • Spicy Kick: Add a pinch of cayenne for warmth and circulation.
  • Coconut Lift: Blend with a splash of coconut water for electrolytes and a softer flavor.
  • Aloe Add-In: Mix in 1–2 tablespoons food-grade aloe vera juice if you tolerate it, for gentle digestive support.

FAQ

Can I make this without a juicer?

Yes. Blend everything with a little water, then strain through a fine sieve or nut milk bag. You’ll get a smooth, clean juice with minimal pulp.

When’s the best time to drink it?

Morning on an empty or lightly filled stomach is ideal, but it also works mid-afternoon as a refresh.

Sip slowly for best results.

Is this safe for sensitive stomachs?

Usually, yes, but go easy on the ginger and lemon at first. Start with a smaller piece of ginger and a light squeeze of lemon, then adjust.

Can I add protein or fiber?

You can blend in a little chia gel or a spoon of hemp seeds, but that turns it into more of a smoothie. For anti-bloat, a lighter, strained juice is often gentler.

How often can I drink it?

1–3 times per week is a good rhythm.

Daily is fine for many people, but keep an eye on how your stomach feels and adjust as needed.

Will it help after a salty meal?

It can. The high water content, potassium, and lemon can help balance out saltiness and support fluid balance.

Wrapping Up

This Ginger, Celery & Green Apple Anti-Bloat Juice is simple, soothing, and bright. It’s quick to make, easy to customize, and gentle enough for everyday use.

Keep the ginger balanced, sip slowly, and enjoy that fresh, light feeling. Sometimes the best reset is just a glass away.

Ginger, Celery & Green Apple Anti-Bloat Juice – Light, Refreshing, and Easy

Prep Time 10 minutes
Total Time 10 minutes
Servings 2 servings

Ingredients
  

  • 4–5 celery stalks, leaves removed
  • 1 medium cucumber, peeled if waxed
  • 1 green apple, cored
  • 1-inch piece fresh ginger, peeled
  • 1/2 lemon, peeled (or juice of 1/2 lemon)
  • Optional: handful of fresh parsley or mint for extra freshness
  • Ice, to serve (optional)
  • Water or coconut water, as needed for blending (if using a blender instead of a juicer)

Instructions
 

  • Prep your produce: Wash everything well. Core the apple, trim the celery ends, peel ginger, and peel the lemon if you’re juicing the whole fruit.
  • If using a juicer: Feed the celery, cucumber, apple, ginger, and lemon through the juicer.Stir to combine.
  • If using a blender: Add chopped celery, cucumber, apple, ginger, and lemon juice with a splash of water. Blend until smooth. Strain through a fine mesh sieve or nut milk bag for a clearer juice.
  • Taste and adjust: For more zing, add a bit more ginger.For more tartness, squeeze in extra lemon. For sweetness, add another half apple.
  • Serve cold: Pour over ice if you like and sip slowly.

Kid-Friendly Sweet Green Juice With Apple & Spinach – A Simple, Tasty Boost

This is the kind of green juice kids actually ask for. It’s sweet, bright, and refreshing, with a mellow spinach flavor that doesn’t overpower. Apple brings natural sweetness, lemon lifts the taste, and a touch of cucumber keeps it crisp.

You get that “green” goodness in a way that feels like a treat, not a chore. It’s quick to make, easy to sip, and perfect for busy mornings or after-school pick-me-ups.

What Makes This Recipe So Good

Close-up detail: A chilled glass of kid-friendly sweet green juice (apple, spinach, cucumber, lemon)
  • Kid-approved flavor: Apple and lemon balance the spinach so it tastes light and sweet, not grassy.
  • Simple ingredients: Nothing fancy—just produce you can find anywhere.
  • Fast to prepare: With a juicer, it takes minutes. A blender works too with a quick strain.
  • Naturally hydrating: Cucumber and apple add water content along with a gentle sweetness.
  • No added sugar needed: The fruit does the heavy lifting.

Shopping List

  • 2 sweet apples (Gala, Fuji, or Honeycrisp)
  • 2 packed cups fresh spinach
  • 1 small cucumber (or half a large)
  • 1/2 lemon, peeled
  • Small piece of fresh ginger (optional, about 1/2 inch)
  • Cold water or ice (for blender method or serving)

Step-by-Step Instructions

Tasty top view: Overhead shot of a small pitcher and two short tumblers filled with the finished swe
  1. Wash everything well. Rinse apples, spinach, and cucumber under cool water.

    Pat dry.

  2. Prep the produce. Core the apples if you like (or leave cores if your juicer handles them). Peel the lemon. Cut cucumber into chunks.

    If using ginger, peel it.

  3. If using a juicer: Juice spinach first, then cucumber, apple, lemon, and ginger. Stir the juice to combine.
  4. If using a blender: Add spinach, cucumber, apple chunks, peeled lemon, and ginger with 1/2 to 3/4 cup cold water. Blend until very smooth, 45–60 seconds.
  5. Strain (blender method): Pour the mixture through a fine-mesh sieve or nut milk bag into a bowl or pitcher.

    Press or squeeze to extract the juice.

  6. Taste and adjust. For extra sweetness, add another half apple. If you want more zing, add a splash of lemon.
  7. Serve cold. Pour over ice or chill for 10–15 minutes. Stir before serving.

Keeping It Fresh

Fresh juice is best right away, but you can store it.

Pour into an airtight bottle or jar, filling to the top to limit air. Keep it in the fridge for up to 24–48 hours. If it separates, just give it a good shake.

For school mornings, make it the night before and keep it chilled.

Why This is Good for You

  • Spinach: Offers iron, folate, and vitamin K, plus a gentle way to add greens without strong flavor.
  • Apples: Provide natural sweetness, vitamin C, and antioxidants.
  • Cucumber: Hydrates and adds minerals with very few calories.
  • Lemon: Adds brightness and vitamin C, which supports iron absorption from spinach.
  • Ginger (optional): Can help with digestion and adds warmth without heat if used lightly.

Note: Juice removes most fiber. That’s fine for a light, fast-absorbing drink, but balance it with fiber-rich meals and snacks throughout the day.

Pitfalls to Watch Out For

  • Overdoing the lemon: Too much can make it tart. Start with half and adjust.
  • Skipping a taste test: Kids vary.

    Taste and tweak sweetness with an extra half apple if needed.

  • Letting it sit too long: Flavor and nutrients fade. Keep it cold and drink within a day or two.
  • Using wilted greens: They can add bitterness. Fresh spinach tastes mild and sweet.
  • Going heavy on ginger: A little goes a long way for kids.

    Keep it subtle.

Variations You Can Try

  • Pear swap: Use ripe pear instead of apple for a silky, sweet finish.
  • Pineapple pop: Add 1/2 cup pineapple for a tropical twist and extra sweetness.
  • Minty fresh: Blend or juice a few mint leaves for a cooling note.
  • Calmer citrus: Swap lemon for orange if your child prefers softer acidity.
  • Extra greens: Add a few romaine leaves for more volume without bitterness.
  • Fiber boost (blender only): Skip straining and serve as a smoothie, adding a little extra water or ice.

FAQ

Can I make this without a juicer?

Yes. Use a blender with a bit of water, then strain through a fine-mesh sieve or nut milk bag. Press or squeeze well to extract the juice.

What apples work best?

Sweet, crisp varieties like Gala, Fuji, or Honeycrisp are ideal.

If you use Granny Smith, expect a more tart, grown-up flavor.

Is this okay for toddlers?

In small amounts, yes, but check with your pediatrician if you have concerns. Offer a few ounces alongside meals rather than as a meal replacement.

Can I add protein?

For juice, protein powders can get chalky. If you want protein, blend as a smoothie instead and add plain yogurt or a mild protein powder designed for smoothies.

How do I cut the sugar?

Use one apple instead of two and add extra cucumber or a few romaine leaves.

You’ll keep the freshness while dialing back sweetness.

Can I make a big batch?

You can, but the flavor is best within 24 hours. If batching, store in small, air-tight bottles filled to the brim to reduce oxidation.

Wrapping Up

This Kid-Friendly Sweet Green Juice with Apple & Spinach hits that sweet spot: bright flavor, simple steps, and real nourishment. It’s a quick way to add greens without a struggle, and it tastes like something kids actually want to drink.

Keep it cold, tweak it to your family’s taste, and enjoy a glass that’s both refreshing and feel-good.

Kid-Friendly Sweet Green Juice With Apple & Spinach - A Simple, Tasty Boost

Prep Time 10 minutes
Total Time 10 minutes
Servings 2 servings

Ingredients
  

  • 2 sweet apples (Gala, Fuji, or Honeycrisp)
  • 2 packed cups fresh spinach
  • 1 small cucumber (or half a large)
  • 1/2 lemon, peeled
  • Small piece of fresh ginger (optional, about 1/2 inch)
  • Cold water or ice (for blender method or serving)

Instructions
 

  • Wash everything well. Rinse apples, spinach, and cucumber under cool water.Pat dry.
  • Prep the produce. Core the apples if you like (or leave cores if your juicer handles them). Peel the lemon. Cut cucumber into chunks.If using ginger, peel it.
  • If using a juicer: Juice spinach first, then cucumber, apple, lemon, and ginger. Stir the juice to combine.
  • If using a blender: Add spinach, cucumber, apple chunks, peeled lemon, and ginger with 1/2 to 3/4 cup cold water. Blend until very smooth, 45–60 seconds.
  • Strain (blender method): Pour the mixture through a fine-mesh sieve or nut milk bag into a bowl or pitcher.Press or squeeze to extract the juice.
  • Taste and adjust. For extra sweetness, add another half apple. If you want more zing, add a splash of lemon.
  • Serve cold. Pour over ice or chill for 10–15 minutes. Stir before serving.

Minty Green Juice for Energy and Hydration – Fresh, Light, and Reviving

This bright, minty green juice is the kind of pick-me-up you’ll look forward to. It’s cool, crisp, and incredibly refreshing—perfect for mornings, post-workouts, or that mid-afternoon slump. You’ll taste fresh mint, cucumber, and apple with a hint of citrus.

The best part? It hydrates while giving you a gentle energy lift, without the crash of overly sweet drinks.

What Makes This Recipe So Good

Close-up detail: Silky, strained minty green juice being poured through a fine-mesh strainer into a
  • Ultra-hydrating: Cucumber and coconut water deliver electrolytes and high water content for quick hydration.
  • Clean, natural energy: Apple and lemon add brightness and a light sugar boost without heavy sweetness.
  • Cooling flavor: Fresh mint keeps it crisp and invigorating, especially on hot days.
  • No juicer required: You can make it in a blender and strain it—fast and low-effort.
  • Gentle on the stomach: No dairy, no heavy fibers in the final drink, just smooth, easy sipping.

Shopping List

  • 1 large cucumber (English or Persian)
  • 1 green apple (Granny Smith or a sweet-tart variety)
  • 1 packed cup fresh mint leaves
  • 1 handful fresh spinach or kale (optional for a deeper green)
  • 1 small lemon or lime
  • 1 cup cold coconut water (unsweetened)
  • 1/2 to 1 cup cold water or ice
  • Pinch of sea salt
  • Optional boosters: fresh ginger (1/2 inch), celery (1 stalk), honey or maple syrup (1–2 teaspoons if you like sweeter)

Step-by-Step Instructions

Tasty top view final presentation: Overhead shot of a chilled glass of minty green juice over ice, g
  1. Prep the produce: Wash everything well. Peel the lemon (and ginger, if using).

    Core the apple. If your cucumber has thick skin or a waxy coating, peel it.

  2. Chop for blending: Cut cucumber and apple into chunks. Tear mint leaves off the stems.

    Roughly chop spinach or kale.

  3. Blend the base: Add cucumber, apple, mint, spinach/kale (if using), coconut water, and 1/2 cup cold water to a blender. Add ginger or celery if you like.
  4. Season and blend: Add a small pinch of sea salt and squeeze in the lemon or lime. Blend on high until very smooth, 30–60 seconds.
  5. Taste and adjust: If it’s too strong, add more water or ice.

    For more zing, add extra lemon. For more sweetness, blend in a teaspoon of honey or maple.

  6. Strain (optional but recommended): Pour through a fine-mesh strainer or nut milk bag into a pitcher, pressing to extract the juice. This gives a silky, light texture.
  7. Chill and serve: Pour over ice and garnish with a mint sprig.

    Drink right away for the brightest flavor.

Storage Instructions

Best fresh: This juice tastes brightest within 30 minutes of making it. If you need to store it, keep it in an airtight jar in the refrigerator for up to 24 hours.

Minimize oxidation: Fill the jar to the very top to limit air, and add a squeeze of lemon to preserve color. Shake before drinking.

Freezing: Freeze in ice cube trays for up to 1 month.

Blend the cubes with fresh water or coconut water when ready.

Why This is Good for You

  • Hydration and electrolytes: Cucumber and coconut water replenish fluids and minerals like potassium.
  • Natural energy: Apple provides quick-burning carbs, while lemon brightens and supports digestion.
  • Antioxidants and phytonutrients: Mint and leafy greens support circulation, focus, and overall wellness.
  • Gentle on the gut: Light, low-fiber juice is easy to absorb before workouts or on busy mornings.

Pitfalls to Watch Out For

  • Over-sweetening: Too much apple or added sweetener can cause a sugar crash. Keep it crisp, not syrupy.
  • Skipping the salt: A tiny pinch of sea salt enhances flavor and helps with hydration, especially after exercise.
  • Using old mint: Wilted mint dulls the flavor. Fresh, fragrant leaves make a big difference.
  • No straining when needed: If texture bothers you, strain for a smoother sip.

    It’s worth the extra minute.

  • Letting it sit too long: Oxidation reduces freshness and nutrients. Drink soon after making.

Recipe Variations

  • Ginger Kick: Add 1/2–1 inch fresh ginger for a spicy, energizing boost.
  • Celery Cooler: Swap half the cucumber for 2 celery stalks for a more savory, mineral-rich taste.
  • Pineapple Mint: Replace apple with 1/2 cup pineapple for a tropical twist.
  • Matcha Lift: Blend in 1/2 teaspoon matcha powder for a gentle caffeine boost.
  • Protein Add-On: Stir in unflavored collagen or a small scoop of neutral protein powder after straining.

FAQ

Can I make this without coconut water?

Yes. Use cold water and a pinch more sea salt, or mix half water and half chilled herbal tea.

It will still taste crisp and hydrating.

Do I need a juicer?

No. A blender plus a fine-mesh strainer or nut milk bag works very well. The texture will be smooth and light after straining.

Is it okay to drink this every day?

In general, yes, especially if it replaces sugary drinks.

If you’re sensitive to fruit sugars or on specific medical plans, adjust the apple amount or consult your healthcare provider.

What can I use instead of mint?

Try fresh basil for a sweet, peppery twist, or parsley for a greener, herbal note. Start with less and adjust to taste.

Can I skip the lemon?

You can, but the juice will be less bright and may brown faster. Lime works perfectly as a substitute.

In Conclusion

This Minty Green Juice is simple, clean, and fast—an easy way to hydrate and feel refreshed.

With crisp cucumber, cooling mint, and a spark of citrus, it’s a light lift whenever you need it. Keep it flexible, adjust to your taste, and enjoy it fresh for the best flavor and benefits.

Minty Green Juice for Energy and Hydration - Fresh, Light, and Reviving

Prep Time 10 minutes
Total Time 10 minutes
Servings 2 servings

Ingredients
  

  • 1 large cucumber (English or Persian)
  • 1 green apple (Granny Smith or a sweet-tart variety)
  • 1 packed cup fresh mint leaves
  • 1 handful fresh spinach or kale (optional for a deeper green)
  • 1 small lemon or lime
  • 1 cup cold coconut water (unsweetened)
  • 1/2 to 1 cup cold water or ice
  • Pinch of sea salt
  • Optional boosters: fresh ginger (1/2 inch), celery (1 stalk), honey or maple syrup (1–2 teaspoons if you like sweeter)

Instructions
 

  • Prep the produce: Wash everything well. Peel the lemon (and ginger, if using).Core the apple. If your cucumber has thick skin or a waxy coating, peel it.
  • Chop for blending: Cut cucumber and apple into chunks. Tear mint leaves off the stems.Roughly chop spinach or kale.
  • Blend the base: Add cucumber, apple, mint, spinach/kale (if using), coconut water, and 1/2 cup cold water to a blender. Add ginger or celery if you like.
  • Season and blend: Add a small pinch of sea salt and squeeze in the lemon or lime. Blend on high until very smooth, 30–60 seconds.
  • Taste and adjust: If it’s too strong, add more water or ice.For more zing, add extra lemon. For more sweetness, blend in a teaspoon of honey or maple.
  • Strain (optional but recommended): Pour through a fine-mesh strainer or nut milk bag into a pitcher, pressing to extract the juice. This gives a silky, light texture.
  • Chill and serve: Pour over ice and garnish with a mint sprig.Drink right away for the brightest flavor.

Kale, Apple & Ginger Gut-Healing Green Juice – Fresh, Bright, and Soothing

This bright green juice is crisp, zesty, and gentle on the stomach. It’s the kind of simple, feel-good recipe you can sip in the morning or as a refreshing reset in the afternoon. Kale brings deep greens and minerals, apple adds natural sweetness, and ginger offers a warm kick that supports digestion.

The result tastes clean and energizing, without being overly earthy. If you’re looking for something light, nourishing, and easy to make, this one’s a winner.

Why This Recipe Works

Overhead shot of the finished Kale, Apple & Ginger Green Juice poured over ice in a clear highball g
  • Balanced flavor: Sweet apples smooth out kale’s bitterness while lemon and ginger keep it bright.
  • Easy on digestion: Ginger and lemon can help calm the gut, and the juice is light and hydrating.
  • Simple ingredients: Everything is easy to find and quick to prep.
  • Customizable: Adjust sweetness, spice, and greens to your taste without losing the core benefits.

Shopping List

  • 1 large bunch kale (curly or lacinato), stems trimmed
  • 2 medium apples (Granny Smith for tart, Honeycrisp or Gala for sweeter)
  • 1-inch piece fresh ginger, peeled
  • 1 small cucumber
  • 1 small lemon (peeled)
  • Fresh mint (small handful, optional)
  • Filtered water or coconut water (optional, for blending)
  • Ice (optional, for serving)

How to Make It

  1. Wash and prep: Rinse kale, apples, cucumber, and mint. Trim tough kale stems, core apples if you like, and peel the lemon and ginger.
  2. If using a juicer: Feed kale, cucumber, apples, ginger, lemon, and mint through the juicer.Stir the juice to combine flavors.
  3. If using a blender: Add chopped ingredients to the blender with 1/2–1 cup water or coconut water. Blend until very smooth.
  4. Strain (blender method): Pour the mixture through a fine mesh sieve or nut milk bag into a bowl, pressing to extract the juice.
  5. Taste and adjust: Add more lemon for brightness, apple for sweetness, or ginger for heat. If it’s too strong, dilute with a splash of water.
  6. Serve cold: Pour over ice or chill for 10 minutes.Drink fresh for the best flavor and nutrients.

How to Store

  • Refrigerate: Store in an airtight glass jar for up to 24–48 hours.
  • Minimize oxidation: Fill the container to the top and seal tightly. A squeeze of lemon can help preserve color and taste.
  • Shake before drinking: Separation is normal; give it a quick shake.
  • Freezing: Freeze in ice cube trays for up to 1 month. Thaw in the fridge and stir.

Health Benefits

  • Kale: Packed with vitamins A, C, and K, plus minerals like calcium and magnesium that support overall wellness.
  • Ginger: Known for soothing the stomach and supporting healthy digestion.
  • Apple: Adds natural sweetness and polyphenols; the pectin in whole apples supports gut health (note that juice contains less fiber).
  • Lemon: Brightens flavor and provides vitamin C, which supports immune function.
  • Cucumber: Hydrating and light, helping the juice feel refreshing rather than heavy.

Pitfalls to Watch Out For

  • Too much ginger: A little goes a long way.Start small and add more to taste.
  • Skipping acidity: Without lemon, the juice can taste flat and overly grassy.
  • Over-sweetening: Using very sweet apples plus coconut water can make it sugary. Balance with lemon.
  • Letting it sit too long: Fresh juice oxidizes. For best taste and nutrients, drink within 24 hours.
  • Using only stems: Thick kale stems can be fibrous and bitter.Trim them for a smoother, cleaner flavor.

Variations You Can Try

  • Extra gut support: Add a pinch of ground turmeric and a crack of black pepper.
  • Fiber boost: Blend instead of juice and skip straining, or stir in 1 teaspoon chia seeds and let sit 5 minutes.
  • Herbal twist: Swap mint for basil or cilantro for a fresh, savory note.
  • Lower sugar: Use one apple and add celery or an extra cucumber.
  • Tropical: Add a small chunk of pineapple for zing and sweetness.

FAQ

Can I make this without a juicer?

Yes. Blend everything with a little water or coconut water until smooth, then strain through a fine mesh sieve or nut milk bag. It’s quick and still tastes great.

What kind of apples work best?

Granny Smith gives a tart, crisp finish.

If you prefer sweeter juice, use Honeycrisp, Gala, or Fuji. You can also mix one tart and one sweet apple for balance.

Is this safe for sensitive stomachs?

Generally, yes—ginger and lemon can be soothing. If you’re sensitive to raw greens, start with less kale, add more cucumber, and sip slowly.

Always adjust to your comfort.

Can I add protein?

For a smoothie-style drink, blend and skip straining, then add plain yogurt or an unflavored protein powder. Note that this changes the texture and flavor from a pure juice.

How often should I drink it?

A few times a week is a nice rhythm. Use it as a refreshing, nutrient-dense option rather than a meal replacement unless you’re pairing it with other foods.

Why is my juice turning brown?

Oxidation happens when juice is exposed to air.

Store it in a full, airtight container and add a splash of lemon to help keep the color bright.

In Conclusion

This Kale, Apple & Ginger Gut-Healing Green Juice is clean, vibrant, and easy to make with everyday ingredients. It hits the sweet spot between refreshing and nourishing, with a flavor that feels lively rather than harsh. Keep it simple, adjust to your taste, and enjoy it fresh for the best results.

One glass is a small, steady way to support your gut and feel good.

Kale, Apple & Ginger Gut-Healing Green Juice - Fresh, Bright, and Soothing

Prep Time 10 minutes
Total Time 10 minutes
Servings 2 servings

Ingredients
  

  • 1 large bunch kale (curly or lacinato), stems trimmed
  • 2 medium apples (Granny Smith for tart, Honeycrisp or Gala for sweeter)
  • 1-inch piece fresh ginger, peeled
  • 1 small cucumber
  • 1 small lemon (peeled)
  • Fresh mint (small handful, optional)
  • Filtered water or coconut water (optional, for blending)
  • Ice (optional, for serving)

Instructions
 

  • Wash and prep: Rinse kale, apples, cucumber, and mint. Trim tough kale stems, core apples if you like, and peel the lemon and ginger.
  • If using a juicer: Feed kale, cucumber, apples, ginger, lemon, and mint through the juicer.Stir the juice to combine flavors.
  • If using a blender: Add chopped ingredients to the blender with 1/2–1 cup water or coconut water. Blend until very smooth.
  • Strain (blender method): Pour the mixture through a fine mesh sieve or nut milk bag into a bowl, pressing to extract the juice.
  • Taste and adjust: Add more lemon for brightness, apple for sweetness, or ginger for heat. If it’s too strong, dilute with a splash of water.
  • Serve cold: Pour over ice or chill for 10 minutes.Drink fresh for the best flavor and nutrients.

Spinach, Lemon & Cucumber Refreshing Juice – Light, Bright, and Hydrating

This juice is crisp, clean, and exactly what you want when you need a fresh reset. It’s the kind of drink that feels like a cool breeze—zesty lemon, cooling cucumber, and a gentle green boost from spinach. No fancy equipment or weird ingredients required.

Just simple, bright flavors that wake up your senses and leave you feeling refreshed. Whether it’s a morning pick-me-up or a mid-afternoon hydrator, this one’s a keeper.

What Makes This Special

Close-up detail shot of the finished Spinach, Lemon & Cucumber Refreshing Juice being strained throu

This juice balances flavor and function beautifully. Cucumber brings serious hydration, lemon adds brightness and a bit of tang, and spinach gives a mild earthiness without overpowering.

A touch of apple or pear adds natural sweetness, so there’s no need for sugar. Best of all, it’s quick to make and easy to customize based on what you have on hand.

Shopping List

  • Spinach: 2 packed cups of fresh baby spinach (or regular spinach, stems trimmed)
  • Cucumber: 1 large cucumber (English or Persian types work well)
  • Lemon: 1 medium lemon (peeled if blending; unpeeled if juicing and you like a slight bitter note)
  • Apple or Pear: 1 medium, for natural sweetness (optional but recommended)
  • Fresh Ginger: 1/2–1 inch piece, peeled (optional for a gentle kick)
  • Mint: A small handful of fresh mint leaves (optional for extra freshness)
  • Cold Water or Coconut Water: 1/2–1 cup, if using a blender
  • Ice: For serving
  • Pinch of Salt: Optional, to enhance flavor

Step-by-Step Instructions

Overhead final presentation of the poured juice served over ice in a clear highball glass, garnished
  1. Wash and prep: Rinse spinach, cucumber, lemon, and apple well. Peel the lemon (if blending) and ginger.

    Core the apple. Roughly chop everything into blender-friendly chunks.

  2. Choose your method: If you have a juicer, feed cucumber, spinach, lemon, apple, and ginger through. If using a blender, add all ingredients with 1/2–1 cup cold water or coconut water.
  3. Blend until smooth: Start on low, move to high, and blend until the mixture looks silky and bright green.
  4. Strain (optional): For a smoother, juice-like texture, pour through a fine-mesh sieve or nut milk bag.

    Press to extract as much liquid as possible.

  5. Taste and adjust: Add a squeeze more lemon for brightness, a few mint leaves for freshness, or a pinch of salt to sharpen the flavors.
  6. Serve cold: Pour over ice and enjoy immediately for the crispest taste and best nutrient retention.

Storage Instructions

  • Refrigeration: Store in an airtight glass jar for up to 24 hours. Fill to the top to reduce air exposure.
  • Shake before drinking: Natural separation is normal. Shake or stir to recombine.
  • Freezing: Freeze in ice cube trays for up to 1 month.

    Blend cubes with water for a quick refresh later.

Benefits of This Recipe

  • Hydration: Cucumber and lemon water help replenish fluids and feel light on the stomach.
  • Gentle greens: Spinach adds nutrients with a mild taste, making it beginner-friendly.
  • Naturally sweetened: Apple or pear provides sweetness without refined sugar.
  • Digestive support: Lemon and ginger can feel soothing and brighten flavor without heaviness.
  • Quick and flexible: Works with a blender or juicer and welcomes simple swaps.

Pitfalls to Watch Out For

  • Too bitter: Using lemon peel in a blender can make the drink bitter. Peel it unless you like that edge.
  • Watery flavor: Add less water if blending, then adjust gradually. Too much dilutes the taste.
  • Overpowering ginger: Start with a small piece; you can always add more.
  • Not cold enough: Warm juice tastes flat.

    Use chilled produce or serve over ice.

Alternatives

  • No apple? Use pear, a few grapes, or a small piece of pineapple.
  • No spinach? Try romaine or baby kale. Baby kale is mild; mature kale is stronger.
  • No mint? Basil adds a fresh twist; cilantro gives a herbal note if you enjoy it.
  • Boosters: Add chia seeds (stir after blending), a splash of coconut water, or a pinch of matcha for a gentle lift.
  • Lower sugar option: Skip the apple and use extra cucumber and a touch more lemon.

FAQ

Can I make this without a juicer?

Yes. Use a blender with a little water or coconut water, then strain through a fine-mesh sieve or nut milk bag for a smooth texture.

Do I need to peel the cucumber?

No.

If the skin is thin (English or Persian cucumbers), keep it on for nutrients and color. If the skin is waxed or thick, peel it for a cleaner taste.

Is this good for mornings?

Absolutely. It’s light, hydrating, and not too sweet.

It pairs well with a simple breakfast or stands alone as a quick start.

Can I add protein?

Yes. A scoop of unflavored or vanilla protein works best if you’re blending. Keep in mind it will thicken the drink and mellow the flavors.

How do I make it less tart?

Use half a lemon, add a bit more apple or pear, or splash in coconut water.

Chill well to round the flavors.

Can kids drink this?

Usually, yes, but go light on the ginger and lemon at first. Taste and adjust to keep it mild and pleasant.

Wrapping Up

This Spinach, Lemon & Cucumber Refreshing Juice is simple, clean, and bright—easy enough for busy mornings and satisfying any time you want something fresh. Keep it cold, tweak it to your taste, and enjoy the crisp balance of greens and citrus.

It’s a small, easy win for your day.

Spinach, Lemon & Cucumber Refreshing Juice - Light, Bright, and Hydrating

Prep Time 10 minutes
Total Time 10 minutes
Servings 2 servings

Ingredients
  

  • Spinach: 2 packed cups of fresh baby spinach (or regular spinach, stems trimmed)
  • Cucumber: 1 large cucumber (English or Persian types work well)
  • Lemon: 1 medium lemon (peeled if blending; unpeeled if juicing and you like a slight bitter note)
  • Apple or Pear: 1 medium, for natural sweetness (optional but recommended)
  • Fresh Ginger: 1/2–1 inch piece, peeled (optional for a gentle kick)
  • Mint: A small handful of fresh mint leaves (optional for extra freshness)
  • Cold Water or Coconut Water: 1/2–1 cup, if using a blender
  • Ice: For serving
  • Pinch of Salt: Optional, to enhance flavor

Instructions
 

  • Wash and prep: Rinse spinach, cucumber, lemon, and apple well. Peel the lemon (if blending) and ginger.Core the apple. Roughly chop everything into blender-friendly chunks.
  • Choose your method: If you have a juicer, feed cucumber, spinach, lemon, apple, and ginger through. If using a blender, add all ingredients with 1/2–1 cup cold water or coconut water.
  • Blend until smooth: Start on low, move to high, and blend until the mixture looks silky and bright green.
  • Strain (optional): For a smoother, juice-like texture, pour through a fine-mesh sieve or nut milk bag.Press to extract as much liquid as possible.
  • Taste and adjust: Add a squeeze more lemon for brightness, a few mint leaves for freshness, or a pinch of salt to sharpen the flavors.
  • Serve cold: Pour over ice and enjoy immediately for the crispest taste and best nutrient retention.

Golden Turmeric Mango Smoothie (Anti-Inflammatory & Creamy)

This smoothie is sunshine in a glass—creamy, vibrant, and packed with feel-good ingredients. It blends ripe mango with turmeric, ginger, and a hint of citrus for a refreshing, balanced flavor. The texture is lush without being heavy, and it’s naturally sweet with no need for added sugar.

Best of all, it takes just a few minutes and simple ingredients you probably already have.

What Makes This Special

Close-up detail/process shot: Golden turmeric mango smoothie swirling mid-blend in a clear high-spee

This smoothie combines flavor with function. Mango brings natural sweetness and tropical brightness, while turmeric and ginger add a warm, cozy spice and anti-inflammatory support. The result is a creamy, golden drink that feels both indulgent and nourishing.

  • Anti-inflammatory power: Turmeric and ginger work together, and black pepper helps boost turmeric’s benefits.
  • Restaurant-level creaminess: Coconut milk or yogurt gives a luxurious texture.
  • No refined sugar: Sweetness comes from ripe mango, with optional dates if you want more.
  • Quick and flexible: Blend-and-go in under 5 minutes, with easy swaps for what you have on hand.

What You’ll Need

  • 1 heaping cup frozen mango (or 1 large ripe mango, cubed)
  • 1 small banana (fresh or frozen, for creaminess)
  • 1 cup coconut milk or almond milk (canned light coconut milk for richer texture)
  • 1/2 cup plain yogurt (dairy or coconut; optional but makes it extra creamy)
  • 1 teaspoon ground turmeric (or 1-inch knob fresh, peeled)
  • 1/2 teaspoon ground ginger (or 1-inch knob fresh, peeled)
  • 1/8 teaspoon black pepper (helps with turmeric absorption)
  • 1 tablespoon fresh lemon or lime juice (brightens the flavor)
  • 1–2 teaspoons honey or maple syrup (optional, to taste)
  • Ice as needed to thicken, especially if using fresh fruit
  • Pinch of cinnamon (optional, for warmth)

Instructions

Final presentation/top view: Overhead shot of a Golden Turmeric Mango Smoothie poured into a frosty
  1. Add milk, yogurt, turmeric, ginger, black pepper, and citrus juice to the blender first.

    This helps the spices blend smoothly.

  2. Add mango and banana on top. If using fresh fruit, toss in a handful of ice for a colder, thicker smoothie.
  3. Blend on high until completely smooth, 30–60 seconds. Scrape down the sides if needed.
  4. Taste and adjust.

    Add honey or maple if you want it sweeter, or a splash more milk if it’s too thick.

  5. Pour into a chilled glass and sprinkle a tiny pinch of cinnamon or turmeric on top if you like.

Keeping It Fresh

For the best flavor and texture, drink right after blending. If you need to store it, refrigerate in a sealed jar for up to 24 hours and shake before drinking. For make-ahead, portion the fruit and spices in freezer bags, then add liquid and blend when you’re ready.

Health Benefits

  • Turmeric: Contains curcumin, which supports a healthy inflammatory response.

    Black pepper helps your body absorb it better.

  • Ginger: Known for easing digestion and adding a soothing, warming note.
  • Mango: Rich in vitamin C, vitamin A, and antioxidants for immune support and skin health.
  • Yogurt and milk: Provide protein and healthy fats for steady energy and a satisfying texture.

What Not to Do

  • Don’t skip the black pepper if you’re using turmeric—it makes a big difference in absorption.
  • Don’t overdo the turmeric: More than 1 teaspoon (ground) can taste bitter and overpower the smoothie.
  • Don’t add boiling liquids: Heat can dull the fresh flavor and change the texture.
  • Don’t blend too long once it’s smooth—over-blending can warm the smoothie and thin it out.

Recipe Variations

  • Protein boost: Add a scoop of vanilla or unflavored protein powder, or 2 tablespoons hemp hearts.
  • Green glow: Blend in a handful of spinach. It won’t change the flavor much, just the color.
  • Tropical twist: Swap half the mango for pineapple for extra tang.
  • Dairy-free and extra silky: Use coconut milk and coconut yogurt only.
  • Gut-friendly: Add 1 tablespoon chia seeds or ground flax for fiber and omega-3s.
  • Spice latte vibe: Add a pinch of cardamom and extra cinnamon for warmth.

FAQ

Can I use fresh turmeric and ginger instead of ground?

Yes. Use about 1-inch of each, peeled and sliced.

Fresh roots give a brighter, slightly peppery flavor. Start small and adjust to taste.

How do I make it sweeter without sugar?

Use a very ripe banana or add a soft Medjool date. Frozen mango that’s fully ripe also tastes sweeter and gives better texture.

Is this good for post-workout?

Absolutely.

It offers carbs from fruit and protein if you include yogurt or protein powder, plus anti-inflammatory spices that may help with recovery.

Can I skip the banana?

Yes. Replace with 1/2 cup extra mango and 1/4 avocado for creaminess, or add more yogurt and a few ice cubes.

Will the turmeric stain my blender?

It can. Rinse right after blending, then wash with warm soapy water.

A little baking soda paste helps lift any stains.

What if it’s too thick?

Add more milk a splash at a time and blend briefly. If it’s too thin, add a few ice cubes or more frozen mango.

In Conclusion

This Golden Turmeric Mango Smoothie is creamy, bright, and quietly powerful. It’s the kind of drink that lifts your mood and supports your body at the same time.

Keep the ingredients simple, tweak the sweetness to your taste, and enjoy a golden glass of comfort any time of day.

Golden Turmeric Mango Smoothie (Anti-Inflammatory & Creamy) - Bright, Comforting, and Easy

Prep Time 5 minutes
Total Time 5 minutes
Servings 2 servings

Ingredients
  

  • 1 heaping cup frozen mango (or 1 large ripe mango, cubed)
  • 1 small banana (fresh or frozen, for creaminess)
  • 1 cup coconut milk or almond milk (canned light coconut milk for richer texture)
  • 1/2 cup plain yogurt (dairy or coconut; optional but makes it extra creamy)
  • 1 teaspoon ground turmeric (or 1-inch knob fresh, peeled)
  • 1/2 teaspoon ground ginger (or 1-inch knob fresh, peeled)
  • 1/8 teaspoon black pepper (helps with turmeric absorption)
  • 1 tablespoon fresh lemon or lime juice (brightens the flavor)
  • 1–2 teaspoons honey or maple syrup (optional, to taste)
  • Ice as needed to thicken, especially if using fresh fruit
  • Pinch of cinnamon (optional, for warmth)

Instructions
 

  • Add milk, yogurt, turmeric, ginger, black pepper, and citrus juice to the blender first.This helps the spices blend smoothly.
  • Add mango and banana on top. If using fresh fruit, toss in a handful of ice for a colder, thicker smoothie.
  • Blend on high until completely smooth, 30–60 seconds. Scrape down the sides if needed.
  • Taste and adjust.Add honey or maple if you want it sweeter, or a splash more milk if it’s too thick.
  • Pour into a chilled glass and sprinkle a tiny pinch of cinnamon or turmeric on top if you like.

Strawberry Oat Protein Smoothie (Filling Breakfast in a Glass)

If mornings feel rushed, this smoothie has your back. It’s thick, creamy, and actually keeps you full thanks to oats and protein. You get bright strawberry flavor, a touch of vanilla, and a silky texture that tastes like a treat.

It blends up in minutes and uses ingredients you probably already have. Whether you’re heading out the door or need a quick desk breakfast, this one makes mornings easier.

Why This Recipe Works

Cooking process — Close-up of a blender jar mid-blend with the Strawberry Oat Protein Smoothie tur
  • Balanced macros: Protein powder and Greek yogurt provide staying power, while oats add slow-digesting carbs and fiber.
  • Great texture: Oats make it thick and milkshake-like without ice cream or thickeners.
  • Naturally sweet: Ripe strawberries and banana add sweetness, so you don’t need much (or any) extra sugar.
  • Customizable: Works with dairy or non-dairy milk, and any protein powder you like.
  • Freezer-friendly: Frozen fruit keeps it cold and creamy without watering it down.

Shopping List

  • Frozen strawberries (1 cup)
  • Ripe banana, sliced and frozen if possible (1 small)
  • Rolled oats (1/4 cup)
  • Vanilla or unflavored protein powder (1 scoop; whey or plant-based)
  • Greek yogurt (1/2 cup; plain or vanilla)
  • Milk of choice (3/4 to 1 cup; dairy, almond, oat, or soy)
  • Chia seeds or ground flaxseed (1 teaspoon, optional for extra fiber)
  • Honey or maple syrup (1–2 teaspoons, optional)
  • Vanilla extract (1/4 teaspoon, optional)
  • Ice (a few cubes if you want it extra thick and frosty)

How to Make It

Final dish — Overhead shot of the finished Strawberry Oat Protein Smoothie poured into a tall clea
  1. Soften the oats: Add milk and oats to the blender first. Let them sit for 2–3 minutes while you gather the rest.

    This helps the oats blend ultra-smooth.

  2. Load the blender: Add frozen strawberries, banana, Greek yogurt, protein powder, and optional chia/flax. Drizzle in honey and vanilla if using.
  3. Blend until creamy: Start low, then increase to high for 30–60 seconds until smooth. If it’s too thick, add a splash more milk.

    For thicker, add a few ice cubes and blend again.

  4. Taste and adjust: Add a bit more sweetener if needed, or a pinch of salt to sharpen flavors.
  5. Serve immediately: Pour into a large glass or to-go cup. Top with a few sliced strawberries or a sprinkle of oats if you like.

Storage Instructions

  • Short-term: Store in a sealed jar in the fridge for up to 24 hours. Shake well before drinking.
  • Freeze as packs: Portion strawberries, banana, oats, and seeds into freezer bags.

    In the morning, just add milk, yogurt, and protein, then blend.

  • Prevent separation: If storing, blend in 1/4 teaspoon xanthan gum or 1 tablespoon instant oats to help keep it emulsified.

Why This is Good for You

  • Protein for satiety: Protein powder plus Greek yogurt helps keep you full and supports muscle repair.
  • Fiber for digestion: Oats, strawberries, and chia/flax deliver fiber for steady energy and gut health.
  • Micronutrient boost: Strawberries bring vitamin C and antioxidants; dairy or fortified plant milks add calcium.
  • Balanced energy: Carbs from fruit and oats pair with protein and healthy fats for a steady morning lift.

What Not to Do

  • Don’t skip the liquid: Too little milk can overwork your blender and make the smoothie pasty.
  • Don’t overload with sweeteners: Taste first. Fruit usually provides enough sweetness.
  • Don’t use steel-cut oats: They won’t blend smoothly. Stick to rolled or quick oats.
  • Don’t over-blend with ice: It can make the texture watery.

    Add ice last and pulse briefly.

Recipe Variations

  • Peanut Butter & Jelly Vibe: Add 1 tablespoon peanut butter and a pinch of salt.
  • Green Boost: Throw in a handful of baby spinach. You won’t taste it, but you’ll get extra nutrients.
  • Dairy-Free: Use almond or soy milk and a plant-based yogurt. Choose a vegan protein powder.
  • Extra Fiber: Add 2 tablespoons oat bran or 1 tablespoon psyllium husk; increase milk slightly.
  • Chocolate-Covered Strawberry: Use chocolate protein powder or add 1 tablespoon unsweetened cocoa.
  • Low-Sugar: Skip banana and add 1/2 avocado for creaminess, plus a few more strawberries.

FAQ

Can I use fresh strawberries instead of frozen?

Yes.

Add a handful of ice to chill and thicken the smoothie, or freeze the banana to keep it creamy.

What kind of protein powder works best?

Whey blends smoothly and tastes creamy. For dairy-free, try pea or a pea-rice blend. Choose vanilla or unflavored to keep the strawberry flavor center stage.

Do I need to cook the oats first?

No.

Rolled or quick oats blend fine uncooked. Letting them sit in the milk for a couple of minutes helps them soften.

How can I make it higher in protein?

Add an extra half scoop of protein powder, swap in high-protein Greek yogurt, or use soy milk for more protein than almond milk.

Can I make this the night before?

Yes. Blend, refrigerate in a sealed jar, and shake well before drinking.

The texture may thicken; add a splash of milk if needed.

What if I don’t have Greek yogurt?

Use regular yogurt and reduce the milk slightly, or add 1–2 tablespoons cottage cheese for extra creaminess and protein.

In Conclusion

This Strawberry Oat Protein Smoothie is a fast, feel-good breakfast that actually fills you up. It’s creamy, naturally sweet, and easy to customize to your taste and diet. Keep the ingredients on hand and you’ve got a reliable morning go-to that’s as nourishing as it is tasty.

Strawberry Oat Protein Smoothie (Filling Breakfast in a Glass) - Simple, Creamy, and Satisfying

Prep Time 5 minutes
Total Time 5 minutes
Servings 2 servings

Ingredients
  

  • Frozen strawberries (1 cup)
  • Ripe banana, sliced and frozen if possible (1 small)
  • Rolled oats (1/4 cup)
  • Vanilla or unflavored protein powder (1 scoop; whey or plant-based)
  • Greek yogurt (1/2 cup; plain or vanilla)
  • Milk of choice (3/4 to 1 cup; dairy, almond, oat, or soy)
  • Chia seeds or ground flaxseed (1 teaspoon, optional for extra fiber)
  • Honey or maple syrup (1–2 teaspoons, optional)
  • Vanilla extract (1/4 teaspoon, optional)
  • Ice (a few cubes if you want it extra thick and frosty)

Instructions
 

  • Soften the oats: Add milk and oats to the blender first. Let them sit for 2–3 minutes while you gather the rest.This helps the oats blend ultra-smooth.
  • Load the blender: Add frozen strawberries, banana, Greek yogurt, protein powder, and optional chia/flax. Drizzle in honey and vanilla if using.
  • Blend until creamy: Start low, then increase to high for 30–60 seconds until smooth. If it’s too thick, add a splash more milk.For thicker, add a few ice cubes and blend again.
  • Taste and adjust: Add a bit more sweetener if needed, or a pinch of salt to sharpen flavors.
  • Serve immediately: Pour into a large glass or to-go cup. Top with a few sliced strawberries or a sprinkle of oats if you like.

Mango Matcha Protein Smoothie (Energizing & Antioxidant-Rich)

If your morning needs a lift without the jitters, this smoothie hits the sweet spot. It blends creamy mango with earthy matcha and a boost of protein, so you get steady energy and a refreshing, tropical flavor. It’s quick to make, easy to customize, and surprisingly satisfying.

Keep it as a pre-workout drink, a light breakfast, or a midday pick-me-up that won’t weigh you down.

Why This Recipe Works

Cooking process shot: A high-speed blender mid-whirl blending a vibrant Mango Matcha Protein Smoothi
  • Balanced energy: Matcha provides a gentle caffeine lift paired with L-theanine for focus, while protein and fiber help keep blood sugar steady.
  • Great flavor combo: Mango’s natural sweetness rounds out the grassy notes of matcha, making it smooth and bright without tasting bitter.
  • Creamy without heavy cream: Frozen mango and banana add body, so you get a silky texture with simple ingredients.
  • Nutritious and satisfying: You’ll get antioxidants from matcha, vitamin C from mango, and protein for fullness—all in one glass.

What You’ll Need

  • 1 cup frozen mango chunks (fresh works too; add a few ice cubes for thickness)
  • 1/2 frozen banana (for creaminess; optional if you prefer less sweetness)
  • 1 scoop vanilla protein powder (whey, pea, or your favorite)
  • 1 teaspoon matcha powder (ceremonial or culinary grade)
  • 1 cup milk of choice (almond, oat, dairy, or soy)
  • 1–2 teaspoons honey or maple syrup (optional, adjust to taste)
  • 1 tablespoon chia seeds or ground flax (optional for fiber and omega-3s)
  • A pinch of salt (optional, enhances flavor)
  • Ice cubes (optional, for a thicker, frosty texture)

How to Make It

Final dish top view: Overhead shot of the finished Mango Matcha Protein Smoothie poured into a chill
  1. Prep your blender: Add milk first to help the blades catch, then frozen mango, banana, protein powder, matcha, and any add-ins.
  2. Sweeten as needed: Add honey or maple syrup if your mango isn’t very sweet. Start with a small amount and adjust.
  3. Blend until smooth: Blend on high for 30–45 seconds, scraping down the sides if needed. Add ice for extra thickness.
  4. Taste and tweak: If it’s too thick, add a splash more milk.

    If it’s too grassy, add a touch more mango or sweetener.

  5. Serve right away: Pour into a chilled glass and enjoy while it’s cold and creamy.

How to Store

  • Short term: Keep in the fridge for up to 24 hours in a sealed jar. Shake before drinking as it may separate.
  • Meal prep: Portion the dry ingredients (protein, matcha, seeds) in small containers and freeze fruit in bags. Blend fresh when ready.
  • Freezing: You can freeze the blended smoothie in a silicone tray and thaw portions overnight in the fridge for a quick grab-and-go option.

Benefits of This Recipe

  • Steady energy: Matcha’s caffeine paired with L-theanine supports calm focus without the crash.
  • Antioxidant-packed: Matcha and mango deliver catechins and vitamin C to support overall wellness.
  • Protein-forward: A full scoop of protein helps with satiety and muscle recovery, especially post-workout.
  • Gut-friendly options: Add chia or flax for fiber, which can support digestion and fullness.

What Not to Do

  • Don’t overdo the matcha: More than 1–1.5 teaspoons can turn the smoothie bitter.
  • Don’t skip liquid: Too little milk can strain your blender and lead to a chunky texture.
  • Don’t use unripe mango: It won’t be sweet enough and can taste tart.

    If using fresh, choose ripe, soft fruit.

  • Don’t add hot water to matcha here: This smoothie doesn’t need it; blending hydrates the matcha just fine.

Recipe Variations

  • Coconut twist: Use coconut milk and add shredded coconut for a tropical vibe.
  • Green boost: Add a handful of spinach. It won’t affect taste but bumps up nutrients.
  • Creamy yogurt: Add 1/4–1/2 cup Greek yogurt for extra protein and tang.
  • Citrus pop: Add a squeeze of lime or orange juice for brightness.
  • Ginger zing: Blend in 1/2 teaspoon fresh grated ginger for warmth and digestion support.
  • Low-sugar option: Skip banana and sweetener; use extra mango and unsweetened milk.
  • Coffee-matcha hybrid: Swap 1/4–1/3 cup of the milk for chilled coffee for a stronger kick.

FAQ

Can I make this without protein powder?

Yes. Use 1/2 cup Greek yogurt or silken tofu for protein and creaminess.

You can also add 2 tablespoons hemp seeds.

What kind of matcha should I use?

Ceremonial grade has a smoother, less bitter flavor, but good culinary grade works well in smoothies. Choose a bright green powder and store it airtight, away from heat and light.

Is this smoothie good before a workout?

Absolutely. It offers quick carbs from fruit, steady energy from matcha, and optional protein for recovery.

If you have a sensitive stomach, keep the serving smaller and skip the chia.

Can I make it dairy-free?

Yes. Use almond, oat, or soy milk, and pick a plant-based protein powder. Check labels to ensure it blends smoothly and isn’t overly gritty.

How do I avoid a gritty texture?

Blend longer, add liquid first, and choose a fine, high-quality matcha and a smooth protein powder.

If needed, add an extra splash of milk.

Final Thoughts

This Mango Matcha Protein Smoothie is a simple way to get energy, antioxidants, and satisfying protein in one glass. It’s quick, bright, and easy to tailor to your routine. Keep a bag of frozen mango on hand, and you’ll always be minutes away from a creamy, feel-good sip.

Mango Matcha Protein Smoothie (Energizing & Antioxidant-Rich) - Simple, Bright, and Filling

Prep Time 5 minutes
Total Time 5 minutes
Servings 2 servings

Ingredients
  

  • 1 cup frozen mango chunks (fresh works too; add a few ice cubes for thickness)
  • 1/2 frozen banana (for creaminess; optional if you prefer less sweetness)
  • 1 scoop vanilla protein powder (whey, pea, or your favorite)
  • 1 teaspoon matcha powder (ceremonial or culinary grade)
  • 1 cup milk of choice (almond, oat, dairy, or soy)
  • 1–2 teaspoons honey or maple syrup (optional, adjust to taste)
  • 1 tablespoon chia seeds or ground flax (optional for fiber and omega-3s)
  • A pinch of salt (optional, enhances flavor)
  • Ice cubes (optional, for a thicker, frosty texture)

Instructions
 

  • Prep your blender: Add milk first to help the blades catch, then frozen mango, banana, protein powder, matcha, and any add-ins.
  • Sweeten as needed: Add honey or maple syrup if your mango isn’t very sweet. Start with a small amount and adjust.
  • Blend until smooth: Blend on high for 30–45 seconds, scraping down the sides if needed. Add ice for extra thickness.
  • Taste and tweak: If it’s too thick, add a splash more milk.If it’s too grassy, add a touch more mango or sweetener.
  • Serve right away: Pour into a chilled glass and enjoy while it’s cold and creamy.