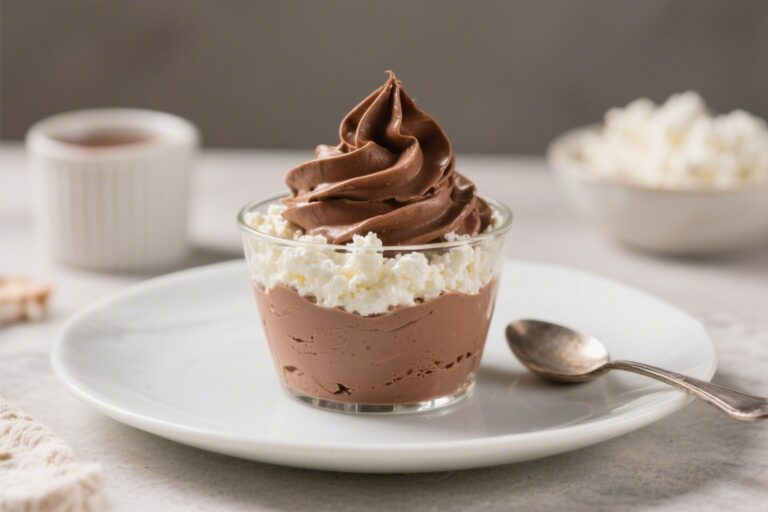
High-Protein Chocolate Covered Strawberries With Greek Yogurt Filling

Chocolate covered strawberries feel fancy, but they don’t have to be heavy on sugar or light on nutrients. This version sneaks in a creamy Greek yogurt center for extra protein and tang. The result is a cool, crisp shell, juicy berry bite, and a soft, cheesecake-like filling.

It’s a quick dessert you can make on a weeknight or prep ahead for guests. No baking, minimal dishes, and just the right amount of sweetness.

What Makes This Special

Close-up process shot: Chocolate-dipped, Greek-yogurt–filled strawberries resting on a parchment-l

These aren’t your average chocolate strawberries. The Greek yogurt filling adds protein and a soft, creamy contrast to the snap of the chocolate.

A touch of vanilla and honey rounds out the flavor without overloading on sugar. You can customize the coating—dark chocolate for antioxidant punch, or milk chocolate for a gentler taste. They’re simple, elegant, and surprisingly satisfying.

Shopping List

  • 1 pound fresh strawberries (medium to large, with stems if possible)
  • 1 cup plain Greek yogurt (2% or 5% for a creamier filling)
  • 1–2 tablespoons honey or maple syrup (adjust to taste)
  • 1/2 teaspoon vanilla extract
  • Pinch of salt
  • 8 ounces dark chocolate (60–70% cacao), chopped or chips
  • 1 teaspoon coconut oil (optional, for a smoother shell)
  • Optional toppings: crushed nuts, cocoa nibs, shredded coconut, flaky sea salt
  • Equipment: piping bag or zip-top bag, small paring knife, baking sheet, parchment paper

Instructions

Tasty top-view final presentation: Overhead shot of a platter of finished high-protein chocolate-cov
  1. Prep the berries: Rinse strawberries, pat dry thoroughly, and let them air-dry for at least 15 minutes.

    Moisture will prevent the chocolate from sticking.

  2. Make the filling: Stir Greek yogurt, honey, vanilla, and a pinch of salt until smooth. Taste and adjust sweetness. Chill for 10 minutes to thicken.
  3. Core the strawberries: Using a paring knife, gently remove a small plug from the top of each berry to create a cavity without cutting through the sides.
  4. Fill them: Transfer the yogurt mixture to a piping bag (or zip-top bag with a small corner snipped).

    Pipe yogurt into each strawberry just to the top—don’t overfill.

  5. Pre-chill: Place filled strawberries on a parchment-lined tray and freeze for 10–15 minutes. This helps the chocolate set quickly.
  6. Melt the chocolate: Microwave chopped chocolate with coconut oil in 20–30 second bursts, stirring between each, until smooth. Alternatively, use a double boiler.
  7. Dip and coat: Hold each strawberry by the stem and dip into the chocolate, letting excess drip off.

    Set back on the parchment. Add toppings while the chocolate is still wet.

  8. Set the shell: Chill in the fridge for 15–20 minutes until firm. If you prefer a thicker shell, dip a second time once the first layer sets.
  9. Serve: Enjoy chilled or slightly cool.

    The yogurt center should be creamy, not frozen solid.

Keeping It Fresh

Store the strawberries in a single layer in an airtight container lined with paper towels. Keep them in the fridge for up to 24–36 hours. For best texture, eat the same day.

Avoid stacking—layers can smudge the chocolate and make the berries weep. If freezing, plan to enjoy them straight from the freezer like mini ice cream bites.

Health Benefits

  • Protein boost: Greek yogurt adds a satisfying hit of protein, helping you feel fuller, longer.
  • Antioxidants: Dark chocolate and strawberries are packed with polyphenols and vitamin C.
  • Balanced sweetness: Honey or maple syrup lets you control sugar without losing flavor.
  • Healthy fats: A small amount of dark chocolate and optional nuts adds heart-friendly fats.

What Not to Do

  • Don’t skip drying the berries. Any moisture will cause the chocolate to seize or slide off.
  • Don’t overfill the cavity. Excess yogurt will spill during dipping and make a mess.
  • Don’t dip warm strawberries. Pre-chilling helps the chocolate set quickly and evenly.
  • Don’t use thin yogurt. Avoid runny yogurt; stick to thick Greek yogurt for structure.
  • Don’t rush the set time. Let the shell firm up fully for a clean bite and better presentation.

Alternatives

  • Dairy-free: Use a thick coconut yogurt and dairy-free chocolate.
  • Flavor swaps: Add lemon zest or almond extract to the yogurt for a cheesecake vibe.
  • Protein upgrade: Stir 1–2 teaspoons vanilla or chocolate protein powder into the yogurt; add a splash of milk if too thick.
  • Texture toppings: Try chopped pistachios, toasted almonds, or cocoa nibs for crunch.
  • Chocolate options: Use milk or white chocolate if you prefer sweeter; balance with a less sweet filling.

FAQ

Can I make these ahead of time?

Yes. They’re best within 24 hours.

Prep in the morning for evening, and keep them chilled in a single layer.

Why is my chocolate clumping or dull?

Water likely touched the chocolate, or it overheated. Melt slowly, dry everything well, and stir often. A teaspoon of coconut oil helps with shine.

How do I prevent the yogurt from leaking?

Keep the filling thick, don’t overfill, and pre-chill the strawberries before dipping.

A double-dip also adds insurance.

Can I use frozen strawberries?

Not ideal. They release water as they thaw, which ruins the chocolate coating. Fresh strawberries work best.

What’s a good serving size?

Two to three strawberries make a satisfying snack or dessert, especially if you’ve added protein to the yogurt.

Do I need a piping bag?

No.

A zip-top bag with a tiny corner cut off works just as well for neat filling.

Wrapping Up

High-Protein Chocolate Covered Strawberries with Greek Yogurt Filling are a simple way to elevate a classic treat. They look impressive, taste rich, and sneak in extra protein without effort. Keep a batch chilling for an after-dinner dessert or a midday pick-me-up.

Simple ingredients, quick steps, and a sweet payoff you can feel good about.

High-Protein Chocolate Covered Strawberries With Greek Yogurt Filling - A Simple, Better-For-You Treat

Prep Time 15 minutes
Total Time 15 minutes
Servings 12 servings

Ingredients
  

  • 1 pound fresh strawberries (medium to large, with stems if possible)
  • 1 cup plain Greek yogurt (2% or 5% for a creamier filling)
  • 1–2 tablespoons honey or maple syrup (adjust to taste)
  • 1/2 teaspoon vanilla extract
  • Pinch of salt
  • 8 ounces dark chocolate (60–70% cacao), chopped or chips
  • 1 teaspoon coconut oil (optional, for a smoother shell)
  • Optional toppings: crushed nuts, cocoa nibs, shredded coconut, flaky sea salt
  • Equipment: piping bag or zip-top bag, small paring knife, baking sheet, parchment paper

Instructions
 

  • Prep the berries: Rinse strawberries, pat dry thoroughly, and let them air-dry for at least 15 minutes.Moisture will prevent the chocolate from sticking.
  • Make the filling: Stir Greek yogurt, honey, vanilla, and a pinch of salt until smooth. Taste and adjust sweetness. Chill for 10 minutes to thicken.
  • Core the strawberries: Using a paring knife, gently remove a small plug from the top of each berry to create a cavity without cutting through the sides.
  • Fill them: Transfer the yogurt mixture to a piping bag (or zip-top bag with a small corner snipped).Pipe yogurt into each strawberry just to the top—don’t overfill.
  • Pre-chill: Place filled strawberries on a parchment-lined tray and freeze for 10–15 minutes. This helps the chocolate set quickly.
  • Melt the chocolate: Microwave chopped chocolate with coconut oil in 20–30 second bursts, stirring between each, until smooth. Alternatively, use a double boiler.
  • Dip and coat: Hold each strawberry by the stem and dip into the chocolate, letting excess drip off.Set back on the parchment. Add toppings while the chocolate is still wet.
  • Set the shell: Chill in the fridge for 15–20 minutes until firm. If you prefer a thicker shell, dip a second time once the first layer sets.
  • Serve: Enjoy chilled or slightly cool.The yogurt center should be creamy, not frozen solid.

High-Protein Lemon Herb Chicken Easter Lunch (Light & Spring Fresh)

Spring calls for food that feels bright, clean, and satisfying without weighing you down. This lemon herb chicken checks every box: juicy, zesty, and loaded with lean protein. It’s the kind of dish that looks special on an Easter table but is simple enough for a weeknight.

Pair it with a crisp salad, roasted asparagus, or baby potatoes, and you’ve got a complete meal. If you’re hosting, this is an easy win that keeps things fresh and stress-free.

Why This Recipe Works

Close-up detail of sliced lemon-herb chicken cutlet just off the grill, juicy interior glistening wi
  • Lean protein, big flavor: Chicken breast stays juicy thanks to a quick marinade with lemon, garlic, and olive oil.
  • Balanced acidity: Fresh lemon and herbs brighten the dish without heavy sauces or cream.
  • Fast and flexible: Grill, roast, or pan-sear—whatever fits your kitchen setup.
  • Meal-prep friendly: Leftovers are great in salads, wraps, or grain bowls.

Ingredients

  • 4 boneless, skinless chicken breasts (about 1.5–2 lbs total)
  • 2 lemons (zest of 1, juice of both)
  • 3 tablespoons extra-virgin olive oil
  • 3 cloves garlic, finely minced
  • 1 tablespoon fresh thyme leaves (or 1 teaspoon dried)
  • 2 tablespoons fresh parsley, chopped
  • 1 tablespoon fresh rosemary, finely chopped (or 1 teaspoon dried)
  • 1 teaspoon honey or maple syrup (optional, for balance)
  • 1 teaspoon Dijon mustard
  • 1 teaspoon kosher salt, plus more to taste
  • 1/2 teaspoon black pepper
  • 1/2 teaspoon red pepper flakes (optional, for a gentle kick)
  • Lemon slices, for garnish
  • Extra herbs, for serving

Instructions

Overhead final presentation: beautifully plated High-Protein Lemon Herb Chicken on a white ceramic p
  1. Prep the chicken: If the breasts are thick, slice them horizontally to make cutlets or pound to an even 1/2–3/4 inch thickness. This helps them cook evenly and stay tender.
  2. Make the marinade: In a bowl, whisk lemon zest, lemon juice, olive oil, garlic, thyme, parsley, rosemary, honey, Dijon, salt, pepper, and red pepper flakes.
  3. Marinate: Add chicken to a zip-top bag or dish.

    Pour in the marinade, coat well, and refrigerate for 30 minutes to 2 hours. Don’t exceed 4 hours or the acid can toughen the meat.

  4. Choose your cooking method:
    • Grill: Preheat to medium-high. Grill 4–5 minutes per side, until internal temp reaches 165°F.
    • Oven: Preheat to 425°F. Place on a lined sheet pan and roast 14–18 minutes, depending on thickness.
    • Skillet: Heat a little oil over medium-high.

      Sear 4–6 minutes per side until cooked through.

  5. Rest: Transfer to a plate and rest 5 minutes to lock in juices.
  6. Finish and serve: Top with a squeeze of fresh lemon, a drizzle of olive oil, extra herbs, and lemon slices. Serve with spring sides like asparagus, peas, or a simple arugula salad.

Keeping It Fresh

  • Prep ahead: Mix the marinade a day early. Add chicken the morning of and cook just before serving.
  • Serve room-temp: This dish holds well and tastes great slightly warm or at room temperature—ideal for a holiday spread.
  • Bright sides: Keep the vibe light with roasted carrots, steamed green beans, quinoa tabbouleh, or citrus-dressed greens.
  • Leftover magic: Slice and toss into farro bowls, pasta salad, or lettuce wraps with a yogurt-lemon sauce.

Why This is Good for You

  • High protein: Chicken breast delivers lean protein to support muscle and keep you full.
  • Heart-healthy fats: Olive oil adds satisfying monounsaturated fats.
  • Low in sugar and heavy carbs: Great for a balanced holiday meal without the crash.
  • Herbs and citrus: Fresh herbs bring antioxidants; lemon adds brightness with minimal calories.

Common Mistakes to Avoid

  • Over-marinating: Too much acid for too long can turn the texture mushy or tough.

    Stick to 30 minutes to 2 hours.

  • Skipping the rest: Cutting right away releases juices. Rest 5 minutes.
  • Uneven thickness: Pound or slice into cutlets so everything cooks evenly.
  • Overcooking: Use a thermometer and pull at 165°F. Carryover heat is real.
  • Too much salt early: Taste after cooking and finish with flaky salt if needed.

Recipe Variations

  • Greek-style: Add oregano, a little red wine vinegar, and serve with tzatziki and cucumbers.
  • Herb yogurt marinade: Swap half the olive oil for Greek yogurt for extra tenderness and tang.
  • Sheet-pan meal: Roast with baby potatoes, asparagus, and lemon wheels for a one-pan Easter lunch.
  • Citrus twist: Use a mix of lemon and orange juice for a softer, floral brightness.
  • Bone-in thighs: Juicier and forgiving; roast at 425°F for 30–40 minutes, depending on size.

FAQ

Can I make this ahead for a crowd?

Yes.

Cook up to 1 day ahead, chill, and bring to room temperature before serving. Refresh with a squeeze of lemon and a drizzle of olive oil.

What if I don’t have fresh herbs?

Use dried: 1 teaspoon each of thyme and rosemary, and 1/2 teaspoon dried parsley. Dried herbs are stronger, so use less than fresh.

How do I keep the chicken juicy?

Pound to even thickness, don’t over-marinate, cook to 165°F, and rest before slicing.

A light drizzle of olive oil at the end also helps.

Can I cook this in an air fryer?

Yes. Air fry at 380°F for 10–14 minutes, flipping halfway, until internal temperature hits 165°F.

Is there a dairy-free option for serving sauces?

Try a quick dairy-free sauce: olive oil, lemon juice, Dijon, capers, and chopped parsley whisked together.

Wrapping Up

This High-Protein Lemon Herb Chicken is bright, simple, and exactly what a spring holiday table needs. It’s easy to scale, quick to cook, and tastes great with light, seasonal sides.

Keep the flavors clean, the cooking precise, and let the lemon and herbs shine. Your Easter lunch just got fresher—and a whole lot easier.

High-Protein Lemon Herb Chicken Easter Lunch (Light & Spring Fresh) - A Bright, Easy Crowd-Pleaser

Prep Time 15 minutes
Cook Time 25 minutes
Total Time 40 minutes
Servings 6 servings

Ingredients
  

  • 4 boneless, skinless chicken breasts (about 1.5–2 lbs total)
  • 2 lemons (zest of 1, juice of both)
  • 3 tablespoons extra-virgin olive oil
  • 3 cloves garlic, finely minced
  • 1 tablespoon fresh thyme leaves (or 1 teaspoon dried)
  • 2 tablespoons fresh parsley, chopped
  • 1 tablespoon fresh rosemary, finely chopped (or 1 teaspoon dried)
  • 1 teaspoon honey or maple syrup (optional, for balance)
  • 1 teaspoon Dijon mustard
  • 1 teaspoon kosher salt, plus more to taste
  • 1/2 teaspoon black pepper
  • 1/2 teaspoon red pepper flakes (optional, for a gentle kick)
  • Lemon slices, for garnish
  • Extra herbs, for serving

Instructions
 

  • Prep the chicken: If the breasts are thick, slice them horizontally to make cutlets or pound to an even 1/2–3/4 inch thickness. This helps them cook evenly and stay tender.
  • Make the marinade: In a bowl, whisk lemon zest, lemon juice, olive oil, garlic, thyme, parsley, rosemary, honey, Dijon, salt, pepper, and red pepper flakes.
  • Marinate: Add chicken to a zip-top bag or dish.Pour in the marinade, coat well, and refrigerate for 30 minutes to 2 hours. Don’t exceed 4 hours or the acid can toughen the meat.
  • Choose your cooking method: Grill: Preheat to medium-high. Grill 4–5 minutes per side, until internal temp reaches 165°F.
  • Oven: Preheat to 425°F. Place on a lined sheet pan and roast 14–18 minutes, depending on thickness.
  • Skillet: Heat a little oil over medium-high.Sear 4–6 minutes per side until cooked through.
  • Rest: Transfer to a plate and rest 5 minutes to lock in juices.
  • Finish and serve: Top with a squeeze of fresh lemon, a drizzle of olive oil, extra herbs, and lemon slices. Serve with spring sides like asparagus, peas, or a simple arugula salad.

Blender Protein Waffles (No Mixing, No Mess)

These blender protein waffles are the kind of breakfast you actually want to make on a weekday. No bowls, no whisking, and no mess to clean up. You toss everything into a blender, pour, and cook.

They come out crisp on the edges, soft inside, and lightly sweet. It’s an easy way to get more protein without sacrificing flavor or texture.

What Makes This Special

Cooking process, close-up detail: Golden protein waffle lifting from a hot waffle iron, steam gently

Most protein waffle recipes need careful mixing to avoid lumps. This one doesn’t.

The blender gives you a smooth batter in seconds and makes pouring into the waffle iron simple.

  • High protein without a chalky taste.
  • Easy cleanup: the blender is your mixing bowl.
  • Meal-prep friendly: the waffles freeze and reheat well.
  • Customizable: use your favorite protein powder and milk.

Ingredients

  • 1 cup rolled oats (or oat flour)
  • 1 scoop vanilla or unflavored whey protein powder (about 25–30 g)
  • 1 large egg
  • 1 cup milk of choice (dairy, almond, or oat)
  • 1 tablespoon melted butter or coconut oil
  • 1 tablespoon maple syrup or honey (optional for sweetness)
  • 1 teaspoon baking powder
  • 1/2 teaspoon vanilla extract
  • Pinch of salt
  • Optional add-ins: 1/2 teaspoon cinnamon, 1 tablespoon chia or ground flax

Instructions

Final dish, overhead: Top-down shot of a stack of blender protein waffles on a matte white plate, ed
  1. Preheat your waffle iron. Lightly grease it if needed.
  2. Blend the batter: Add oats, protein powder, egg, milk, butter or oil, sweetener, baking powder, vanilla, and salt to a blender. Blend on high for 20–30 seconds until smooth.

    Scrape the sides and pulse once more if needed.

  3. Rest the batter for 2–3 minutes to let the oats hydrate and the baking powder activate. The batter should thicken slightly.
  4. Pour and cook: Pour batter into the center of the hot waffle iron, just enough to cover the surface. Close and cook until golden and crisp, usually 3–5 minutes depending on your machine.
  5. Repeat with remaining batter.

    Keep cooked waffles on a wire rack so they stay crisp.

  6. Serve with yogurt, fresh berries, nut butter, or a drizzle of maple syrup.

How to Store

  • Fridge: Cool completely, then store in an airtight container for up to 4 days.
  • Freeze: Freeze in a single layer, then transfer to a freezer bag for up to 2 months. Place parchment between waffles to prevent sticking.
  • Reheat: Toast from chilled or frozen until hot and crisp. Avoid microwaving if you want crunch.

Health Benefits

  • Protein for satiety: The combination of egg and protein powder helps keep you full and supports muscle recovery.
  • Whole grains: Oats add fiber for steady energy and digestive health.
  • Balanced macros: Carbs from oats, protein from powder and egg, and healthy fats from butter or coconut oil create a satisfying meal.
  • Lower sugar option: You control the sweetness, which makes this a smarter breakfast than most waffles.

Common Mistakes to Avoid

  • Overfilling the waffle iron: This causes overflow and soggy edges.

    Use less batter than you think.

  • Skipping the rest time: A quick 2–3 minute rest improves texture and rise.
  • Using too much protein powder: More is not better. Too much can make waffles dry and rubbery.
  • Opening the iron too soon: Wait until steam slows and the waffle releases easily.
  • Cold ingredients: Room-temperature milk and egg help the batter blend and cook evenly.

Variations You Can Try

  • Chocolate: Add 1 tablespoon cocoa powder and a few chocolate chips.
  • Blueberry: Stir in 1/2 cup fresh or frozen blueberries after blending.
  • Cinnamon roll: Add 1 teaspoon cinnamon and a swirl of Greek yogurt mixed with maple syrup on top.
  • Banana: Add 1/2 ripe banana to the blender and reduce the milk slightly.
  • Gluten-free: Use certified gluten-free oats and a gluten-free protein powder.
  • Dairy-free: Use plant milk and coconut oil; choose a plant-based protein powder.

FAQ

Can I use casein or plant-based protein powder?

Yes, but you may need to adjust the liquid. Casein thickens more than whey, so add a splash of milk if the batter is too thick.

Many plant proteins absorb more liquid too, so blend, rest, and adjust as needed.

Do I have to use oats?

No. You can swap the oats for 3/4 cup all-purpose flour or a gluten-free blend. If using flour, blend just to combine and avoid overmixing.

Why are my waffles soft instead of crisp?

They likely need more time or airflow.

Cook until deep golden, then cool on a wire rack. Reheat in a toaster to restore crunch.

Can I make pancakes with this batter?

Absolutely. Pour onto a hot greased skillet and cook over medium heat, flipping when bubbles form and edges set.

How much protein is in each waffle?

It depends on your protein powder and waffle size.

With one 30 g scoop of whey and the ingredients listed, you’ll get roughly 12–18 g protein per standard waffle.

Wrapping Up

These blender protein waffles check every box: quick, clean, and satisfying. Keep the base recipe handy, then customize it with flavors you love. Make a double batch on Sunday, freeze the extras, and enjoy a high-protein breakfast any day of the week.

Blender Protein Waffles (No Mixing, No Mess) - Fast, Fluffy, and Delicious

Prep Time 5 minutes
Cook Time 10 minutes
Total Time 15 minutes
Servings 4 servings

Ingredients
  

  • 1 cup rolled oats (or oat flour)
  • 1 scoop vanilla or unflavored whey protein powder (about 25–30 g)
  • 1 large egg
  • 1 cup milk of choice (dairy, almond, or oat)
  • 1 tablespoon melted butter or coconut oil
  • 1 tablespoon maple syrup or honey (optional for sweetness)
  • 1 teaspoon baking powder
  • 1/2 teaspoon vanilla extract
  • Pinch of salt
  • Optional add-ins: 1/2 teaspoon cinnamon, 1 tablespoon chia or ground flax

Instructions
 

  • Preheat your waffle iron. Lightly grease it if needed.
  • Blend the batter: Add oats, protein powder, egg, milk, butter or oil, sweetener, baking powder, vanilla, and salt to a blender. Blend on high for 20–30 seconds until smooth.Scrape the sides and pulse once more if needed.
  • Rest the batter for 2–3 minutes to let the oats hydrate and the baking powder activate. The batter should thicken slightly.
  • Pour and cook: Pour batter into the center of the hot waffle iron, just enough to cover the surface. Close and cook until golden and crisp, usually 3–5 minutes depending on your machine.
  • Repeat with remaining batter.Keep cooked waffles on a wire rack so they stay crisp.
  • Serve with yogurt, fresh berries, nut butter, or a drizzle of maple syrup.

Low Carb High Protein Chicken Stir Fry (No Rice, Big Flavor)

Skip the takeout and make this quick chicken stir fry at home. It’s loaded with tender chicken, crisp veggies, and a bold, garlicky sauce—without the rice. You’ll get plenty of protein and fiber while keeping carbs in check.

Everything cooks in one pan, and the whole thing comes together in about 20 minutes. It’s weeknight-friendly, meal-prep friendly, and genuinely delicious.

What Makes This Recipe So Good

Cooking process, wok action: Searing chicken strips and crisp-tender veggies in a carbon-steel wok o
  • High protein, low carb: Lean chicken breast plus non-starchy vegetables keep macros balanced.
  • Huge flavor: Ginger, garlic, and a savory sauce make every bite pop.
  • Fast and flexible: Use what you have—fresh or frozen veggies both work.
  • One-pan cleanup: Everything happens in a hot skillet or wok.
  • No rice needed: It’s satisfying on its own, but you can add cauliflower rice if you want more volume.

Shopping List

  • Chicken: 1.25–1.5 lb boneless skinless chicken breasts (or thighs), thinly sliced
  • Vegetables: 1 red bell pepper, 1 small zucchini, 1 cup broccoli florets, 1/2 red onion, 1 cup snap peas or green beans, 1 cup mushrooms (optional)
  • Aromatics: 3 cloves garlic, 1 tablespoon fresh ginger (or 1 teaspoon ground ginger)
  • Oil: Avocado oil or light olive oil, plus a little sesame oil for flavor
  • Sauce: Tamari or low-sodium soy sauce, rice vinegar or apple cider vinegar, fish sauce (optional), chili flakes or sriracha, and a touch of granulated sweetener (monk fruit, allulose, or a small amount of honey if you’re not strict low carb)
  • Thickener (optional): 1/2 teaspoon xanthan gum or 1 teaspoon arrowroot (arrowroot adds a few carbs)
  • Garnishes: Sesame seeds, sliced scallions, lime wedges
  • Optional add-ons: Cauliflower rice or shirataki noodles for extra volume

Step-by-Step Instructions

Final plated, overhead: Low carb high protein chicken stir fry served without rice on a wide white c
  1. Prep the chicken: Pat dry and slice into thin strips. Toss with a pinch of salt, pepper, and 1 teaspoon soy sauce.

    Optional: add 1 teaspoon baking soda, toss, and rest 10 minutes for extra tenderness; rinse and pat dry before cooking.

  2. Make the sauce: In a small bowl, mix 3 tablespoons tamari/soy, 1 tablespoon rice vinegar, 1/2 teaspoon sesame oil, 1/2 teaspoon fish sauce (optional), 1–2 teaspoons sweetener, and chili flakes or sriracha to taste. If using a thickener, sprinkle in xanthan gum and whisk well.
  3. Heat the pan: Set a large skillet or wok over medium-high heat. Add 1 tablespoon oil and swirl until shimmering.
  4. Sear the chicken: Cook in two batches so it browns, 2–3 minutes per side, just until cooked through.

    Remove to a plate.

  5. Stir-fry the veggies: Add another teaspoon of oil if needed. Stir-fry broccoli and snap peas first for 2 minutes. Add peppers, zucchini, mushrooms, and onion; cook 3–4 minutes until crisp-tender.
  6. Add aromatics: Push veggies to the sides.

    Add a small drizzle of oil, then the garlic and ginger. Stir 30 seconds until fragrant.

  7. Combine and sauce: Return chicken and juices to the pan. Pour in the sauce and toss for 60–90 seconds until glossy and everything is coated.

    Adjust salt, heat, or sweetness to taste.

  8. Finish and serve: Turn off heat. Sprinkle sesame seeds and scallions. Squeeze lime over the top.

    Serve as-is, or spoon over warm cauliflower rice.

How to Store

  • Fridge: Store in an airtight container for up to 4 days.
  • Reheat: Warm in a skillet over medium heat with a splash of water or soy sauce, 2–3 minutes. Microwave 60–90 seconds, stirring halfway.
  • Freezer: Freezes well for up to 2 months. Thaw in the fridge overnight before reheating.

Benefits of This Recipe

  • Protein forward: Helps with satiety and supports muscle maintenance.
  • Low carb without feeling deprived: Big flavor and texture variety keep it satisfying.
  • Micronutrient-rich: Colorful veggies bring fiber, vitamins, and antioxidants.
  • Meal-prep friendly: Scales easily and reheats well.
  • Customizable: Works with many diets, including gluten-free if you use tamari.

Pitfalls to Watch Out For

  • Overcrowding the pan: Leads to steaming instead of searing.

    Cook chicken in batches.

  • Soggy veggies: High heat and short cook time keep them crisp.
  • Over-thickening: Xanthan gum works fast—use a tiny amount or skip it for a lighter sauce.
  • Too salty: Use low-sodium soy and season gradually. Remember fish sauce adds saltiness.
  • Dry chicken: Thin slices cook quickly—pull them as soon as they’re done.

Recipe Variations

  • Spicy Garlic: Add extra chili flakes and an extra clove of garlic.
  • Lemon Pepper: Finish with lemon zest, lemon juice, and cracked black pepper.
  • Thai-Inspired: Swap lime for lemon, add fish sauce and a few basil leaves at the end.
  • Peanut-Free “Peanut” Sauce: Stir 1–2 tablespoons almond or sunflower seed butter into the sauce for creaminess.
  • Extra Veg: Add cabbage, asparagus, or baby spinach in the last minute.
  • Different Protein: Swap chicken for shrimp, turkey, firm tofu, or lean beef.

FAQ

Can I use frozen vegetables?

Yes. Use a very hot pan and cook them straight from frozen.

Stir-fry until the moisture evaporates and they start to brown before adding sauce.

Is there a substitute for soy sauce?

Coconut aminos works well and is naturally sweeter and less salty. You may want to reduce or skip additional sweetener.

What can I serve this with that’s still low carb?

Cauliflower rice, shirataki noodles, or a simple cabbage “rice” sautéed with garlic are all great options.

How do I keep the chicken tender?

Slice thinly, cook over high heat, and avoid overcooking. The quick baking-soda velvet trick also helps keep it juicy.

Can I make it ahead?

Absolutely.

Store the cooked stir fry and sauce separately if you can, then combine when reheating for the best texture.

In Conclusion

This Low Carb High Protein Chicken Stir Fry brings big, takeout-style flavor with clean, simple ingredients. It’s fast, flexible, and satisfying enough to stand on its own—no rice required. Keep it in your weeknight rotation, and tweak the sauce or veggies to match your mood and what’s in your fridge.

Low Carb High Protein Chicken Stir Fry (No Rice, Big Flavor) - Fast, Fresh, and Satisfying

Prep Time 10 minutes
Cook Time 15 minutes
Total Time 25 minutes
Servings 4 servings

Ingredients
  

  • Chicken: 1.25–1.5 lb boneless skinless chicken breasts (or thighs), thinly sliced
  • Vegetables: 1 red bell pepper, 1 small zucchini, 1 cup broccoli florets, 1/2 red onion, 1 cup snap peas or green beans, 1 cup mushrooms (optional)
  • Aromatics: 3 cloves garlic, 1 tablespoon fresh ginger (or 1 teaspoon ground ginger)
  • Oil: Avocado oil or light olive oil, plus a little sesame oil for flavor
  • Sauce: Tamari or low-sodium soy sauce, rice vinegar or apple cider vinegar, fish sauce (optional), chili flakes or sriracha, and a touch of granulated sweetener (monk fruit, allulose, or a small amount of honey if you’re not strict low carb)
  • Thickener (optional): 1/2 teaspoon xanthan gum or 1 teaspoon arrowroot (arrowroot adds a few carbs)
  • Garnishes: Sesame seeds, sliced scallions, lime wedges
  • Optional add-ons: Cauliflower rice or shirataki noodles for extra volume

Instructions
 

  • Prep the chicken: Pat dry and slice into thin strips. Toss with a pinch of salt, pepper, and 1 teaspoon soy sauce.Optional: add 1 teaspoon baking soda, toss, and rest 10 minutes for extra tenderness; rinse and pat dry before cooking.
  • Make the sauce: In a small bowl, mix 3 tablespoons tamari/soy, 1 tablespoon rice vinegar, 1/2 teaspoon sesame oil, 1/2 teaspoon fish sauce (optional), 1–2 teaspoons sweetener, and chili flakes or sriracha to taste. If using a thickener, sprinkle in xanthan gum and whisk well.
  • Heat the pan: Set a large skillet or wok over medium-high heat. Add 1 tablespoon oil and swirl until shimmering.
  • Sear the chicken: Cook in two batches so it browns, 2–3 minutes per side, just until cooked through.Remove to a plate.
  • Stir-fry the veggies: Add another teaspoon of oil if needed. Stir-fry broccoli and snap peas first for 2 minutes. Add peppers, zucchini, mushrooms, and onion; cook 3–4 minutes until crisp-tender.
  • Add aromatics: Push veggies to the sides.Add a small drizzle of oil, then the garlic and ginger. Stir 30 seconds until fragrant.
  • Combine and sauce: Return chicken and juices to the pan. Pour in the sauce and toss for 60–90 seconds until glossy and everything is coated.Adjust salt, heat, or sweetness to taste.
  • Finish and serve: Turn off heat. Sprinkle sesame seeds and scallions. Squeeze lime over the top.Serve as-is, or spoon over warm cauliflower rice.

High Protein Cottage Cheese Ranch Dip (Perfect for Snacking)

This ranch dip is the kind of snack that makes eating well feel effortless. It’s thick, creamy, and full of tangy ranch flavor, with a big boost of protein thanks to cottage cheese. You can blend it smooth or leave it a little chunky—your call.

It comes together in minutes, and it’s great with veggies, crackers, or as a spread for wraps and sandwiches. If you love ranch but want something more nourishing, this is your go-to.

Why This Recipe Works

Close-up detail shot: A small ceramic bowl of creamy cottage cheese ranch dip just out of the blende
  • Protein-rich and satisfying: Cottage cheese adds a creamy texture and plenty of protein, keeping you full longer.
  • Quick and customizable: Use dried herbs or fresh, blend smooth or keep it textured—either way, it’s ready fast.
  • Classic ranch flavor: Lemon, dill, garlic, and onion powder deliver that nostalgic ranch taste without heavy mayo.
  • Versatile: Works as a dip, dressing (with a splash of milk), or sandwich spread.

Ingredients

  • 1 cup cottage cheese (2% or 4% for creamier texture)
  • 2 tablespoons plain Greek yogurt or sour cream (optional, for extra tang)
  • 1 tablespoon lemon juice (or 2 teaspoons white wine vinegar)
  • 1 teaspoon dried dill (or 1 tablespoon fresh, finely chopped)
  • 1 teaspoon dried parsley (or 1 tablespoon fresh, finely chopped)
  • 1/2 teaspoon dried chives (or 1 tablespoon fresh, finely chopped)
  • 1/2 teaspoon garlic powder
  • 1/2 teaspoon onion powder
  • 1/4 to 1/2 teaspoon kosher salt, to taste
  • 1/4 teaspoon black pepper
  • 1–2 tablespoons milk or water (optional, to thin)

How to Make It

Overhead final presentation: top-down grazing board featuring the finished cottage cheese ranch dip
  1. Blend the base: Add cottage cheese, lemon juice, and Greek yogurt (if using) to a blender or food processor. Blend until smooth and creamy, about 20–30 seconds.
  2. Add the ranch flavors: Sprinkle in dill, parsley, chives, garlic powder, onion powder, salt, and pepper.

    Pulse a few times to combine. Taste and adjust seasoning.

  3. Adjust the texture: For a thinner dip or dressing, blend in 1–2 tablespoons milk or water until it reaches your preferred consistency.
  4. Rest for flavor: Let it sit for 10–15 minutes in the fridge. This helps the herbs bloom and the flavors meld.
  5. Serve: Pair with carrots, cucumbers, bell peppers, cherry tomatoes, celery, crackers, or use as a sandwich spread.

Keeping It Fresh

Store the dip in an airtight container in the fridge for up to 4 days. Give it a quick stir before serving, as natural separation can occur.

If it thickens, loosen with a splash of milk or water. For best flavor, keep it chilled and avoid leaving it out for more than 2 hours at a time.

Health Benefits

  • High protein: Cottage cheese and Greek yogurt provide a substantial protein boost to support satiety and muscle repair.
  • Lower in calories than mayo-based dips: You get creamy texture without heavy fats.
  • Calcium and B vitamins: Supports bone health and energy metabolism.
  • Customizable sodium: You control the salt level, especially when pairing with salty crackers or chips.

Common Mistakes to Avoid

  • Over-salting early: Taste after blending and resting. The flavors sharpen as it chills.
  • Skipping acid: Lemon juice or vinegar is key for that ranch tang.

    Without it, the dip tastes flat.

  • Using only nonfat dairy: Fat carries flavor. A 2% cottage cheese gives a better, more satisfying texture.
  • Over-blending fresh herbs: If using fresh herbs, pulse gently to avoid turning the dip green and bitter.

Recipe Variations

  • Spicy Ranch: Add 1–2 teaspoons hot sauce or 1/4 teaspoon cayenne. Fold in chopped pickled jalapeños for extra kick.
  • Avocado Ranch: Blend in 1/2 ripe avocado and a squeeze of lime.

    Thin as needed.

  • Buttermilk Ranch: Replace milk with 2–3 tablespoons buttermilk for classic tang and a pourable texture.
  • Herb-Forward: Use all fresh herbs and add a handful of finely chopped cilantro or basil for a bright twist.
  • Blue Cheese Ranch: Stir in 2–3 tablespoons crumbled blue cheese after blending for texture and bold flavor.
  • Dairy-Free Lookalike: Use a thick dairy-free cottage cheese alternative and vegan yogurt; season generously to compensate.

FAQ

Can I make this without a blender?

Yes. Use small-curd cottage cheese and mash with a fork or whisk for a rustic texture. The flavor is the same, just less smooth.

What kind of cottage cheese is best?

2% or 4% cottage cheese gives the creamiest result.

Nonfat works, but it’s less rich and may need extra seasoning.

Can I use a ranch seasoning packet?

Absolutely. Use 1–2 tablespoons of a ranch seasoning mix and adjust salt. Keep the lemon juice for brightness.

How do I turn this into a salad dressing?

Blend until very smooth, then whisk in milk or buttermilk a tablespoon at a time until pourable.

Is it kid-friendly?

Yes.

Keep spices mild and serve with familiar dippers like crackers, cucumbers, or carrot sticks.

Can I freeze this dip?

No. Dairy-based dips like this tend to separate and become grainy after freezing. Make it fresh and enjoy within a few days.

Wrapping Up

This High Protein Cottage Cheese Ranch Dip brings creamy comfort and solid nutrition to your snack table.

It’s quick, customizable, and tastes like classic ranch with a lighter feel. Keep a batch in the fridge and you’ll always have a satisfying dip, spread, or dressing ready to go.

High Protein Cottage Cheese Ranch Dip (Perfect for Snacking) - Creamy, Tangy, and Easy

Prep Time 10 minutes
Total Time 10 minutes
Servings 6 servings

Ingredients
  

  • 1 cup cottage cheese (2% or 4% for creamier texture)
  • 2 tablespoons plain Greek yogurt or sour cream (optional, for extra tang)
  • 1 tablespoon lemon juice (or 2 teaspoons white wine vinegar)
  • 1 teaspoon dried dill (or 1 tablespoon fresh, finely chopped)
  • 1 teaspoon dried parsley (or 1 tablespoon fresh, finely chopped)
  • 1/2 teaspoon dried chives (or 1 tablespoon fresh, finely chopped)
  • 1/2 teaspoon garlic powder
  • 1/2 teaspoon onion powder
  • 1/4 to 1/2 teaspoon kosher salt, to taste
  • 1/4 teaspoon black pepper
  • 1–2 tablespoons milk or water (optional, to thin)

Instructions
 

  • Blend the base: Add cottage cheese, lemon juice, and Greek yogurt (if using) to a blender or food processor. Blend until smooth and creamy, about 20–30 seconds.
  • Add the ranch flavors: Sprinkle in dill, parsley, chives, garlic powder, onion powder, salt, and pepper.Pulse a few times to combine. Taste and adjust seasoning.
  • Adjust the texture: For a thinner dip or dressing, blend in 1–2 tablespoons milk or water until it reaches your preferred consistency.
  • Rest for flavor: Let it sit for 10–15 minutes in the fridge. This helps the herbs bloom and the flavors meld.
  • Serve: Pair with carrots, cucumbers, bell peppers, cherry tomatoes, celery, crackers, or use as a sandwich spread.

High Protein Breakfast Flatbread With Eggs & Cottage Cheese

This breakfast flatbread is warm, cheesy, and loaded with protein without feeling heavy. It’s the kind of meal that keeps you full for hours and still takes less than 15 minutes to make. The combination of creamy cottage cheese, soft-scrambled eggs, and a crisp flatbread hits all the right notes—savory, satisfying, and fresh.

Add a few toppings, and it becomes a go-to morning routine you’ll actually look forward to.

What Makes This Special

Cooking process close-up: Soft-scrambled eggs just set and creamy being pushed gently across a nonst

This flatbread packs a surprising amount of protein while staying light and balanced. The cottage cheese melts into a creamy layer that acts like a sauce, and the eggs add richness without needing a ton of oil. You can customize it endlessly—herbs, hot sauce, vegetables, or smoked salmon all work.

It’s also easy to scale for one or a family.

Ingredients

  • 1 whole-grain or high-protein flatbread (naan, lavash, or tortilla)
  • 2 large eggs
  • 1/2 cup cottage cheese (2% or 4% for creamier texture)
  • 1 teaspoon olive oil or butter
  • Salt and black pepper, to taste
  • 1/4 teaspoon garlic powder (optional)
  • 1/4 teaspoon smoked paprika or chili flakes (optional)
  • Fresh toppings: chopped chives or green onions, baby arugula, sliced cherry tomatoes, or avocado
  • Optional protein boosts: smoked salmon, turkey bacon, or a sprinkle of grated Parmesan

Step-by-Step Instructions

Final plated top view: High Protein Breakfast Flatbread with a warm, lightly toasted naan base sprea
  1. Warm the flatbread: Heat a dry skillet over medium. Warm the flatbread for 1–2 minutes per side until lightly toasted and flexible. Set aside on a plate.
  2. Prep the eggs: Crack eggs into a bowl, add a pinch of salt and pepper, and whisk until smooth and slightly frothy.
  3. Cook the eggs gently: Add olive oil or butter to the skillet over medium-low heat.

    Pour in the eggs and stir slowly with a spatula until soft and just set, 1–2 minutes. Remove from heat while still creamy.

  4. Spread the cottage cheese: Add cottage cheese to the warm flatbread. Season with salt, pepper, and garlic powder.

    The heat will soften it slightly.

  5. Layer the eggs: Spoon the soft-scrambled eggs over the cottage cheese. Sprinkle smoked paprika or chili flakes if using.
  6. Add fresh toppings: Finish with chives, arugula, tomatoes, or avocado. If using extra protein like smoked salmon, add it now.
  7. Serve immediately: Slice and eat warm.

    Add a squeeze of lemon over greens for brightness, if you like.

How to Store

This is best fresh, but you can plan ahead. Store components separately for the best texture. Keep cooked eggs and cottage cheese in airtight containers in the fridge for up to 2 days.

Assemble and reheat the flatbread in a skillet over low heat for 2–3 minutes. Avoid microwaving the assembled flatbread for too long or it may turn soggy.

Benefits of This Recipe

  • High protein: Eggs and cottage cheese keep you full and support muscle recovery.
  • Quick and flexible: Ready in under 15 minutes with pantry-friendly ingredients.
  • Balanced nutrition: Protein, fiber (from whole-grain flatbread), and healthy fats keep energy steady.
  • Customizable: Works for vegetarian diets and can easily fit higher-calorie or lower-carb needs.

Pitfalls to Watch Out For

  • Overcooking the eggs: Dry eggs make the flatbread feel heavy. Pull them off heat while still soft.
  • Watery toppings: Wet tomatoes or greens can make the base soggy.

    Pat them dry first.

  • Too much moisture: If your cottage cheese is very loose, spread a thin layer or drain briefly.
  • Using a flimsy wrap: Choose a sturdy flatbread so it holds up to the toppings.

Alternatives

  • Lower carb: Use a low-carb wrap or a high-protein tortilla.
  • No cottage cheese: Swap in ricotta, Greek yogurt, or whipped feta.
  • Dairy-free: Use dairy-free cottage cheese or hummus and add an extra egg for protein.
  • Extra veggies: Add sautéed spinach, mushrooms, or peppers for volume and fiber.
  • Different flavor profiles: Try pesto and cherry tomatoes, or za’atar with cucumbers and a drizzle of tahini.

FAQ

Can I bake this instead of using a skillet?

Yes. Toast the flatbread at 375°F (190°C) for 3–5 minutes, then add cottage cheese and pre-cooked eggs. Return to the oven for 2 minutes to warm through, then finish with fresh toppings.

What cottage cheese should I use?

Use 2% or 4% for a creamier texture and better flavor.

Small-curd tends to spread more evenly. If you prefer ultra-smooth, blend it for 20–30 seconds.

How much protein is in one serving?

Estimated 28–35 grams per flatbread, depending on the brand of flatbread and cottage cheese. Adding smoked salmon or turkey bacon can push it higher.

Can I make this ahead for meal prep?

Partially.

Cook the eggs and store them separately. Assemble right before eating and warm the flatbread to keep it from turning soggy.

What’s the best way to reheat?

Reheat the flatbread in a skillet over low heat for a few minutes. If reheating eggs, do it gently to avoid rubbery texture.

In Conclusion

This High Protein Breakfast Flatbread With Eggs & Cottage Cheese delivers big flavor and steady energy with minimal effort.

It’s simple to customize, fast to make, and satisfying without being heavy. Keep a stack of flatbreads and a tub of cottage cheese on hand, and breakfast practically makes itself.

High Protein Breakfast Flatbread With Eggs & Cottage Cheese - Simple, Satisfying, and Quick

Prep Time 5 minutes
Cook Time 10 minutes
Total Time 15 minutes
Servings 2 servings

Ingredients
  

  • 1 whole-grain or high-protein flatbread (naan, lavash, or tortilla)
  • 2 large eggs
  • 1/2 cup cottage cheese (2% or 4% for creamier texture)
  • 1 teaspoon olive oil or butter
  • Salt and black pepper, to taste
  • 1/4 teaspoon garlic powder (optional)
  • 1/4 teaspoon smoked paprika or chili flakes (optional)
  • Fresh toppings: chopped chives or green onions, baby arugula, sliced cherry tomatoes, or avocado
  • Optional protein boosts: smoked salmon, turkey bacon, or a sprinkle of grated Parmesan

Instructions
 

  • Warm the flatbread: Heat a dry skillet over medium. Warm the flatbread for 1–2 minutes per side until lightly toasted and flexible. Set aside on a plate.
  • Prep the eggs: Crack eggs into a bowl, add a pinch of salt and pepper, and whisk until smooth and slightly frothy.
  • Cook the eggs gently: Add olive oil or butter to the skillet over medium-low heat.Pour in the eggs and stir slowly with a spatula until soft and just set, 1–2 minutes. Remove from heat while still creamy.
  • Spread the cottage cheese: Add cottage cheese to the warm flatbread. Season with salt, pepper, and garlic powder.The heat will soften it slightly.
  • Layer the eggs: Spoon the soft-scrambled eggs over the cottage cheese. Sprinkle smoked paprika or chili flakes if using.
  • Add fresh toppings: Finish with chives, arugula, tomatoes, or avocado. If using extra protein like smoked salmon, add it now.
  • Serve immediately: Slice and eat warm.Add a squeeze of lemon over greens for brightness, if you like.

High Protein Breakfast Quesadilla With Chicken & Cheese

Looking for a breakfast that actually keeps you full and tastes amazing? This high protein breakfast quesadilla brings together tender chicken, melty cheese, and a crispy tortilla for a quick, satisfying morning win. It cooks in minutes, uses simple ingredients, and works just as well for lunch or dinner.

Whether you’re trying to hit your protein goal or just want something comforting, this is a practical choice. It’s the kind of breakfast you can make on a busy weekday and still feel like you treated yourself.

What Makes This Special

Cooking process, close-up detail: A half-moon breakfast quesadilla in a nonstick skillet mid-cook, t

This quesadilla checks a lot of boxes: it’s fast, hearty, and balanced. You get a solid dose of protein from chicken, eggs, and cheese, plus steady energy from the tortilla.

It’s also easy to scale for a crowd or customize based on what you have. Best of all, it’s made in one pan and uses everyday ingredients.

What You’ll Need

  • 1 large flour tortilla (8–10 inches; whole wheat if you prefer)
  • 1/2 to 3/4 cup cooked chicken, shredded or chopped (rotisserie works great)
  • 2 large eggs (optional but boosts protein and fluffiness)
  • 1/2 cup shredded cheese (cheddar, Monterey Jack, or a blend)
  • 1–2 teaspoons olive oil or butter for the pan
  • 2 tablespoons chopped onion (optional)
  • 2 tablespoons diced bell pepper or jalapeño (optional)
  • Salt and black pepper to taste
  • 1/4 teaspoon chili powder or smoked paprika (optional)
  • Salsa, hot sauce, or Greek yogurt for serving
  • Fresh cilantro or green onion for garnish (optional)

How to Make It

Final dish, overhead top view: Sliced high-protein chicken-and-cheese breakfast quesadilla arranged
  1. Prep the filling: If your chicken is plain, toss it with a pinch of salt, pepper, and chili powder or smoked paprika. Set aside.
  2. Cook the veggies (optional): Heat a nonstick skillet over medium heat with a small drizzle of oil.

    Sauté onion and peppers for 2–3 minutes until softened. Remove to a plate.

  3. Scramble the eggs: Beat the eggs with a pinch of salt and pepper. Add a touch more oil to the skillet and scramble just until softly set.

    Don’t overcook. Transfer to the same plate as the veggies.

  4. Assemble in the pan: Reduce heat to medium-low. Add a thin layer of oil or butter.

    Place the tortilla in the skillet. Sprinkle half the cheese over one half of the tortilla.

  5. Add the protein: Layer on the chicken, scrambled eggs, and any cooked veggies. Top with the remaining cheese.

    Fold the tortilla over to create a half-moon.

  6. Crisp and melt: Cook 2–3 minutes per side, pressing gently with a spatula, until the tortilla is golden and the cheese is melted. Adjust heat to avoid burning.
  7. Finish and serve: Let it rest 1 minute on a cutting board to set. Slice into wedges.

    Serve with salsa, hot sauce, and a dollop of Greek yogurt. Garnish with cilantro or green onion if you like.

Keeping It Fresh

Leftovers keep well for up to 2 days in an airtight container in the fridge. For best results, reheat in a skillet or air fryer until crispy and hot.

You can also meal-prep the components—cooked chicken, chopped veggies, and shredded cheese—so assembly takes under 5 minutes in the morning. If freezing, wrap the assembled (but not sauced) quesadilla tightly and freeze up to 2 months, then reheat in a skillet or 375°F oven until warmed through.

Why This is Good for You

  • High protein: Chicken, eggs, and cheese provide a strong protein base to support muscle and keep you full longer.
  • Balanced energy: The tortilla offers carbs for quick fuel, while fat from cheese helps with satiety.
  • Customizable nutrients: Add fiber and vitamins with peppers, spinach, or tomatoes without changing the core recipe.
  • Portion control: It’s easy to scale and split, making it a practical choice for calorie awareness.

Common Mistakes to Avoid

  • Overfilling the tortilla: Too much filling makes it hard to fold and flip. Keep layers even and modest.
  • High heat from the start: A scorching pan burns the tortilla before the cheese melts.

    Use medium to medium-low heat.

  • Dry chicken: Season and warm your chicken with a little oil or salsa to keep it moist.
  • Skipping the rest: Let the quesadilla sit for a minute before slicing so the cheese sets and the layers hold.

Alternatives

  • Low-carb swap: Use a low-carb or high-fiber tortilla, or make a “naked” scramble with the same fillings.
  • No eggs: Skip the eggs and add more chicken or beans for protein.
  • Extra protein: Stir a spoonful of cottage cheese into the eggs or add black beans or turkey bacon.
  • Cheese options: Try pepper jack for heat, mozzarella for extra melt, or a reduced-fat blend.
  • Veggie boost: Spinach, mushrooms, or tomatoes add color and nutrients without much prep.
  • Dairy-free: Use a plant-based cheese that melts well and add avocado for creaminess.

FAQ

How much protein is in this quesadilla?

With 3/4 cup chicken, 2 eggs, and 1/2 cup cheese, you’re typically looking at roughly 45–55 grams of protein, depending on brands and portions. Using more chicken or a high-protein wrap can push it higher.

Can I make it without eggs?

Yes. Replace the eggs with extra chicken or add black beans for a similar protein hit.

It will still be hearty and flavorful.

What’s the best cheese for melting?

Monterey Jack, cheddar, or a Mexican blend melt smoothly and taste great. If you want a little kick, pepper jack is an easy upgrade.

Can I use a corn tortilla?

You can, but it’s smaller and more fragile. Consider using two corn tortillas, sandwich-style, and flip carefully.

Flour tortillas are easier for a folded quesadilla.

How do I keep the tortilla crispy?

Use moderate heat, don’t overload with wet fillings, and cook in a lightly oiled skillet. Reheat on a dry pan or air fryer to bring back the crunch.

Is rotisserie chicken okay?

Absolutely. It’s convenient and flavorful.

Shred it and season lightly to refresh the taste before adding to the quesadilla.

Final Thoughts

This high protein breakfast quesadilla is quick, flexible, and genuinely satisfying. With simple ingredients and one pan, you get a crispy, cheesy, protein-packed meal that fits any schedule. Make it your own with veggies, spice levels, and toppings—then enjoy a breakfast that actually keeps you going.

High Protein Breakfast Quesadilla With Chicken & Cheese - Simple, Satisfying, and Fast

Prep Time 10 minutes
Cook Time 10 minutes
Total Time 20 minutes
Servings 2 servings

Ingredients
  

  • 1 large flour tortilla (8–10 inches; whole wheat if you prefer)
  • 1/2 to 3/4 cup cooked chicken, shredded or chopped (rotisserie works great)
  • 2 large eggs (optional but boosts protein and fluffiness)
  • 1/2 cup shredded cheese (cheddar, Monterey Jack, or a blend)
  • 1–2 teaspoons olive oil or butter for the pan
  • 2 tablespoons chopped onion (optional)
  • 2 tablespoons diced bell pepper or jalapeño (optional)
  • Salt and black pepper to taste
  • 1/4 teaspoon chili powder or smoked paprika (optional)
  • Salsa, hot sauce, or Greek yogurt for serving
  • Fresh cilantro or green onion for garnish (optional)

Instructions
 

  • Prep the filling: If your chicken is plain, toss it with a pinch of salt, pepper, and chili powder or smoked paprika. Set aside.
  • Cook the veggies (optional): Heat a nonstick skillet over medium heat with a small drizzle of oil.Sauté onion and peppers for 2–3 minutes until softened. Remove to a plate.
  • Scramble the eggs: Beat the eggs with a pinch of salt and pepper. Add a touch more oil to the skillet and scramble just until softly set.Don’t overcook. Transfer to the same plate as the veggies.
  • Assemble in the pan: Reduce heat to medium-low. Add a thin layer of oil or butter.Place the tortilla in the skillet. Sprinkle half the cheese over one half of the tortilla.
  • Add the protein: Layer on the chicken, scrambled eggs, and any cooked veggies. Top with the remaining cheese.Fold the tortilla over to create a half-moon.
  • Crisp and melt: Cook 2–3 minutes per side, pressing gently with a spatula, until the tortilla is golden and the cheese is melted. Adjust heat to avoid burning.
  • Finish and serve: Let it rest 1 minute on a cutting board to set. Slice into wedges.Serve with salsa, hot sauce, and a dollop of Greek yogurt. Garnish with cilantro or green onion if you like.

Egg White Breakfast Wrap With Spinach & Feta (High Protein, Low Cal)

This breakfast wrap is light, savory, and ready in minutes. It’s the kind of morning meal that actually keeps you full without dragging you down. Tender egg whites, sautéed spinach, and creamy feta get tucked into a warm tortilla for a simple, balanced bite.

It’s great for busy weekdays, post-workout meals, or anyone looking to keep calories in check while hitting their protein goals.

What Makes This Special

Cooking process close-up: Soft-scrambled egg whites setting in a nonstick skillet with wilted spinac

This wrap leans on egg whites for lean protein with minimal fat, making it a smart choice if you want a filling breakfast without extra calories. Spinach brings a pop of color and a dose of iron and fiber, while feta adds a salty, tangy kick that makes the whole thing feel satisfying. It’s fast, budget-friendly, and easily customizable.

Plus, it wraps up neatly, so you can eat it on the go.

Shopping List

  • Egg whites (from a carton or 4–5 whites from whole eggs)
  • Fresh spinach (2 packed cups)
  • Feta cheese (about 2 tablespoons, crumbled)
  • Whole-wheat or low-carb tortilla (8–10 inch)
  • Olive oil or cooking spray (1 teaspoon or a light spray)
  • Salt and black pepper
  • Garlic powder or minced garlic (optional)
  • Red pepper flakes (optional, for heat)
  • Fresh herbs like dill or parsley (optional)
  • Cherry tomatoes or roasted red peppers (optional add-ins)

How to Make It

Final dish overhead: Overhead shot of a neatly toasted whole-wheat breakfast wrap, seam-side down an
  1. Warm the pan: Heat a nonstick skillet over medium heat. Add a teaspoon of olive oil or a quick spray to coat the surface.
  2. Sauté the spinach: Toss in the spinach with a pinch of salt. Stir for 1–2 minutes until wilted.

    Add a small pinch of garlic powder or minced garlic if you like.

  3. Cook the egg whites: Pour in the egg whites. Season with salt and pepper. Let them set slightly, then gently push the edges toward the center until they’re soft and just cooked, about 2–3 minutes.
  4. Add the feta: Sprinkle crumbled feta over the eggs.

    Turn off the heat and let the residual warmth soften the cheese.

  5. Warm the tortilla: In a separate pan or the microwave, warm your tortilla until pliable.
  6. Assemble: Spoon the egg white and spinach mixture onto the tortilla. Add any extras like herbs, tomatoes, or red pepper flakes.
  7. Wrap it up: Fold the sides in, then roll from the bottom into a snug wrap. Place seam-side down.
  8. Optional toast: For a crisp exterior, return the wrap to the skillet for 1–2 minutes per side.

How to Store

If you’re meal prepping, cook the egg whites and spinach ahead and store them separately from the tortilla.

Keep in an airtight container in the fridge for up to 3 days. Reheat the filling in a skillet or microwave, then assemble fresh. If storing a fully assembled wrap, wrap tightly in foil and reheat in a skillet or toaster oven to keep it from getting soggy.

Health Benefits

  • High protein, low fat: Egg whites deliver protein to support muscle recovery and satiety with minimal calories.
  • Greens you can taste: Spinach adds vitamins A, C, K, and folate, plus fiber for digestion.
  • Balanced carbs: A whole-wheat or low-carb tortilla gives steady energy without a crash.
  • Flavor with purpose: Feta brings calcium and bold taste, so you need less cheese overall.

Pitfalls to Watch Out For

  • Overcooking egg whites: They turn rubbery fast.

    Pull them off the heat when they’re just set.

  • Too much moisture: Wet spinach or juicy add-ins can make the wrap soggy. Pat veggies dry and don’t overfill.
  • Salty cheese + salt: Feta is naturally salty, so season lightly and adjust at the end.
  • Tortilla tearing: Cold tortillas crack. Warm them first for easy rolling.

Variations You Can Try

  • Mediterranean: Add roasted red peppers, olives, and a sprinkle of dried oregano.
  • Spicy: Mix in jalapeños, hot sauce, or harissa with the spinach.
  • Veg boost: Fold in sautéed mushrooms, onions, or zucchini for extra volume.
  • Herb-forward: Fresh dill, basil, or parsley brightens the flavor without extra calories.
  • Cheese swap: Try goat cheese or part-skim mozzarella for a different profile.
  • Gluten-free: Use a gluten-free tortilla or a chickpea wrap.

FAQ

Can I use whole eggs instead of egg whites?

Yes.

Two whole eggs will add richness and more nutrients, though the calories and fat will be higher. You can also do a mix: one whole egg plus extra whites for balance.

What’s the best tortilla for low calories?

Look for a high-fiber, low-carb whole-wheat tortilla in the 70–100 calorie range. Many brands offer wraps with added fiber that stay soft and fold well.

Can I make this dairy-free?

Absolutely.

Skip the feta or use a dairy-free feta-style crumble. Add a squeeze of lemon and a pinch of nutritional yeast to keep it flavorful.

How do I keep the wrap from getting soggy?

Pat spinach dry after washing, avoid watery add-ins, and assemble just before eating. If prepping ahead, store the filling separately and toast the wrap before serving.

Is this good for weight loss?

It can be.

It’s high in protein and relatively low in calories, which helps with fullness and portion control. Just watch add-ins like extra cheese or heavy sauces.

Can I bake these for a crowd?

Yes. Assemble wraps, place seam-side down on a sheet pan, and bake at 375°F (190°C) for 8–10 minutes to warm and crisp.

Serve with a light yogurt sauce if you like.

Final Thoughts

This Egg White Breakfast Wrap With Spinach & Feta is simple, fast, and genuinely satisfying. It’s easy to customize, packs in protein, and tastes great without weighing you down. Keep a bag of spinach, a carton of egg whites, and a few tortillas on hand, and you’ve got a reliable breakfast any day of the week.

Egg White Breakfast Wrap With Spinach & Feta (High Protein, Low Cal) - A Fresh, Satisfying Start

Prep Time 5 minutes
Cook Time 10 minutes
Total Time 15 minutes
Servings 2 servings

Ingredients
  

  • Egg whites (from a carton or 4–5 whites from whole eggs)
  • Fresh spinach (2 packed cups)
  • Feta cheese (about 2 tablespoons, crumbled)
  • Whole-wheat or low-carb tortilla (8–10 inch)
  • Olive oil or cooking spray (1 teaspoon or a light spray)
  • Salt and black pepper
  • Garlic powder or minced garlic (optional)
  • Red pepper flakes (optional, for heat)
  • Fresh herbs like dill or parsley (optional)
  • Cherry tomatoes or roasted red peppers (optional add-ins)

Instructions
 

  • Warm the pan: Heat a nonstick skillet over medium heat. Add a teaspoon of olive oil or a quick spray to coat the surface.
  • Sauté the spinach: Toss in the spinach with a pinch of salt. Stir for 1–2 minutes until wilted.Add a small pinch of garlic powder or minced garlic if you like.
  • Cook the egg whites: Pour in the egg whites. Season with salt and pepper. Let them set slightly, then gently push the edges toward the center until they’re soft and just cooked, about 2–3 minutes.
  • Add the feta: Sprinkle crumbled feta over the eggs.Turn off the heat and let the residual warmth soften the cheese.
  • Warm the tortilla: In a separate pan or the microwave, warm your tortilla until pliable.
  • Assemble: Spoon the egg white and spinach mixture onto the tortilla. Add any extras like herbs, tomatoes, or red pepper flakes.
  • Wrap it up: Fold the sides in, then roll from the bottom into a snug wrap. Place seam-side down.
  • Optional toast: For a crisp exterior, return the wrap to the skillet for 1–2 minutes per side.

Fluffy Greek Yogurt Protein Pancakes – Light, High-Protein, and Easy

These pancakes are soft, thick, and satisfying without feeling heavy. Greek yogurt gives them a protein boost and a tender texture, while a little baking powder keeps them fluffy. They cook up golden in minutes and taste just like classic pancakes, with a clean ingredient list you can feel good about.

Perfect for busy mornings, post-workout brunch, or a cozy weekend stack with berries and maple syrup.

What Makes This Special

  • High in protein: Greek yogurt and eggs add natural protein—no chalky protein powder needed.
  • Fluffy texture: The yogurt’s creaminess and baking powder create lift without dryness.
  • Simple ingredients: Pantry basics come together fast for a reliable, delicious stack.
  • Balanced sweetness: Lightly sweetened so you can add syrup, fruit, or nut butter as you like.
  • Kid-friendly and meal-prep friendly: Batter mixes quickly, and leftovers reheat well.

Shopping List

  • 1 cup plain Greek yogurt (2% or whole milk works best)
  • 2 large eggs
  • 1 teaspoon vanilla extract
  • 2 tablespoons maple syrup or honey (optional for a lightly sweet batter)
  • 3/4 cup all-purpose flour (or white whole wheat for extra fiber)
  • 1 teaspoon baking powder
  • 1/4 teaspoon baking soda
  • Pinch of salt
  • 2–4 tablespoons milk (as needed to thin batter)
  • Butter, ghee, or oil for the pan
  • Optional add-ins: blueberries, mini chocolate chips, cinnamon, lemon zest

Step-by-Step Instructions

Final plated overhead: A tall stack of golden Greek yogurt protein pancakes on a white ceramic plate
  1. Whisk the wet ingredients: In a medium bowl, whisk Greek yogurt, eggs, vanilla, and maple syrup until smooth.
  2. Combine the dry ingredients: In a separate bowl, mix flour, baking powder, baking soda, and salt.
  3. Bring it together: Add dry ingredients to wet and stir gently until just combined. If the batter is very thick, add milk 1 tablespoon at a time. Aim for a thick but spoonable batter.
  4. Rest the batter: Let it sit for 5 minutes.This helps the flour hydrate and boosts fluffiness.
  5. Preheat the pan: Heat a nonstick skillet or griddle over medium heat. Lightly grease with butter or oil.
  6. Portion and cook: Scoop about 1/4 cup batter per pancake. If using add-ins, sprinkle them on top now.Cook until bubbles form on the surface and edges look set, about 2–3 minutes.
  7. Flip and finish: Turn carefully and cook 1–2 more minutes until golden and cooked through. Reduce heat slightly if they brown too fast.
  8. Serve warm: Top with fresh berries, a pat of butter, maple syrup, or a dollop of yogurt and a drizzle of honey.

Storage Instructions

  • Refrigerate: Cool completely, then store in an airtight container for up to 4 days.
  • Freeze: Lay pancakes on a sheet pan to freeze, then transfer to a freezer bag for up to 2 months. Separate layers with parchment to prevent sticking.
  • Reheat: Toast in a toaster, warm in a skillet over low heat, or microwave in 15–20 second bursts until heated through.

Why This is Good for You

  • Protein-rich: Greek yogurt and eggs support muscle repair and keep you full longer.
  • Balanced carbs and fats: Provides steady energy without a sugar crash.
  • Customizable nutrients: Add berries for antioxidants, chia for fiber, or nuts for healthy fats.

What Not to Do

  • Don’t overmix: Stir until the flour just disappears.Overmixing leads to dense, tough pancakes.
  • Don’t cook on high heat: A medium heat prevents burning before the centers cook through.
  • Don’t skip the rest: A short 5-minute rest improves texture and rise.
  • Don’t use fat-free yogurt: It can make the batter gummy. Use 2% or whole milk yogurt for best results.

Recipe Variations

  • Lemon Blueberry: Add 1 teaspoon lemon zest and 1/2 cup fresh or frozen blueberries.
  • Cinnamon Banana:</-strong> Mash 1 small ripe banana into the wet ingredients and add 1/2 teaspoon cinnamon.
  • Chocolate Chip: Fold in 1/4 cup mini chocolate chips; serve with a light dusting of cocoa.
  • Whole Grain: Use white whole wheat flour and a splash more milk for a hearty texture.
  • Extra Protein:</-strong> Stir in 1 tablespoon nut butter or 1–2 tablespoons finely ground almond flour. If using protein powder, add 1–2 tablespoons and increase milk as needed.

FAQ

Can I make the batter ahead of time?

Yes, but for best rise, cook within 30 minutes.

If you must prep ahead, refrigerate up to 12 hours and stir in a splash of milk before cooking.

What if I only have fat-free Greek yogurt?

It will work, but the pancakes may be less tender. Add 1 tablespoon melted butter or oil to the batter to improve texture.

How do I know when to flip?

Look for small bubbles across the surface and slightly dry edges. The underside should be golden when you peek with a spatula.

Can I make them gluten-free?

Yes.

Use a 1:1 gluten-free all-purpose flour blend. You may need an extra tablespoon of milk for the right consistency.

Why are my pancakes gummy inside?

The heat is likely too high or the batter too thick. Lower the heat and thin the batter with a little milk.

Make sure you’re not overmixing.

In Conclusion

Fluffy Greek Yogurt Protein Pancakes deliver the best of both worlds: a soft, café-style stack with impressive staying power. They’re simple to make, easy to customize, and perfect for weekdays or a slow Sunday morning. Keep this recipe in your back pocket for a reliable, feel-good breakfast that tastes like a treat and fuels your day.

Fluffy Greek Yogurt Protein Pancakes - Light, High-Protein, and Easy

Prep Time 10 minutes
Cook Time 15 minutes
Total Time 25 minutes
Servings 4 servings

Ingredients
  

  • 1 cup plain Greek yogurt (2% or whole milk works best)
  • 2 large eggs
  • 1 teaspoon vanilla extract
  • 2 tablespoons maple syrup or honey (optional for a lightly sweet batter)
  • 3/4 cup all-purpose flour (or white whole wheat for extra fiber)
  • 1 teaspoon baking powder
  • 1/4 teaspoon baking soda
  • Pinch of salt
  • 2–4 tablespoons milk (as needed to thin batter)
  • Butter, ghee, or oil for the pan
  • Optional add-ins: blueberries, mini chocolate chips, cinnamon, lemon zest

Instructions
 

  • Whisk the wet ingredients: In a medium bowl, whisk Greek yogurt, eggs, vanilla, and maple syrup until smooth.
  • Combine the dry ingredients: In a separate bowl, mix flour, baking powder, baking soda, and salt.
  • Bring it together: Add dry ingredients to wet and stir gently until just combined. If the batter is very thick, add milk 1 tablespoon at a time. Aim for a thick but spoonable batter.
  • Rest the batter: Let it sit for 5 minutes.This helps the flour hydrate and boosts fluffiness.
  • Preheat the pan: Heat a nonstick skillet or griddle over medium heat. Lightly grease with butter or oil.
  • Portion and cook: Scoop about 1/4 cup batter per pancake. If using add-ins, sprinkle them on top now.Cook until bubbles form on the surface and edges look set, about 2–3 minutes.
  • Flip and finish: Turn carefully and cook 1–2 more minutes until golden and cooked through. Reduce heat slightly if they brown too fast.
  • Serve warm: Top with fresh berries, a pat of butter, maple syrup, or a dollop of yogurt and a drizzle of honey.

Vanilla Berry Protein Smoothie Bowl (Simple, Thick & Meal-Worthy)

This smoothie bowl tastes like dessert but eats like a full meal. It’s thick, cold, and loaded with berries, protein, and healthy fats that keep you full for hours. No fancy ingredients or tricky steps—just a blender and a few pantry staples.

Make it for breakfast, a post-workout recharge, or an afternoon pick-me-up that actually satisfies.

What Makes This Special

Overhead shot of a thick, scoopable vanilla berry protein smoothie bowl just after blending, spooned

Thick and scoopable: It’s designed to be eaten with a spoon, not sipped.

Balanced macros: Protein, fiber, and healthy fats for steady energy.

Only real ingredients: Frozen berries, banana, vanilla protein, and milk of choice.

Customizable: Adjust sweetness, protein, and toppings to fit your goals.

Shopping List

  • Frozen mixed berries (1 to 1.5 cups)
  • Frozen banana (1 small, in chunks)
  • Vanilla protein powder (1 scoop; whey or plant-based)
  • Greek yogurt (1/3 to 1/2 cup; plain or vanilla)
  • Milk of choice (1/4 to 1/2 cup; almond, oat, dairy, etc.)
  • Chia seeds (1 tablespoon)
  • Nut butter (1 tablespoon; almond, peanut, or cashew)
  • Vanilla extract (1/2 teaspoon)
  • Optional sweetener (1–2 teaspoons maple syrup, honey, or a few drops stevia)
  • Toppings: sliced banana, fresh berries, granola, coconut flakes, cacao nibs, hemp seeds

Step-by-Step Instructions

Close-up, low-angle process shot of the smoothie base mid-blend being scooped with a spatula from th
  1. Prep your base: Add frozen berries and frozen banana to your blender first. This helps the blades grab the fruit and create a thick texture.
  2. Add protein and creaminess: Scoop in the protein powder and Greek yogurt. This combo makes it creamy and keeps you full.
  3. Flavor and healthy fats: Add chia seeds, nut butter, and vanilla extract.

    These boost thickness, fiber, and flavor.

  4. Pour in a little liquid: Start with 1/4 cup milk. You want just enough to get things moving. You can always add more.
  5. Blend low and slow: Pulse or blend on low, using a tamper if you have one.

    Scrape down the sides as needed. Add milk 1 tablespoon at a time until it turns into a thick, soft-serve-like blend.

  6. Taste and adjust: If it’s not sweet enough, add a touch of honey or maple syrup. If it’s too tart, a bit more banana or yogurt helps.
  7. Serve immediately: Spoon into a chilled bowl to keep it thick.

    Add toppings for crunch and extra nutrients.

Storage Instructions

  • Short term: Keep leftovers in the fridge for up to 24 hours. It will soften; give it a stir and add a few ice cubes if needed.
  • Freeze for later: Pour into a freezer-safe container and freeze up to 1 month. Thaw at room temp for 10–15 minutes, then stir or re-blend with a splash of milk.
  • Meal prep tip: Pre-portion frozen fruit and banana in bags.

    In the morning, just add protein, yogurt, and milk.

Why This is Good for You

  • Protein for satiety and muscle support: The combo of protein powder and Greek yogurt helps keep you full and supports recovery.
  • Fiber and antioxidants: Berries and chia seeds deliver fiber plus antioxidants that support overall health.
  • Healthy fats: Nut butter and chia add fats that help you absorb nutrients and stay satisfied.
  • Lower added sugar: Sweetness comes mostly from fruit; you control any extras.

What Not to Do

  • Don’t overdo the liquid: Too much milk turns it into a drink, not a bowl. Add slowly.
  • Don’t skip frozen fruit: Room-temp fruit won’t give you that thick, scoopable texture.
  • Don’t blend on high right away: Start low to avoid air pockets and uneven blending.
  • Don’t pile on sugary toppings: Choose balanced additions like nuts, seeds, and unsweetened coconut.

Alternatives

  • No banana: Use 1/2 cup frozen mango or frozen cauliflower rice plus a teaspoon of sweetener.
  • Dairy-free: Use coconut or almond milk yogurt, and a plant-based protein powder.
  • Higher protein: Add 2 tablespoons hemp seeds or an extra half-scoop of protein.
  • Nut-free: Swap nut butter for sunflower seed butter and top with pumpkin seeds.
  • Extra thick: Add 1–2 teaspoons psyllium husk or more chia, then blend and rest 2 minutes to thicken.

FAQ

Can I make this without protein powder?

Yes. Use 3/4 cup Greek yogurt and add 1–2 tablespoons hemp seeds for a protein boost.

You may want a little extra vanilla extract for flavor.

What blender works best?

A high-powered blender is ideal, but you can use a standard one by blending in short pulses and adding liquid slowly. A tamper helps keep it thick.

How do I make it sweeter without sugar?

Use a riper banana, more vanilla extract, or a couple of pitted dates. Stevia or monk fruit also works if you prefer zero-sugar options.

Can I use fresh berries?

You can, but you’ll lose thickness.

If using fresh berries, add extra ice or freeze your banana to keep it scoopable.

What toppings are best for staying full?

Go for a mix of crunch and fat: granola, almonds, chia or hemp seeds, coconut flakes, and a drizzle of nut butter. These add staying power and texture.

Wrapping Up

This Vanilla Berry Protein Smoothie Bowl is simple to make, thick enough to eat with a spoon, and balanced enough to count as a real meal. Keep the liquid low, use frozen fruit, and tailor the toppings to your goals.

Save this as your quick, reliable breakfast or post-workout staple—you’ll make it on repeat.

Vanilla Berry Protein Smoothie Bowl (Simple, Thick & Meal-Worthy) - A Creamy, Satisfying Breakfast

Prep Time 5 minutes
Total Time 5 minutes
Servings 1 servings

Ingredients
  

  • Frozen mixed berries (1 to 1.5 cups)
  • Frozen banana (1 small, in chunks)
  • Vanilla protein powder (1 scoop; whey or plant-based)
  • Greek yogurt (1/3 to 1/2 cup; plain or vanilla)
  • Milk of choice (1/4 to 1/2 cup; almond, oat, dairy, etc.)
  • Chia seeds (1 tablespoon)
  • Nut butter (1 tablespoon; almond, peanut, or cashew)
  • Vanilla extract (1/2 teaspoon)
  • Optional sweetener (1–2 teaspoons maple syrup, honey, or a few drops stevia)
  • Toppings: sliced banana, fresh berries, granola, coconut flakes, cacao nibs, hemp seeds

Instructions
 

  • Prep your base: Add frozen berries and frozen banana to your blender first. This helps the blades grab the fruit and create a thick texture.
  • Add protein and creaminess: Scoop in the protein powder and Greek yogurt. This combo makes it creamy and keeps you full.
  • Flavor and healthy fats: Add chia seeds, nut butter, and vanilla extract.These boost thickness, fiber, and flavor.
  • Pour in a little liquid: Start with 1/4 cup milk. You want just enough to get things moving. You can always add more.
  • Blend low and slow: Pulse or blend on low, using a tamper if you have one.Scrape down the sides as needed. Add milk 1 tablespoon at a time until it turns into a thick, soft-serve-like blend.
  • Taste and adjust: If it’s not sweet enough, add a touch of honey or maple syrup. If it’s too tart, a bit more banana or yogurt helps.
  • Serve immediately: Spoon into a chilled bowl to keep it thick.Add toppings for crunch and extra nutrients.