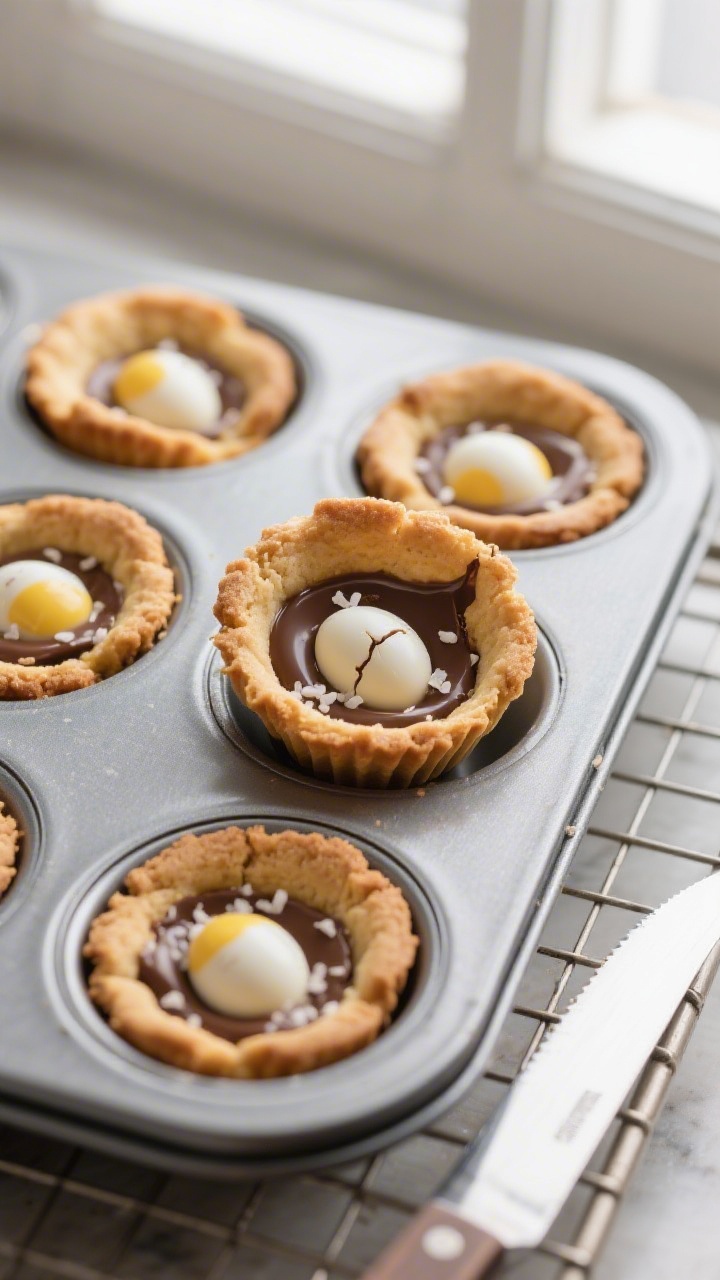
Creme Egg Stuffed Cookie Cups – Gooey Centers, Crispy Edges
These cookie cups are all about contrast: golden, chewy edges with a molten, chocolatey Creme Egg center. They bake up in a muffin tin, so you get perfect portions and a satisfying bite every time. The best part?
They look fancy but come together with pantry staples and a pack of Creme Eggs. Whether it’s Easter or just a Tuesday treat, these are the kind of bakes that make people smile.
What Makes This Special
Think of your favorite chocolate chip cookie, then give it a surprise center that oozes when warm. That’s the magic here.
The muffin tin shape helps the dough hold the filling, so you get crispy rims and soft middles. Creme Eggs melt into a rich pocket of chocolate and fondant, turning a simple cookie into a showstopper with zero fuss.
Shopping List
- 12 mini Creme Eggs (or 6 regular Creme Eggs, halved)
- 1/2 cup (115 g) unsalted butter, melted and slightly cooled
- 1/2 cup (100 g) granulated sugar
- 1/2 cup (110 g) packed light brown sugar
- 1 large egg
- 1 tsp vanilla extract
- 1 2/3 cups (210 g) all-purpose flour
- 1/2 tsp baking soda
- 1/4 tsp fine salt
- 1/2 cup (85 g) chocolate chips (optional but great)
- Nonstick spray or softened butter for the muffin tin
Instructions

- Chill the Creme Eggs: Pop the Creme Eggs in the fridge for 20–30 minutes. Cold centers hold their shape better while baking.
- Prep the oven and tin: Heat oven to 350°F (175°C).
Grease a standard 12-cup muffin tin well, including the rims.
- Mix the wet ingredients: In a bowl, whisk melted butter with granulated and brown sugars until smooth. Add egg and vanilla; whisk until glossy.
- Combine the dry: In a separate bowl, stir flour, baking soda, and salt. Fold into the wet mix just until no dry streaks remain.
Stir in chocolate chips if using. The dough will be thick.
- Portion the base: Scoop about 1 tablespoon of dough into each muffin cup and press to cover the bottom.
- Add the filling: Unwrap the chilled Creme Eggs. Place one mini egg (or a half regular egg, cut-side down) in the center of each cup.
- Seal the tops: Add another tablespoon of dough over each egg and gently press around the sides to fully enclose the candy.
Don’t compact too hard; you want room for spread.
- Bake: Bake 10–13 minutes until the edges look set and lightly golden. The centers will still look soft—that’s perfect.
- Cool briefly: Let them cool in the tin for 10 minutes to firm up. Run a thin knife around the edges, then lift out to a rack.
- Serve: Enjoy warm for a gooey center, or at room temp for a fudgier bite.
A pinch of flaky salt on top is a great finish.
Keeping It Fresh
Store cookie cups in an airtight container at room temperature for 3–4 days. The centers stay soft, but reheat in the microwave for 8–10 seconds if you want that molten middle again. For longer storage, freeze up to 2 months.
Thaw at room temp, then warm briefly before serving.
Why This is Good for You
- Built-in portion control: Muffin-cup sizing makes it easier to enjoy a treat without overdoing it.
- Simple ingredients: No artificial flavors needed—vanilla, butter, and chocolate do the heavy lifting.
- Joy factor: A fun bake can boost mood and make sharing sweeter. Sometimes, that’s the best kind of “good for you.”
What Not to Do
- Don’t skip chilling the Creme Eggs: Warm eggs can burst or over-melt, leading to leaky cups.
- Don’t overbake: If the tops are fully browned, you’ve gone too far. Pull them when rims are just set.
- Don’t under-grease the tin: These like to stick.
A thorough spray saves the day.
- Don’t overmix the dough: Tough dough leads to dense cups. Stir just until combined.
Alternatives
- Different chocolates: Swap Creme Eggs for caramel-filled chocolates, mini peanut butter cups, or truffles.
- Flavor twists: Add orange zest, instant espresso powder (1 tsp), or cinnamon (1/2 tsp) to the dough.
- Brown butter: For deeper flavor, brown the butter, cool it, then proceed. Expect a slightly nuttier taste.
- Gluten-free: Use a 1:1 gluten-free baking blend.
Check the candy is GF-friendly.
- Bigger batch: Double the recipe and bake in two tins, rotating halfway through for even color.
FAQ
Can I use a mini muffin tin?
Yes, but use mini Creme Eggs only and reduce bake time to 8–10 minutes. Keep an eye on the edges—they’re your best doneness cue.
How do I keep the centers from leaking?
Chill the eggs, fully enclose them in dough, and avoid overbaking. A well-greased tin and a 10-minute rest after baking also help them hold shape.
Do I need to chill the dough?
No, not for this recipe.
The dough is designed to work right away. If your kitchen is very warm, a 15-minute chill can help prevent extra spread.
What if I only have regular Creme Eggs?
Slice them in half lengthwise and use one half per cup, cut-side down. Chill well before cutting for cleaner halves.
Can I make the dough ahead?
Yes.
Store covered in the fridge for up to 48 hours. Let it sit at room temperature for 20–30 minutes before assembling so it’s easier to scoop.
Wrapping Up
Creme Egg Stuffed Cookie Cups are simple to make and wildly satisfying—soft, gooey centers wrapped in a golden cookie shell. With a short ingredient list and a muffin tin, you can whip up a bakery-worthy treat at home.
Keep this one in your back pocket for holidays, bake sales, or whenever you want a guaranteed crowd-pleaser.

Creme Egg Stuffed Cookie Cups - Gooey Centers, Crispy Edges
Ingredients
- 12 mini Creme Eggs (or 6 regular Creme Eggs, halved)
- 1/2 cup (115 g) unsalted butter, melted and slightly cooled
- 1/2 cup (100 g) granulated sugar
- 1/2 cup (110 g) packed light brown sugar
- 1 large egg
- 1 tsp vanilla extract
- 1 2/3 cups (210 g) all-purpose flour
- 1/2 tsp baking soda
- 1/4 tsp fine salt
- 1/2 cup (85 g) chocolate chips (optional but great)
- Nonstick spray or softened butter for the muffin tin
Instructions
- Chill the Creme Eggs: Pop the Creme Eggs in the fridge for 20–30 minutes. Cold centers hold their shape better while baking.
- Prep the oven and tin: Heat oven to 350°F (175°C).Grease a standard 12-cup muffin tin well, including the rims.
- Mix the wet ingredients: In a bowl, whisk melted butter with granulated and brown sugars until smooth. Add egg and vanilla; whisk until glossy.
- Combine the dry: In a separate bowl, stir flour, baking soda, and salt. Fold into the wet mix just until no dry streaks remain.Stir in chocolate chips if using. The dough will be thick.
- Portion the base: Scoop about 1 tablespoon of dough into each muffin cup and press to cover the bottom.
- Add the filling: Unwrap the chilled Creme Eggs. Place one mini egg (or a half regular egg, cut-side down) in the center of each cup.
- Seal the tops: Add another tablespoon of dough over each egg and gently press around the sides to fully enclose the candy.Don’t compact too hard; you want room for spread.
- Bake: Bake 10–13 minutes until the edges look set and lightly golden. The centers will still look soft—that’s perfect.
- Cool briefly: Let them cool in the tin for 10 minutes to firm up. Run a thin knife around the edges, then lift out to a rack.
- Serve: Enjoy warm for a gooey center, or at room temp for a fudgier bite.A pinch of flaky salt on top is a great finish.
Printable Recipe Card
Want just the essential recipe details without scrolling through the article? Get our printable recipe card with just the ingredients and instructions.