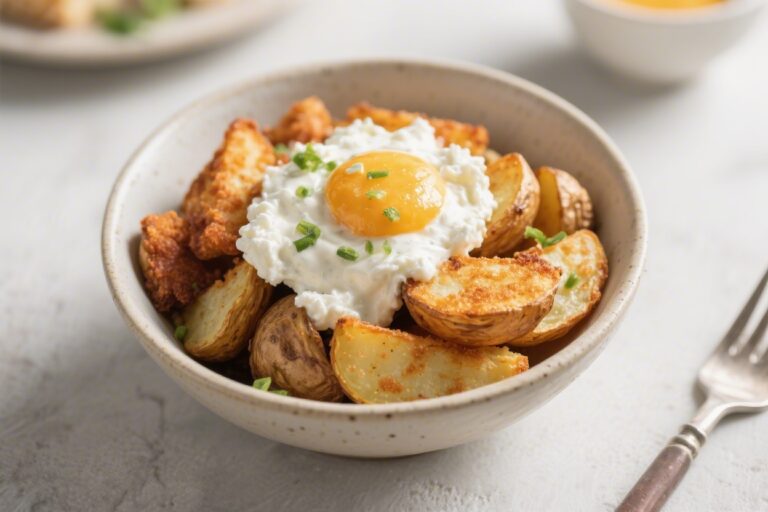
Molten Hot Chocolate Cookies With Marshmallow Centers – Gooey, Cozy, and Easy

These cookies taste like a mug of hot chocolate in dessert form—warm, gooey, and nostalgic. The edges are soft and chewy, while the center hides a melty marshmallow that oozes when you break them open. They’re simple enough for a weeknight treat but special enough for a holiday platter.

If you love hot cocoa, these will be your new favorite cookie to share—or keep for yourself.

Why This Recipe Works

Close-up detail: A freshly baked molten hot chocolate cookie torn open to reveal the gooey, melty ma

These cookies use a mix of cocoa powder and melted chocolate for a deep, hot chocolate flavor. Chilling the dough helps it firm up, so it wraps around the marshmallow without melting too fast. A touch of cornstarch keeps the crumb tender, while brown sugar adds moisture and chew.

The result is a bakery-style cookie with a gooey center and a rich, cozy taste.

Ingredients

  • 1/2 cup (113 g) unsalted butter, melted and slightly cooled
  • 4 oz (115 g) semi-sweet chocolate, chopped or chips
  • 3/4 cup (150 g) brown sugar, packed
  • 1/4 cup (50 g) granulated sugar
  • 1 large egg, room temperature
  • 1 large egg yolk, room temperature
  • 1 1/2 tsp vanilla extract
  • 1 cup (125 g) all-purpose flour
  • 1/3 cup (30 g) unsweetened cocoa powder (natural or Dutch-process)
  • 1 tsp cornstarch
  • 1/2 tsp baking soda
  • 1/2 tsp fine sea salt
  • 12 large marshmallows, halved crosswise (or 24 mini marshmallows)
  • Optional: 1/2 cup mini chocolate chips, flaky salt for finishing

Instructions

Cooking process: Shaped cookie dough balls on parchment-lined baking sheet, each wrapped completely
  1. Melt the chocolate: In a heatproof bowl, microwave the butter and semi-sweet chocolate in 20–30 second bursts, stirring between each, until smooth. Let cool 5 minutes.
  2. Whisk wet ingredients: Add brown sugar, granulated sugar, egg, egg yolk, and vanilla to the chocolate mixture. Whisk until glossy and combined.
  3. Combine dry ingredients: In a separate bowl, whisk flour, cocoa powder, cornstarch, baking soda, and salt.
  4. Make the dough: Stir dry ingredients into wet until just combined.

    Fold in mini chocolate chips if using. The dough will be soft.

  5. Chill: Cover and refrigerate for 45–60 minutes until scoopable but not rock hard. This prevents marshmallows from bursting out.
  6. Prep marshmallows: Halve large marshmallows crosswise.

    Line two baking sheets with parchment and heat oven to 350°F (175°C).

  7. Shape cookies: Scoop about 2 tablespoons of dough (a heaping medium cookie scoop). Flatten into a disc, place a marshmallow half in the center, and wrap dough fully around it, sealing seams well. Place seam-side down on the sheet, spacing 2 inches apart.
  8. Bake: Bake one sheet at a time for 9–11 minutes, until edges are set and tops look slightly crackly.

    Don’t overbake; centers should feel soft.

  9. Finish: Sprinkle with a pinch of flaky salt if you like. Let cookies cool on the sheet for 10 minutes to set before moving to a rack. Serve warm for maximum gooeyness.

Keeping It Fresh

  • Room temperature: Store cooled cookies in an airtight container for 2–3 days.

    The marshmallow stays soft.

  • Reheat: Microwave one cookie for 8–10 seconds to revive the molten center.
  • Freeze baked: Freeze in a single layer, then bag for up to 2 months. Thaw at room temp and warm briefly.
  • Freeze unbaked: Shape and stuff the dough, freeze balls on a tray, then bag. Bake from frozen at 350°F, adding 1–2 minutes.
Final dish top view: Overhead shot of a cozy serving scene with a small stack of finished molten hot

Benefits of This Recipe

  • Big flavor, simple steps: Pantry ingredients create a rich, hot chocolate taste.
  • Show-stopping center: The marshmallow surprise makes them memorable without fancy tools.
  • Make-ahead friendly: Dough chills well and bakes beautifully from frozen.
  • Kid-approved and party-ready: Perfect for cookie swaps, movie nights, or snow days.

Pitfalls to Watch Out For

  • Marshmallow leakage: If seams aren’t sealed, marshmallow can ooze out.

    Pinch dough closed and bake seam-side down.

  • Overbaking: Pull them when edges set but centers look soft. Overbaking dries the cookie and hardens the marshmallow.
  • Dough too warm: If dough gets sticky, chill for 10–15 minutes before shaping.
  • Too little salt: A small amount of salt boosts chocolate flavor. Don’t skip it.

Alternatives

  • Hot cocoa mix twist: Replace 2 tablespoons of cocoa powder with your favorite hot cocoa mix for a nostalgic flavor.
  • Peppermint version: Add 1/2 teaspoon peppermint extract and roll dough balls in crushed candy canes.
  • Dark chocolate lovers: Use 70% chocolate and Dutch-process cocoa for a deeper, less sweet cookie.
  • Mini marshmallows: Use 2 mini marshmallows per cookie if that’s what you have.
  • Gluten-free: Substitute a 1:1 gluten-free flour blend with xanthan gum; bake time may vary by 1–2 minutes.

FAQ

Can I use cocoa powder only and skip the melted chocolate?

Yes, but the flavor and texture won’t be as rich.

If skipping melted chocolate, add 2 more tablespoons butter and an extra tablespoon of cocoa powder, and expect a slightly less fudgy cookie.

Why add an extra egg yolk?

The yolk makes the cookies chewier and richer. It helps mimic that molten brownie texture without making the dough too runny.

My marshmallows keep bursting out. What can I do?

Chill the dough, fully enclose the marshmallow with no gaps, and bake seam-side down.

If your oven runs hot, lower the temperature to 340°F and add a minute.

How do I know they’re done?

The edges will look set and the tops slightly crackly, but the centers should still feel soft when gently touched. They’ll continue to set on the pan as they cool.

Can I make them smaller?

Yes. Use 1 tablespoon of dough and one mini marshmallow.

Bake 7–9 minutes and keep a close eye on them.

In Conclusion

Molten Hot Chocolate Cookies with Marshmallow Centers bring all the comfort of a cozy mug to a handheld treat. They’re rich, gooey, and easy enough for any day of the week. With a few smart tips—chilled dough, sealed seams, and the right bake time—you’ll get perfect results every time.

Make a batch, warm them up, and enjoy the oozy center while it lasts.

Double Chocolate Peppermint Crinkle Cookies – Festive, Fudgy, and Minty

These cookies taste like a winter evening wrapped in a cozy sweater. They’re fudgy in the middle, crisp at the edges, and dusted with a snowy coat of powdered sugar. A touch of peppermint brightens the rich chocolate, making every bite feel festive without being over the top.

If you love classic crinkle cookies, this double chocolate twist with peppermint might become your new holiday favorite.

Why This Recipe Works

Close-up detail: Freshly baked double chocolate peppermint crinkle cookies just out of the oven, sho

Two types of chocolate—cocoa powder and chocolate chips—create deep, brownie-like richness. Oil and brown sugar keep the centers soft and moist, even a day or two after baking. Rolling the dough in granulated sugar first helps the powdered sugar stay bright and snowy. And a measured amount of peppermint extract adds cool flavor without overpowering the chocolate.

Ingredients

  • 1 cup (120 g) all-purpose flour
  • 1/2 cup (45 g) unsweetened cocoa powder (Dutch-process preferred for deeper flavor)
  • 1 teaspoon baking powder
  • 1/4 teaspoon baking soda
  • 1/4 teaspoon fine salt
  • 1/2 cup (100 g) granulated sugar
  • 1/2 cup (110 g) packed brown sugar
  • 1/3 cup (80 ml) neutral oil (canola or vegetable)
  • 2 large eggs, room temperature
  • 1 teaspoon pure vanilla extract
  • 1/2 teaspoon peppermint extract (adjust to taste; see FAQs)
  • 3/4 cup (130 g) semi-sweet chocolate chips or chopped chocolate
  • 1/3 cup (65 g) granulated sugar for rolling
  • 1 cup (120 g) powdered sugar for rolling
  • Optional: 2 tablespoons finely crushed peppermint candies for garnish

Instructions

Cooking process: Chilled dough balls being rolled first in granulated sugar then generously in powde
  1. Whisk the flour, cocoa powder, baking powder, baking soda, and salt in a medium bowl until well combined.
  2. In a large bowl, whisk granulated sugar, brown sugar, and oil until sandy and cohesive.

    Add eggs, one at a time, whisking until smooth. Whisk in vanilla and peppermint extract.

  3. Stir the dry ingredients into the wet just until no dry streaks remain. Fold in the chocolate chips.

    The dough will be thick and sticky.

  4. Cover and chill for at least 1 hour (up to 24 hours). Chilling helps the dough firm up and develop flavor, and it creates better crinkles.
  5. Preheat oven to 350°F (175°C). Line two baking sheets with parchment.
  6. Scoop 1 1/2-tablespoon portions (a small cookie scoop works well).

    Roll each portion into a ball.

  7. Roll each ball in granulated sugar, then generously in powdered sugar, coating all sides.
  8. Arrange on prepared sheets, spacing about 2 inches apart. If using crushed peppermint, sprinkle a tiny pinch on top now.
  9. Bake for 10–12 minutes, until the cookies are puffed, cracked, and just set at the edges. Centers should look slightly soft.
  10. Cool on the sheet for 5 minutes, then transfer to a rack.

    They’ll firm up as they cool but stay fudgy inside.

Keeping It Fresh

Store cooled cookies in an airtight container at room temperature for 3–4 days. To maintain softness, add a slice of bread or a few marshmallows to the container. For longer storage, freeze baked cookies in a single layer, then bag them for up to 2 months.

Thaw at room temperature. You can also freeze scooped, unbaked dough balls for fresh-baked cookies anytime—roll in sugars just before baking.

Tasty top view final presentation: Overhead shot of a plate piled with double chocolate peppermint c

Health Benefits

  • Cocoa provides flavonoids, which have antioxidant properties.
  • Dark or semi-sweet chocolate offers a bit more cocoa content and slightly less sugar than milk chocolate.
  • Portion control is built in—one cookie satisfies a chocolate craving without overdoing it.

These are still a treat, but small tweaks—like using a darker chocolate and keeping portions modest—make them a smarter indulgence.

What Not to Do

  • Don’t skip chilling. Warm dough spreads too much and won’t crinkle nicely.
  • Don’t overbake. If you wait for a dry center, you’ll lose the fudgy texture.
  • Don’t overload the peppermint. Too much extract can taste medicinal.
  • Don’t skimp on the powdered sugar coat. A thin coat melts and looks patchy.
  • Don’t use old baking powder. Stale leavening means fewer cracks and less lift.

Variations You Can Try

  • Mint chocolate chunks: Swap half the chips for chopped peppermint bark.
  • Extra dark: Use all Dutch-process cocoa and 70% chocolate for a bolder taste.
  • Gluten-free: Use a 1:1 gluten-free baking flour blend; chill well before baking.
  • Mocha crinkle: Add 1 teaspoon instant espresso powder with the dry ingredients.
  • White chocolate swirl: Mix in 1/3 cup white chocolate chips for contrast.

FAQ

Can I use peppermint oil instead of extract?

Yes, but it’s much stronger. Use about one-fourth the amount.

Start with 1/8 teaspoon, taste the dough, and adjust carefully.

Why roll in granulated sugar before powdered sugar?

The granulated sugar creates a barrier that helps the powdered sugar stay bright and not melt into the cookie surface during baking.

My cookies didn’t crack. What happened?

Likely reasons are warm dough, old leavening, or overmixing. Make sure the dough is cold, your baking powder is fresh, and you mix just until combined.

Can I reduce the sugar?

You can cut the granulated sugar in the dough by 2–3 tablespoons without major texture issues.

Keep the powdered sugar coating as written for the classic look.

How do I make them chewier?

Use all brown sugar in the dough, bake on the shorter end of the time range, and let them rest on the baking sheet a minute longer before moving to a rack.

Wrapping Up

Double Chocolate Peppermint Crinkle Cookies bring together rich cocoa, melty chocolate, and cool mint in a soft, crinkled package. They’re simple to make, freezer-friendly, and crowd-pleasing. Keep a batch on hand for gifting, sharing, or satisfying that late-night chocolate craving with a festive twist.

Green Citrus Detox Juice With Ginger and Mint – Bright, Zesty, and Refreshing

This juice tastes like a clean slate in a glass. It’s bright, zesty, and a little spicy thanks to fresh ginger. The mint cools everything down and makes each sip extra refreshing.

Whether you’re easing into a healthier routine or just want something that wakes you up, this blend delivers. No fancy techniques, just simple ingredients that work hard.

What Makes This Special

Close-up detail: A chilled glass of green citrus detox juice poured over clinking ice, vivid jade-gr

This juice balances flavor and function. You get the lively tang of citrus, the green power of cucumber and spinach, and the warmth of ginger for a gentle kick.

Mint ties it together with a cool finish. It’s light enough for mornings, yet satisfying after a workout or a heavy meal.

  • Bright flavor: Citrus and mint make it crisp and clean.
  • Easy on the stomach: Cucumber and spinach add hydration without heaviness.
  • Quick to make: Ready in under 10 minutes with a juicer or blender.
  • Customizable: Adjust sweetness, spice, and tartness to your taste.

What You’ll Need

  • 2 medium oranges, peeled
  • 1 large grapefruit, peeled (optional if you prefer less bitterness)
  • 1 lime, peeled
  • 1 large cucumber
  • 2 cups fresh spinach (or kale, stems removed)
  • 1 green apple, cored (for natural sweetness)
  • 1-inch piece fresh ginger, peeled
  • 10–12 fresh mint leaves, plus more for garnish
  • 1/2 cup cold water or coconut water (more if blending)
  • Ice, to serve
  • Pinch of sea salt (optional, to brighten flavor)

Instructions

Cooking process: The blended juice being strained through a fine mesh sieve into a clear pitcher, sh
  1. Prep your produce: Wash everything well. Peel the citrus and ginger.

    Core the apple. Roughly chop large pieces so they fit your juicer or blender.

  2. If using a juicer: Juice cucumber, apple, ginger, and spinach first, then citrus and mint. Stir in water or coconut water to thin if needed.

    Add a small pinch of sea salt.

  3. If using a blender: Add cucumber, citrus segments, apple, spinach, ginger, mint, and water. Blend until very smooth. Strain through a fine mesh sieve or nut milk bag for a cleaner juice, or keep the pulp for extra fiber.
  4. Taste and adjust: For more sweetness, add another half apple.

    For more zing, add extra lime or ginger. Thin with more water if it’s too strong.

  5. Serve cold: Pour over ice and garnish with a sprig of mint. Drink promptly for the best flavor and nutrient quality.

Keeping It Fresh

Fresh juice tastes best right away, but you can store it.

Pour into an airtight bottle, leaving as little air as possible. Refrigerate for up to 24 hours. For longer storage, freeze in portions and thaw overnight in the fridge.

Shake before drinking, as separation is natural.

Tasty top view: Overhead shot of final presentation—two low tumblers filled with the green citrus

Why This Is Good for You

  • Hydration and electrolytes: Cucumber and citrus provide water and potassium to support fluid balance.
  • Vitamin boost: Oranges, grapefruit, and lime deliver vitamin C, which supports immune function and collagen production.
  • Antioxidants: Spinach adds folate, vitamin K, and protective plant compounds.
  • Digestive support: Ginger may help with bloating and nausea, while mint can soothe the stomach.
  • Light on calories, big on flavor: Great for a refreshing reset without feeling deprived.

Pitfalls to Watch Out For

  • Too bitter: Grapefruit and lime pith can add bitterness. Peel cleanly and reduce grapefruit if you’re sensitive to it.
  • Too sweet: Apples add sugar naturally. Use half an apple or skip it if you prefer low-sugar.
  • Overpowering ginger: Start with a small piece and build up.

    It can dominate quickly.

  • Oxidation: Air exposure dulls flavor and color. Store in a tightly sealed container and drink soon.
  • Medication interactions: Grapefruit can interact with certain meds. If unsure, skip the grapefruit or check with your healthcare provider.

Variations You Can Try

  • Green booster: Add celery or parsley for a more herbal profile.
  • Lower sugar: Swap apple for a small kiwi or half a pear, or omit fruit sweeteners entirely.
  • Tropical twist: Use coconut water and add a small chunk of pineapple.
  • Spicy edge: Add a pinch of cayenne or a slice of jalapeño for heat.
  • Fiber-rich: Blend and don’t strain to keep the pulp and fullness factor.
  • Protein add-in: Stir in unflavored collagen or pea protein after blending.

FAQ

Can I make this without a juicer?

Yes.

Blend everything with water until smooth, then strain for a classic juice texture or keep it thick for more fiber.

Is this good for breakfast?

It’s a light, energizing option. If you need more staying power, pair it with yogurt, eggs, or a handful of nuts.

How often can I drink it?

Enjoy it a few times a week as part of a balanced diet. Watch overall fruit intake if you’re tracking sugar.

Can I prep the ingredients ahead?

Absolutely.

Wash and chop produce the night before and store it in the fridge. Juice or blend right before drinking.

What if I don’t like grapefruit?

Use an extra orange or add more lime for brightness without the grapefruit bitterness.

In Conclusion

This Green Citrus Detox Juice with Ginger and Mint is crisp, simple, and refreshing. It’s easy to customize, quick to make, and gentle on the palate.

Keep it cold, tweak it to your taste, and enjoy a bright boost whenever you need a clean, green pick-me-up.

Low-Sugar Peppermint Chocolate Cheesecake – Creamy, Festive, and Balanced

This Low-Sugar Peppermint Chocolate Cheesecake brings cool mint, rich cocoa, and velvety cream cheese together without the sugar overload. It tastes like a holiday dessert, but it’s balanced enough for any time you want something special. The texture is smooth and lush, with a crisp chocolate cookie crust for contrast.

A touch of peppermint makes each bite feel bright and refreshing. It’s simple to make, easy to slice, and always a crowd-pleaser.

What Makes This Recipe So Good

Close-up detail shot: A glossy slice of Low-Sugar Peppermint Chocolate Cheesecake just after the fir
  • Lower sugar, big flavor: Uses a low-glycemic sweetener and dark chocolate for sweetness without the crash.
  • Silky texture: The combination of cream cheese, Greek yogurt, and eggs gives a creamy, stable bake.
  • Balanced mint: Just enough peppermint to be refreshing without tasting like toothpaste.
  • No water bath hassle: A gentle bake and proper cooling help prevent cracks.
  • Make-ahead friendly: Tastes even better the next day after chilling.

Ingredients

  • For the crust:
    • 1 1/2 cups finely crushed chocolate wafer cookies or chocolate almond flour cookies (low-sugar)
    • 3 tablespoons unsalted butter, melted
    • 1 tablespoon granulated low-calorie sweetener (e.g., allulose or erythritol blend)
    • Pinch of salt
  • For the filling:
    • 16 ounces full-fat cream cheese, softened
    • 1/2 cup plain Greek yogurt (2% or full-fat)
    • 2/3 cup granulated low-calorie sweetener (allulose or erythritol/monk fruit blend)
    • 3 large eggs, at room temperature
    • 6 ounces dark chocolate (70–85%), melted and slightly cooled
    • 1/4 cup unsweetened cocoa powder
    • 1 teaspoon pure vanilla extract
    • 1/2 to 3/4 teaspoon peppermint extract (to taste)
    • 1/4 teaspoon fine sea salt
  • For topping (optional):
    • 1/2 cup chilled heavy cream
    • 1 tablespoon powdered low-calorie sweetener
    • Dark chocolate shavings or a light sprinkle of crushed sugar-free peppermint candies

Instructions

Cooking process shot: Overhead view of the baked cheesecake in a 9-inch springform pan right after b
  1. Prep the pan: Heat oven to 325°F (163°C). Line the bottom of a 9-inch springform pan with parchment.

    Lightly grease the sides.

  2. Make the crust: Mix cookie crumbs, melted butter, sweetener, and salt until it looks like damp sand. Press firmly into the bottom of the pan. Bake for 8 minutes, then cool slightly.
  3. Beat the base: In a large bowl, beat cream cheese until smooth, about 1 minute.

    Add sweetener and salt; beat until creamy and no lumps remain.

  4. Add dairy and flavor: Mix in Greek yogurt, vanilla, and peppermint extract. Start with 1/2 teaspoon peppermint, taste, and add more if needed.
  5. Blend in chocolate: Beat in cocoa powder. Pour in melted, cooled dark chocolate and mix until fully combined and silky.
  6. Add eggs: Beat in eggs one at a time on low speed until just incorporated.

    Do not overmix.

  7. Fill and bake: Pour filling over the crust. Tap the pan gently to release bubbles. Bake 45–55 minutes, until edges are set and the center has a slight wobble.
  8. Cool gradually: Turn off the oven, crack the door, and let the cheesecake sit inside for 30 minutes.

    Move to a rack and cool to room temperature.

  9. Chill: Cover and refrigerate at least 6 hours, preferably overnight, for the best texture and clean slices.
  10. Optional topping: Whip heavy cream with powdered sweetener to soft peaks. Spread or pipe on top. Garnish with chocolate shavings or a light sprinkle of sugar-free peppermint pieces.

Storage Instructions

  • Refrigerate: Cover tightly and store for up to 5 days.
  • Freeze: Freeze whole (without whipped cream) or as slices, wrapped well, for up to 2 months.

    Thaw overnight in the fridge.

  • Make-ahead: Best made a day in advance to let flavors meld.
Final presentation top-down shot: Fully chilled and garnished Low-Sugar Peppermint Chocolate Cheesec

Why This is Good for You

  • Lower sugar: Using low-calorie sweeteners reduces overall sugar while keeping sweetness and structure.
  • Dark chocolate benefits: Dark chocolate brings antioxidants and deeper flavor, so you use less sweetener.
  • Protein and satiety: Cream cheese and Greek yogurt add protein and help keep portions satisfying.
  • Controlled portions: The rich texture means a small slice delivers a lot of enjoyment.

Pitfalls to Watch Out For

  • Overbaking: If the center is fully set in the oven, it may turn dry. Look for a slight jiggle.
  • Hot chocolate addition: Add chocolate once cooled to lukewarm to avoid curdling.
  • Too much peppermint: Peppermint extract is strong. Measure carefully and taste the batter.
  • Overmixing eggs: Be gentle to avoid incorporating excess air, which can cause cracks.
  • Crust crumble: Press the crust firmly and pre-bake to help it hold together.

Recipe Variations

  • Gluten-free crust: Use gluten-free chocolate cookies or a mix of almond flour, cocoa powder, butter, and sweetener.
  • No-bake version: Skip eggs, add 1 teaspoon powdered gelatin bloomed in 2 tablespoons warm water to the filling, and chill until set.
  • Mocha mint: Add 1 tablespoon instant espresso powder to the filling for a coffee kick.
  • Mini cheesecakes: Bake in a lined muffin tin for 18–22 minutes for easy portion control.
  • Extra dark: Use 85–90% chocolate and increase sweetener slightly to taste.

FAQ

Can I use regular sugar instead of a low-calorie sweetener?

Yes.

Use the same volume of granulated sugar and powdered sugar for the topping. The cheesecake will no longer be low-sugar but the texture will remain similar.

How do I prevent cracks without a water bath?

Avoid overmixing, bake at a moderate temperature, and don’t overbake. Let it cool gradually in the oven with the door cracked, then chill fully before slicing.

What kind of peppermint extract should I buy?

Look for pure peppermint extract, not mint flavoring.

Pure extract tastes cleaner and you can use less for better results.

Can I make this dairy-free?

You can try dairy-free cream cheese and coconut yogurt, plus coconut cream for the topping. Texture may be slightly softer, so chill longer before serving.

How strong should the peppermint flavor be?

Aim for cool and refreshing, not overpowering. Start with 1/2 teaspoon extract, taste the batter, and add up to 3/4 teaspoon as needed.

Wrapping Up

This Low-Sugar Peppermint Chocolate Cheesecake delivers all the richness you expect with a fresh mint twist and less sugar.

It’s simple to bake, slices cleanly, and tastes even better the next day. Keep the peppermint balanced, avoid overbaking, and you’ll have a standout dessert that feels special without being heavy.

Creamy Roasted Butternut Squash And Sage Soup – Cozy, Flavorful, And Simple

This soup tastes like a warm hug on a cool day. Roasting the squash first brings out deep, caramelized sweetness that blends beautifully with earthy sage and a touch of garlic. The texture is silky, the flavor is rich, and it’s easy enough for a weeknight.

Make it for a comforting lunch, a cozy dinner, or as a starter for a fall gathering.

What Makes This Recipe So Good

Close-up detail: Silky roasted butternut squash and sage soup being blended smooth with an immersion
  • Roasted flavor: Oven-roasting concentrates the squash’s natural sweetness and adds a subtle caramelized edge.
  • Balanced and fragrant: Fresh sage, garlic, and a hint of nutmeg make the soup aromatic without overpowering the squash.
  • Silky texture: Blending with broth and a splash of cream (or coconut milk) creates a velvety finish.
  • Flexible and forgiving: Works with vegetable or chicken broth, dairy or dairy-free options, and different garnishes.
  • Great for make-ahead: Keeps well, freezes beautifully, and reheats like a dream.

Ingredients

  • 1 large butternut squash (about 3 to 3.5 lbs), peeled, seeded, and cubed
  • 2 tablespoons olive oil, plus more for roasting
  • 1 medium yellow onion, chopped
  • 3 garlic cloves, smashed
  • 8–10 fresh sage leaves (plus extra for garnish)
  • 4 cups low-sodium vegetable or chicken broth
  • 1/2 cup heavy cream or full-fat coconut milk
  • 1 tablespoon maple syrup or honey (optional, for balance)
  • 1/4 teaspoon ground nutmeg
  • Salt and freshly ground black pepper, to taste
  • Optional garnishes: crispy sage leaves, toasted pepitas, a swirl of cream, crusty bread

Step-by-Step Instructions

Tasty top view: Overhead shot of a bowl of creamy roasted butternut squash and sage soup with a dram
  1. Preheat and prep: Heat the oven to 425°F (220°C). Line a baking sheet with parchment. Toss the cubed squash with a drizzle of olive oil, salt, and pepper.

    Spread in a single layer.

  2. Roast the squash: Bake for 25–30 minutes, flipping once, until the edges are caramelized and the cubes are tender when pierced.
  3. Sauté aromatics: In a large pot, warm 2 tablespoons olive oil over medium heat. Add onion and a pinch of salt. Cook 5–7 minutes until softened.

    Stir in garlic and sage; cook 1–2 minutes until fragrant.

  4. Combine and simmer: Add the roasted squash to the pot. Pour in the broth and bring to a gentle simmer for 10 minutes to let the flavors meld.
  5. Blend until smooth: Use an immersion blender to purée the soup until silky. Or carefully transfer to a blender in batches and blend until smooth.

    Return to the pot if needed.

  6. Finish the flavor: Stir in cream (or coconut milk), nutmeg, and maple syrup if using. Taste and adjust salt and pepper. If it’s too thick, add a splash of broth; if too thin, simmer a few more minutes.
  7. Garnish and serve: Ladle into bowls and top with a swirl of cream, crispy sage leaves, or toasted pepitas.

    Serve with warm bread.

How to Store

  • Refrigerate: Cool completely, then store in an airtight container for up to 4 days.
  • Freeze: Freeze in portioned containers for up to 3 months. Leave a little headspace for expansion.
  • Reheat: Warm gently on the stove over low heat. Add a splash of broth or water if it thickens in the fridge.
Final dish presentation: Restaurant-quality plating of the soup in a wide, shallow white bowl, ultra

Why This is Good for You

  • Rich in vitamins: Butternut squash is packed with vitamin A, vitamin C, and potassium.
  • Fiber-filled: Helps you feel full and supports digestion.
  • Healthy fats: Olive oil and optional coconut milk add satisfying, heart-healthy fats.
  • Herb benefits: Sage brings antioxidants and a calming, digestive-friendly profile.

Common Mistakes to Avoid

  • Skipping the roast: Boiling the squash alone can lead to flatter flavor.

    Roasting adds depth.

  • Not salting in layers: Season the squash before roasting and the soup as you cook. It builds balanced flavor.
  • Overloading the blender: Blend in batches if using a countertop blender. Hot liquids expand—be careful.
  • Forgetting acidity or sweetness: A tiny splash of maple and the warmth of nutmeg round out the flavor.

    Don’t overdo it, though.

  • Letting it get too thick: Add broth gradually until the texture is luxuriously smooth, not stodgy.

Recipe Variations

  • Dairy-free: Use coconut milk or a creamy oat milk instead of cream.
  • Apple twist: Add 1 peeled, chopped apple to the pot with the onion for a subtle fruity note.
  • Spiced version: Stir in 1/2 teaspoon curry powder or 1/4 teaspoon smoked paprika for warmth.
  • Extra protein: Add a can of drained white beans before blending for a heartier soup.
  • Brown butter finish: Drizzle a spoonful of brown butter over each bowl for nutty richness.

FAQ

Can I use pre-cut squash?

Yes. Pre-cut squash saves time and works well. Choose fresh, firm cubes and roast as directed.

Do I have to peel the squash?

For the best texture, yes.

The peel can be tough and fibrous. A sharp vegetable peeler works quickly.

What can I use instead of sage?

Thyme works beautifully. You can also try a small amount of rosemary, but use less since it’s stronger.

How do I make it thicker or thinner?

For thicker soup, simmer a few extra minutes after blending.

For thinner, add warm broth a little at a time until it’s just right.

Can I make this ahead for guests?

Absolutely. Make it a day or two in advance. Reheat gently and finish with fresh garnishes so it tastes newly made.

Final Thoughts

This creamy roasted butternut squash and sage soup is simple, cozy, and deeply flavorful.

It’s the kind of recipe you’ll come back to all season—easy to adapt, easy to store, and always satisfying. A loaf of crusty bread and a few crisp sage leaves on top make it feel special without extra effort. Enjoy it on a weeknight or serve it proudly at your next gathering.

Cinnamon Apple Baked Oatmeal – Cozy, Make-Ahead Breakfast

This Cinnamon Apple Baked Oatmeal brings all the warm, familiar flavors of apple pie to a simple breakfast. It’s hearty, lightly sweet, and easy to prep on a busy morning. You can bake it once and enjoy slices all week, or serve it warm to a crowd.

The texture lands between oatmeal and a soft, tender cake, which makes it feel special without being fussy. Add a drizzle of maple syrup or a spoon of yogurt, and you’re set.

What Makes This Special

Close-up detail: A just-baked square of Cinnamon Apple Baked Oatmeal on a small ceramic plate, edges
  • Apple pie vibes, breakfast nutrition: Warm cinnamon, soft apples, and toasty oats make it satisfying and nostalgic.
  • Meal-prep friendly: Bake once, reheat for days. It freezes well, too.
  • Flexible: Works with dairy or non-dairy milk, different sweeteners, and your favorite add-ins.
  • No stovetop required: Mix, pour, bake.

    It’s straightforward and low mess.

Ingredients

  • 2 cups old-fashioned rolled oats
  • 1 1/2 cups milk (dairy or unsweetened almond/oat milk)
  • 2 medium apples, peeled if you like, cored, and diced small
  • 2 large eggs (or 2 flax eggs for vegan: 2 tbsp ground flax + 5 tbsp water)
  • 1/3 cup pure maple syrup or honey
  • 2 tbsp melted butter or coconut oil (plus more for greasing)
  • 1 tsp vanilla extract
  • 1 1/2 tsp ground cinnamon
  • 1/4 tsp ground nutmeg (optional)
  • 1 1/2 tsp baking powder
  • 1/4 tsp fine salt
  • 1/2 cup chopped nuts (walnuts or pecans), optional
  • 1/4 cup raisins or dried cranberries, optional

Step-by-Step Instructions

Cooking process: Overhead shot of the baked oatmeal fresh out of the oven in an 8x8-inch parchment-l
  1. Prep the pan: Heat oven to 350°F (175°C). Grease an 8×8-inch or 9×9-inch baking dish.
  2. Mix the dry ingredients: In a large bowl, combine oats, cinnamon, nutmeg, baking powder, salt, and nuts if using.
  3. Whisk the wet ingredients: In another bowl, whisk milk, eggs (or flax eggs), maple syrup, melted butter, and vanilla until smooth.
  4. Add apples: Fold the diced apples and any dried fruit into the wet mixture.
  5. Combine: Pour the wet mixture into the dry and stir until everything is evenly coated. The mixture will look loose; that’s right.
  6. Transfer to the pan: Spread the mixture into the prepared dish.

    Smooth the top.

  7. Bake: Bake for 30–40 minutes, until the center is set and the edges are lightly golden. A toothpick should come out mostly clean.
  8. Cool slightly: Let it rest for 10 minutes before slicing. This helps it firm up.
  9. Serve: Enjoy warm.

    Top with a little yogurt, extra maple syrup, or a sprinkle of cinnamon.

Keeping It Fresh

  • Fridge: Store cooled slices in an airtight container for up to 5 days.
  • Freezer: Wrap individual squares and freeze up to 3 months. Thaw overnight in the fridge.
  • Reheat: Microwave a slice for 45–60 seconds, or warm in a 325°F oven for 10–12 minutes.
Final presentation top view: Tasty top-down breakfast scene with two neatly cut slices of Cinnamon A

Benefits of This Recipe

  • Balanced and filling: Oats bring fiber, apples add natural sweetness, and eggs provide protein.
  • Lowers morning stress: Cook once, eat multiple times. Great for kids and busy schedules.
  • Budget-friendly: Uses pantry staples and seasonal fruit.
  • Customizable: Easy to make gluten-free or dairy-free without losing flavor.

Pitfalls to Watch Out For

  • Too dry: This usually means overbaking.

    Pull it when the center is just set.

  • Gummy texture: Can happen if using quick oats or steel-cut oats. Stick to old-fashioned rolled oats.
  • Soggy apples: Dice apples small and keep the peel thin or remove it for a more uniform texture.
  • Uneven sweetness: If your apples are very tart, taste the batter and add an extra tablespoon of maple syrup.

Alternatives

  • Gluten-free: Use certified gluten-free rolled oats.
  • Vegan: Use flax eggs and plant milk; swap maple syrup for honey if needed.
  • No refined fat: Replace butter with unsweetened applesauce; add a pinch more salt for balance.
  • Extra protein: Stir in 1/2 cup Greek yogurt or a scoop (about 20 g) of unflavored or vanilla protein powder and reduce milk slightly.
  • Flavor twists: Add a pinch of cardamom, swap apples for pears, or sprinkle the top with a cinnamon-sugar mix before baking.

FAQ

Can I use quick oats?

Quick oats will make the bake softer and slightly mushy. For best texture, use old-fashioned rolled oats.

Which apples work best?

Honeycrisp, Pink Lady, or Granny Smith hold their shape and balance sweetness.

Use what you have, but avoid very mealy apples.

Can I assemble it the night before?

Yes. Mix everything, cover, and refrigerate. Bake in the morning, adding 5–10 extra minutes to the cook time.

How do I make it less sweet?

Reduce maple syrup to 1/4 cup and add a splash more milk.

Rely on ripe apples and a topping of yogurt for balance.

Can I double the recipe?

Yes. Use a 9×13-inch pan and bake 5–10 minutes longer, checking for a set center.

What if I don’t have eggs?

Use flax eggs or 1/2 cup unsweetened applesauce. The texture will be a bit softer but still sliceable.

In Conclusion

Cinnamon Apple Baked Oatmeal is cozy, reliable, and easy to make your own.

It turns simple ingredients into a hearty breakfast that keeps well all week. Keep a pan in the fridge, add your favorite toppings, and enjoy a warm, stress-free start to the day.

Keto Gingerbread Mug Cake – Warm, Spiced, and Ready in Minutes

A cozy gingerbread treat in five minutes? Yes, please. This keto mug cake brings all the warm holiday spices without the sugar crash, and it’s perfect for a quick dessert or an afternoon pick-me-up.

The texture is soft and cake-like, with that deep gingerbread flavor you crave. Best of all, it’s made with everyday low-carb ingredients and cooks right in your microwave. No oven, no mess, just a simple, satisfying sweet that tastes like a hug in a mug.

What Makes This Recipe So Good

Close-up detail: A freshly microwaved keto gingerbread mug cake just set and risen above the rim of
  • Fast and easy: Mix everything in one mug and microwave.

    That’s it.

  • Keto-friendly: Low in carbs, high in flavor, and sweetened with a sugar-free sweetener.
  • Classic gingerbread taste: Warm spices like ginger, cinnamon, and nutmeg deliver that nostalgic holiday vibe.
  • Single-serve dessert: Perfect for portion control—no leftovers calling your name.
  • Customizable: Add nuts, chocolate chips, or a dollop of whipped cream without breaking your macros.

Shopping List

  • Almond flour (super-fine)
  • Coconut flour
  • Baking powder (gluten-free)
  • Ground ginger
  • Ground cinnamon
  • Ground nutmeg (or allspice)
  • Salt
  • Granulated erythritol or a keto-friendly sweetener blend
  • Egg (large)
  • Unsweetened almond milk (or another low-carb milk)
  • Unsalted butter (melted) or coconut oil
  • Vanilla extract
  • Blackstrap molasses (optional, 1/4 teaspoon for flavor; see note)
  • Optional toppings: sugar-free whipped cream, a sprinkle of cinnamon, chopped pecans

Step-by-Step Instructions

Tasty top view: Overhead shot of the keto gingerbread mug cake served warm with a generous swirl of
  1. Prep your mug: Use a microwave-safe mug that holds at least 12 ounces. Lightly grease it with butter or oil to prevent sticking.
  2. Mix dry ingredients: Add 3 tablespoons almond flour, 1 teaspoon coconut flour, 1/2 teaspoon baking powder, 1/2 to 3/4 teaspoon ground ginger, 1/2 teaspoon cinnamon, a pinch of nutmeg, a pinch of salt, and 1.5 to 2 tablespoons granulated erythritol. Stir to combine.
  3. Add wet ingredients: Whisk in 1 large egg, 1 tablespoon melted butter, 1 tablespoon unsweetened almond milk, and 1/2 teaspoon vanilla.

    If using, add 1/4 teaspoon blackstrap molasses for classic gingerbread depth.

  4. Stir until smooth: Mix well, scraping the bottom and sides. The batter should be thick but pourable. If it’s too thick, add another teaspoon of almond milk.
  5. Microwave: Cook on high for 60–90 seconds. Start checking at 60 seconds; the cake is done when it’s set on top and springs back lightly.

    Avoid overcooking—it can dry out fast.

  6. Rest: Let it sit for 1 minute. This helps the texture set and stay moist.
  7. Top and enjoy: Add a spoonful of sugar-free whipped cream, a dusting of cinnamon, or chopped nuts. Serve warm.

Keeping It Fresh

If you want to make it ahead, mix the dry ingredients in small jars or zip bags and store them at room temperature for up to two months.

Then just add the wet ingredients when you’re ready to cook.

Cooked mug cake is best fresh, but you can cover and refrigerate leftovers for up to 1 day. Rewarm gently in the microwave for 10–15 seconds. Do not freeze—the texture doesn’t hold up well.

Final dish presentation: Restaurant-quality plated version baked in a ramekin, unmolded onto a small

Benefits of This Recipe

  • Low-carb satisfaction: Curbs dessert cravings without the sugar spike.
  • Built-in portion control: One mug, one serving, minimal temptation.
  • Gluten-free and grain-free: Made with almond and coconut flours.
  • Quick clean-up: One mug, one spoon, and you’re done.

What Not to Do

  • Don’t skip the salt: A pinch enhances the spice and sweetness.
  • Don’t overcook: Even 10 extra seconds can dry it out. Check early.
  • Don’t pack the flours: Spoon and level for accurate measurements.
  • Don’t go heavy on coconut flour: It absorbs lots of liquid.

    Stick to the small amount listed.

  • Don’t use liquid sweeteners only: They can throw off the texture. A granulated keto sweetener works best.

Alternatives

  • Dairy-free: Swap butter for coconut oil and use dairy-free whipped topping.
  • No molasses: Skip it to keep carbs lower. For deeper flavor, add a drop of caramel extract or a pinch more cinnamon.
  • Nut-free: Replace almond flour with 3 tablespoons sunflower seed flour.

    Expect a slight color change.

  • Egg-free: Try a flax egg (1 tablespoon ground flax + 2.5 tablespoons water). Texture will be denser but still tasty.
  • Extra cozy: Add a tiny pinch of cloves or allspice for a stronger gingerbread vibe.
  • Mix-ins: Fold in 1 tablespoon sugar-free chocolate chips or 1 tablespoon chopped pecans before microwaving.

FAQ

Is blackstrap molasses keto?

Strictly speaking, molasses contains sugar. But using just 1/4 teaspoon adds minimal carbs (about 1–1.5g net) and brings classic gingerbread flavor.

It’s optional, so include it only if it fits your macros.

Can I bake this in the oven?

Yes. Pour the batter into a greased ramekin and bake at 350°F (175°C) for 12–15 minutes, or until set in the center.

What sweetener works best?

Granulated erythritol or a monk fruit–erythritol blend gives the best texture. Allulose works too but may make the cake slightly more moist and tender.

Why did my mug cake come out rubbery?

It was likely overcooked or had too much liquid.

Reduce the microwave time by 10–15 seconds and measure your ingredients carefully.

Can I double the recipe?

Make two separate mugs for the best results. A double portion in one mug tends to cook unevenly.

Wrapping Up

This Keto Gingerbread Mug Cake delivers warm spice and comfort in minutes, with simple ingredients and minimal effort. It’s an easy win when you want dessert without derailing your goals.

Keep the dry mix on hand, and you’ll always have a cozy, low-carb treat ready to go. Enjoy it warm with a swirl of whipped cream, and savor every spiced bite.

Healthy Hot Chocolate With Almond Milk – A Cozy, Better-For-You Treat

This hot chocolate is rich, creamy, and comforting—without the heaviness. It’s perfect for a chilly evening, a midday pick-me-up, or a calm moment before bed. You’ll get the classic chocolatey taste with fewer calories and no dairy.

The best part: it comes together in minutes using simple pantry staples. If you’re craving something sweet that still feels nourishing, this is the one.

Why This Recipe Works

Cooking process, close-up detail: Steaming almond milk in a small matte-black saucepan over medium h

This recipe balances indulgence and nutrition. Almond milk keeps it light while still creating a silky texture.

Unsweetened cocoa powder delivers deep chocolate flavor without added sugar. A touch of maple syrup or honey offers natural sweetness you can adjust to taste. A pinch of salt and vanilla rounds out the flavor, so it tastes like a treat, not a compromise.

What You’ll Need

  • 2 cups unsweetened almond milk (barista or extra creamy works best)
  • 2 tablespoons unsweetened cocoa powder (Dutch-processed for smoother flavor, natural for a brighter cocoa taste)
  • 1–2 tablespoons maple syrup or honey (adjust to taste; start with 1 tablespoon)
  • 1/2 teaspoon vanilla extract
  • Pinch of sea salt
  • Optional add-ins: 1–2 teaspoons dark chocolate chips, a pinch of cinnamon, a tiny pinch of cayenne, or a shot of espresso
  • Optional toppings: dairy-free whipped cream, shaved dark chocolate, or a dusting of cocoa

Step-by-Step Instructions

Tasty top view, overhead shot: Overhead shot of a freshly made mug of Healthy Hot Chocolate with Alm
  1. Warm the almond milk. Add the almond milk to a small saucepan over medium heat.

    Heat until steaming but not boiling, stirring occasionally to prevent scorching.

  2. Whisk in cocoa. Add the cocoa powder and whisk vigorously until fully dissolved and smooth. If clumps remain, reduce heat slightly and keep whisking.
  3. Sweeten and season. Stir in the maple syrup or honey, vanilla, and a pinch of salt. Taste and adjust sweetness as needed.
  4. Customize. For a richer cup, add dark chocolate chips and whisk until melted.

    For warmth, add cinnamon; for a subtle kick, add a tiny pinch of cayenne.

  5. Serve hot. Pour into a mug. Top with dairy-free whipped cream or a light dusting of cocoa if you like. Sip while warm.

Storage Instructions

  • Refrigerate: Cool leftovers and store in an airtight jar for up to 3 days.
  • Reheat: Warm on the stove over low heat, whisking to bring back the creamy texture.

    Avoid boiling, which can thin the almond milk and dull the flavor.

  • Shake before reheating: If stored in a jar, give it a good shake to recombine cocoa and sweetener.
Final dish, elevated presentation: Beautifully plated hot chocolate served in a cream-colored stonew

Benefits of This Recipe

  • Lighter than traditional hot chocolate: Almond milk is lower in calories and saturated fat than whole milk or cream.
  • Customizable sweetness: You control the amount and type of sweetener.
  • Antioxidants from cocoa: Unsweetened cocoa provides flavonoids that support heart health.
  • Dairy-free and vegan-friendly: Use maple syrup instead of honey to keep it fully vegan.
  • Quick and simple: Ready in under 10 minutes with basic ingredients.

Common Mistakes to Avoid

  • Overheating the milk: Boiling can make the texture thin and slightly grainy. Keep it just below a simmer.
  • Not whisking enough: Cocoa needs vigorous whisking to fully dissolve and avoid clumps.
  • Adding too much sweetener too soon: Start small. The flavor deepens as it warms, so taste before adding more.
  • Skipping salt: A tiny pinch makes the chocolate taste fuller and more balanced.

Alternatives

  • Milk swaps: Use oat milk for extra creaminess, cashew milk for richness, or soy milk for more protein.
  • Sweetener swaps: Try coconut sugar, date syrup, or a few drops of stevia or monk fruit for a lower-sugar option.
  • Flavor twists: Add peppermint extract for a holiday vibe, orange zest for brightness, or a dash of almond extract for a nutty note.
  • Protein boost: Blend in a scoop of chocolate or vanilla protein powder after heating (off the stove) to prevent curdling.
  • Iced version: Chill, then pour over ice for a refreshing cold chocolate drink.

FAQ

Can I make this without added sugar?

Yes.

Use a few drops of liquid stevia or monk fruit, or skip sweeteners and rely on a small handful of dark chocolate chips for mild sweetness. Taste and adjust.

What cocoa powder works best?

Dutch-processed yields a smoother, less acidic flavor. Natural cocoa is slightly sharper and more intense.

Both work; choose based on your preference.

How do I make it extra creamy?

Use barista-style almond milk, blend briefly with an immersion blender for froth, or whisk in 1 teaspoon of almond butter for body.

Can I microwave this?

Yes. Heat the almond milk in a microwave-safe mug in 30-second bursts until steaming, then whisk in cocoa, sweetener, vanilla, and salt. Microwave another 15–30 seconds if needed.

Is this safe for kids?

Absolutely, though cocoa contains some caffeine.

For young kids, keep portions small or serve earlier in the day.

In Conclusion

Healthy Hot Chocolate with Almond Milk gives you all the cozy comfort of the classic with a lighter, cleaner profile. It’s simple to make, easy to customize, and gentle on your routine. Keep the ingredients on hand, and you’ll always have a quick, soothing treat ready to go.

Cranberry Almond Energy Bites – A Quick, No-Bake Snack

These Cranberry Almond Energy Bites are the kind of snack you actually look forward to. They’re chewy, a little tart, and just sweet enough to hit the spot. You can whisk them together in minutes, no oven required, and keep them on hand for busy mornings or mid-afternoon slumps.

Kids love them, adults love them, and they travel well. Keep a batch in the fridge and you’ll always have a smarter choice than a vending machine.

What Makes This Recipe So Good

Close-up detail: A cluster of finished Cranberry Almond Energy Bites resting on parchment, one bite
  • No-bake and fast: Ready in about 15 minutes with zero cooking.
  • Balanced energy: A mix of fiber, healthy fats, and protein to keep you satisfied.
  • Customizable: Easy to tweak for allergies or different flavor profiles.
  • Simple pantry ingredients: Nothing fancy—just real, accessible foods.
  • Kid- and lunchbox-friendly: They hold their shape and don’t crumble easily.

Shopping List

  • Old-fashioned rolled oats (not instant)
  • Almond butter (or natural peanut butter)
  • Honey or pure maple syrup
  • Chopped dried cranberries (reduced-sugar if preferred)
  • Sliced or slivered almonds
  • Ground flaxseed or chia seeds
  • Vanilla extract
  • Fine sea salt
  • Optional add-ins: mini dark chocolate chips, unsweetened shredded coconut, orange zest, cinnamon

How to Make It

Cooking process: Chilled mixture being scooped and rolled into uniform 1 to 1 1/4 inch balls on a li
  1. Prep the base: In a medium bowl, combine 1 1/2 cups rolled oats, 1/2 cup almond butter, and 1/3 cup honey. Stir until the oats are evenly coated and the mixture starts to clump.
  2. Add flavor and texture: Mix in 1/2 cup chopped dried cranberries, 1/3 cup sliced almonds, 2 tablespoons ground flaxseed (or chia), 1 teaspoon vanilla extract, and a pinch of sea salt.
  3. Adjust consistency: If the mixture feels dry and crumbly, add 1–2 teaspoons more honey or a splash of warm water.

    If it’s too sticky, stir in 1–2 tablespoons more oats.

  4. Chill briefly: Refrigerate the bowl for 10–15 minutes. This makes rolling easier and helps the bites hold their shape.
  5. Roll into bites: Scoop about 1 tablespoon at a time and roll into balls about 1 to 1 1/4 inches in diameter. Lightly damp hands help prevent sticking.
  6. Optional extras: Roll some bites in coconut or add 2 tablespoons mini chocolate chips to the mix for a treat.
  7. Set and store: Place the bites on a lined tray.

    Chill for 20 minutes to firm up before transferring to a container.

How to Store

  • Refrigerator: Keep in an airtight container for up to 2 weeks.
  • Freezer: Freeze on a tray until solid, then transfer to a freezer bag. Store up to 3 months. Thaw at room temp for 10–15 minutes before eating.
  • On the go: Pack in a small container or snack bag.

    They’re fine at room temperature for a day, but keep them cool if it’s very warm out.

Tasty top view: Overhead shot of a final serving—energy bites arranged in a shallow white bowl wit

Benefits of This Recipe

  • Fiber-rich: Oats, cranberries, and flax support digestion and help you feel full.
  • Healthy fats: Almonds and almond butter provide steady, satisfying energy.
  • Naturally sweetened: Honey or maple syrup adds sweetness without refined sugar.
  • Protein boost: Nuts and seeds add a bit of plant-based protein to balance carbs.
  • Meal prep friendly: Make once, snack happily all week.

What Not to Do

  • Don’t use instant oats: They get mushy and won’t hold up as well.
  • Don’t skip the chill time: Rolling is tougher and bites may fall apart.
  • Don’t overdo sticky sweeteners: Too much honey or syrup makes the bites tacky and overly sweet.
  • Don’t pack the mixture too loosely: Press and roll firmly so the bites stay intact.
  • Don’t store uncovered: They will dry out and lose their chewiness.

Recipe Variations

  • Protein-packed: Add 1/4 cup vanilla or unflavored protein powder; increase honey by 1–2 teaspoons if needed to help bind.
  • Citrus cranberry: Add 1 teaspoon fresh orange zest and a pinch of cinnamon.
  • Chocolate almond: Stir in 2 tablespoons mini dark chocolate chips and 1 tablespoon cocoa powder.
  • Nut-free: Use sunflower seed butter and swap almonds for pumpkin seeds.
  • Coconut crunch: Add 1/4 cup unsweetened shredded coconut and a splash of coconut extract.

FAQ

Can I make these vegan?

Yes. Use pure maple syrup instead of honey and stick with dairy-free mix-ins like dark chocolate labeled vegan.

How do I keep them from crumbling?

Make sure the mixture is slightly sticky before rolling, chill it, and press firmly as you shape. If needed, add a teaspoon more honey or a splash of warm water to help bind.

Are quick oats okay?

Quick oats can work in a pinch, but the texture will be softer.

Rolled oats give a better chew and hold.

Can I use fresh cranberries?

No. Fresh cranberries add moisture and will make the bites wet and sour. Dried cranberries are the right choice here.

What’s a serving size?

Usually 1–2 bites, depending on your needs.

Each bite is roughly a couple of good mouthfuls and designed as a small snack.

In Conclusion

Cranberry Almond Energy Bites are the kind of simple recipe that earns a permanent spot in your routine. They’re fast, flexible, and made from ingredients you probably already have. Keep a batch in the fridge for easy snacks, quick breakfasts, or pre-workout fuel.

Once you make them, you’ll wonder how you got by without them.

Winter Citrus Green Detox Juice – Bright, Fresh, and Energizing

Winter mornings can feel heavy, and this juice is a simple way to bring some brightness back. It’s crisp, lightly sweet, and full of zesty citrus that wakes up your taste buds. You don’t need fancy equipment or rare ingredients—just seasonal fruit, fresh greens, and a blender or juicer.

Sip it as a quick breakfast boost or a mid-afternoon reset. It’s refreshing without being too tart, and you’ll feel the difference right away.

What Makes This Recipe So Good

Close-up detail: Vibrant green Winter Citrus Detox Juice being poured through a fine mesh strainer i
  • Seasonal flavor: Winter citrus is at its peak—juicy, sweet, and packed with natural brightness.
  • Balanced taste: The greens are mellowed with orange and grapefruit, plus a hint of ginger for warmth.
  • Hydrating and light: No heaviness, just clean, fresh ingredients that go down easy.
  • Quick to make: Ready in about 10 minutes, start to finish.
  • Customizable: Adjust sweetness, swap greens, or add herbs based on what you like.

Ingredients

  • 2 large oranges, peeled
  • 1 pink grapefruit, peeled (or 2 small if you prefer less bitterness)
  • 1 green apple, cored
  • 2 cups baby spinach or chopped kale (stems removed if using kale)
  • 1 small cucumber, roughly chopped
  • 1 stalk celery (optional, for extra freshness)
  • 1-inch piece fresh ginger, peeled
  • 1/2 lemon, peeled (or juice of 1 lemon)
  • Fresh mint leaves (about 6–8), optional
  • 1/2 to 1 cup cold water or coconut water, as needed
  • Ice, for serving (optional)

How to Make It

Final dish presentation: Two chilled highball glasses of Winter Citrus Green Detox Juice with ice, g
  1. Prep the produce: Peel the citrus, core the apple, and roughly chop everything so it blends easily.
  2. Choose your method: If using a juicer, run all ingredients through it. If using a blender, continue to the next steps.
  3. Blend: Add citrus, apple, greens, cucumber, celery, ginger, lemon, and mint to the blender.

    Pour in 1/2 cup water to start. Blend on high until smooth.

  4. Adjust texture: If it’s too thick, add more water or coconut water. For a silky juice, pour the mixture through a fine mesh strainer or nut milk bag and press to extract the liquid.
  5. Taste and tweak: Add a little extra lemon for brightness, or a drizzle of honey if you want it sweeter.

    A pinch of sea salt can lift the flavors.

  6. Serve cold: Pour over ice or chill for 10–15 minutes. Stir before drinking.

How to Store

  • Refrigerate: Store in an airtight glass jar for up to 24–48 hours. Fill to the top to limit air exposure.
  • Shake before sipping: Natural separation is normal.

    Shake or stir to recombine.

  • Freeze: Pour into ice cube trays and freeze. Blend the cubes with water for a quick refresher later.
Tasty top view: Overhead shot of a finished blender-juiced and strained Winter Citrus Green Detox Ju

Why This is Good for You

  • Vitamin C powerhouse: Oranges, grapefruit, and lemon support your immune system and skin.
  • Hydration and minerals: Cucumber and celery add electrolytes and help you stay hydrated.
  • Green goodness: Spinach or kale provides folate, vitamin K, and gentle fiber.
  • Ginger warmth: Ginger can support digestion and adds a cozy heat in cold weather.
  • Light on sugar, big on flavor: Apple balances the citrus without making it overly sweet.

Pitfalls to Watch Out For

  • Too bitter: Pith from citrus and thick kale stems can add bitterness. Peel citrus well and remove tough stems.
  • Too pulpy: If you prefer a smoother drink, strain the blended mixture.

    No shame in that.

  • Over-diluting: Add water gradually. You want bright flavor, not a watery juice.
  • Skipping the taste test: Citrus sweetness varies. Always taste and adjust lemon, ginger, or sweetness.
  • Medication interactions: Grapefruit can interact with some medications.

    If that applies, swap it out (see Alternatives).

Alternatives

  • No grapefruit: Use extra orange and a splash of lime, or try blood orange for color and sweetness.
  • No apple: Use pear or a few pineapple chunks for a tropical twist.
  • No spinach/kale: Try romaine or a handful of parsley for a gentle green flavor.
  • No ginger: Add fresh turmeric and a pinch of black pepper, or leave it out for a milder juice.
  • Protein boost: Blend in hemp seeds before straining, or pair the juice with yogurt or eggs.

FAQ

Can I make this without a juicer?

Yes. Use a high-speed blender with a bit of water, then strain through a fine mesh sieve or nut milk bag for a smooth juice.

Is it okay to drink this every day?

For most people, yes. Keep portions sensible and balance it with meals that include protein, healthy fats, and fiber.

How do I reduce the sugar?

Skip the apple and use more cucumber and lemon.

You can also add a pinch of salt and extra ginger to keep the flavor bright without sweetness.

What if I don’t like the taste of kale?

Use baby spinach or romaine. They blend into a milder, softer green flavor that’s easy to enjoy.

Can I prep the ingredients ahead?

Absolutely. Wash, peel, and chop everything the night before.

Store in a sealed container in the fridge and blend in the morning.

Final Thoughts

This Winter Citrus Green Detox Juice is simple, bright, and refreshing—perfect for a seasonal reset. It’s easy to tailor to your taste, gentle on the stomach, and quick to make. Keep it flexible, keep it fresh, and let the citrus do the heavy lifting.

One glass can make a cold morning feel a little sunnier.