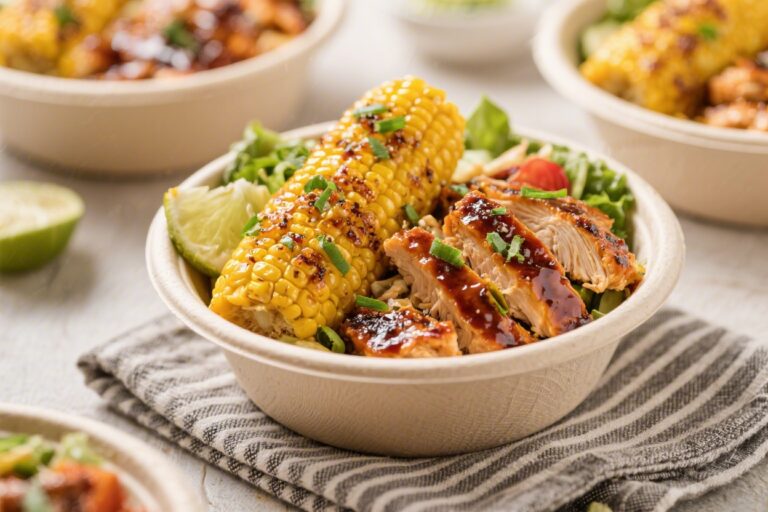
Low-Cal Lemon Herb Chickpea Spring Salad – Bright, Fresh, and Satisfying

This salad brings crisp veggies, creamy chickpeas, and a zesty lemon-herb dressing together in a simple, refreshing bowl. It’s light but filling, with clean flavors that make you feel good after eating. Everything comes together fast, and there’s no cooking required.

It’s perfect for lunch, meal prep, or a quick side that pairs with almost anything. If you like fresh, citrusy flavors with a little crunch, this one’s for you.

Why This Recipe Works

Overhead shot of the prepared Low-Cal Lemon Herb Chickpea Spring Salad mid-toss in a large white cer

This recipe leans on pantry staples and fresh produce for a balance of convenience and brightness. Chickpeas add protein and fiber, so the salad feels substantial without being heavy.

A lemon-forward dressing keeps things lively, while herbs add depth without extra calories. Spring vegetables bring texture and color, making each bite crisp, juicy, and clean.

Ingredients

  • 1 can (15 oz) chickpeas, drained and rinsed
  • 2 cups mixed spring greens or baby spinach
  • 1 cup sliced cucumber
  • 1 cup halved cherry tomatoes
  • 1/2 cup thinly sliced radishes
  • 1/3 cup finely chopped red onion
  • 1/2 cup chopped fresh herbs (mix of parsley, dill, and mint)
  • Zest of 1 lemon
  • Juice of 1 large lemon (about 3–4 tablespoons)
  • 2 tablespoons extra-virgin olive oil
  • 1 teaspoon Dijon mustard
  • 1 small garlic clove, finely grated or minced
  • 1/2 teaspoon honey or maple syrup (optional, for balance)
  • Salt and freshly ground black pepper, to taste
  • Optional toppers: 1 tablespoon toasted seeds (pumpkin or sunflower), red pepper flakes, or shaved Parmesan

Step-by-Step Instructions

Close-up final plating of the salad in a shallow matte stoneware bowl, restaurant-style presentation
  1. Prep the produce: Wash and dry greens. Slice cucumber and radishes, halve the tomatoes, and finely chop the onion and herbs.
  2. Make the dressing: In a small bowl, whisk lemon juice, zest, Dijon, garlic, olive oil, and honey.

    Season with salt and pepper. Taste and adjust acidity or sweetness.

  3. Toss chickpeas: Add chickpeas to a large bowl. Spoon over half the dressing and let them sit for 5 minutes to soak up flavor.
  4. Combine the veggies: Add greens, cucumber, tomatoes, radishes, onion, and herbs to the bowl with chickpeas.
  5. Dress and toss: Pour in the remaining dressing and gently toss until everything is glossy and coated.
  6. Finish and serve: Top with seeds, red pepper flakes, or a few shavings of Parmesan if you like.

    Serve right away or chill for 15 minutes for a crisper bite.

Keeping It Fresh

For meal prep, store the components separately: greens and veggies in one container, chickpeas in another, and dressing in a small jar. Toss right before eating for the best texture. If the salad is already dressed, add a handful of fresh greens before serving to revive it.

It keeps well for up to 2 days in the fridge, but the greens are best on day one.

Benefits of This Recipe

  • Low-calorie, high satiety: Lots of volume from veggies with satisfying fiber and plant protein.
  • Bright flavors without heavy ingredients: Lemon and herbs do the heavy lifting, so you don’t need creamy dressings.
  • Quick and cook-free: Everything comes together in minutes with minimal cleanup.
  • Flexible and seasonal: Swap in whatever crisp spring produce you love or have on hand.

Pitfalls to Watch Out For

  • Overdressing: Too much dressing can weigh down the greens and turn them soggy. Start with less, add more as needed.
  • Skipping the salt: Lemon needs salt for balance. Taste and adjust until the flavors pop.
  • Wet greens: If your greens aren’t well dried, the dressing won’t cling and the salad will taste watery.
  • Too much onion bite: If your onion is sharp, soak slices in cold water for 10 minutes, then drain.

Variations You Can Try

  • Protein boost: Add grilled chicken, tuna, or extra chickpeas.

    For a plant-based upgrade, toss in edamame.

  • Green swap: Use arugula for peppery bite or chopped romaine for extra crunch.
  • Creamy twist: Add a few avocado slices or a spoon of Greek yogurt to the dressing.
  • Crunch factor: Toss in toasted almonds, pistachios, or whole-grain croutons.
  • Herb focus: Go all-in on dill for a deli vibe or mint for a cooling, springy finish.
  • Citrus swap: Try lime and cilantro for a brighter, tangier profile.

FAQ

Can I make this salad ahead of time?

Yes. For best results, store the dressing separately and toss just before serving. If pre-dressed, keep the greens to the side and mix them in last minute.

How can I keep it low-calorie without losing flavor?

Use plenty of fresh herbs, lemon zest, and a touch of Dijon.

These add punch without many calories. Keep the olive oil measured and skip heavy add-ins.

What if I don’t like raw garlic?

Use a smaller amount, or replace it with a pinch of garlic powder. You can also rub the bowl with a cut garlic clove for a softer flavor.

Are canned chickpeas okay?

Absolutely.

Rinse and drain them well to remove excess sodium and improve texture. If you have time, pat them dry for better dressing absorption.

How do I make it gluten-free or vegan?

It’s naturally gluten-free and vegan as written. Just skip Parmesan and check that your mustard is gluten-free if needed.

What can I serve this with?

It pairs well with grilled fish or chicken, a simple frittata, or a grain like quinoa.

It’s also great as a stand-alone lunch.

In Conclusion

This Low-Cal Lemon Herb Chickpea Spring Salad is fresh, fast, and full of flavor. It’s a simple way to eat more vegetables without feeling deprived. Keep it as-is for a light, energizing meal, or customize it with your favorite herbs and crunch.

Either way, it earns a spot in your weekly rotation.

Low-Cal Lemon Herb Chickpea Spring Salad - Bright, Fresh, and Satisfying

Prep Time 15 minutes
Total Time 15 minutes
Servings 4 servings

Ingredients
  

  • 1 can (15 oz) chickpeas, drained and rinsed
  • 2 cups mixed spring greens or baby spinach
  • 1 cup sliced cucumber
  • 1 cup halved cherry tomatoes
  • 1/2 cup thinly sliced radishes
  • 1/3 cup finely chopped red onion
  • 1/2 cup chopped fresh herbs (mix of parsley, dill, and mint)
  • Zest of 1 lemon
  • Juice of 1 large lemon (about 3–4 tablespoons)
  • 2 tablespoons extra-virgin olive oil
  • 1 teaspoon Dijon mustard
  • 1 small garlic clove, finely grated or minced
  • 1/2 teaspoon honey or maple syrup (optional, for balance)
  • Salt and freshly ground black pepper, to taste
  • Optional toppers: 1 tablespoon toasted seeds (pumpkin or sunflower), red pepper flakes, or shaved Parmesan

Instructions
 

  • Prep the produce: Wash and dry greens. Slice cucumber and radishes, halve the tomatoes, and finely chop the onion and herbs.
  • Make the dressing: In a small bowl, whisk lemon juice, zest, Dijon, garlic, olive oil, and honey.Season with salt and pepper. Taste and adjust acidity or sweetness.
  • Toss chickpeas: Add chickpeas to a large bowl. Spoon over half the dressing and let them sit for 5 minutes to soak up flavor.
  • Combine the veggies: Add greens, cucumber, tomatoes, radishes, onion, and herbs to the bowl with chickpeas.
  • Dress and toss: Pour in the remaining dressing and gently toss until everything is glossy and coated.
  • Finish and serve: Top with seeds, red pepper flakes, or a few shavings of Parmesan if you like.Serve right away or chill for 15 minutes for a crisper bite.

High Protein Taco Chicken Meal Prep Bowls (Low Cal & Filling)

These taco chicken bowls are the kind of meal prep you actually look forward to eating. They’re bold, juicy, and loaded with fresh toppings that keep every bite interesting. Each bowl packs serious protein while staying light on calories, so you feel satisfied without the afternoon slump.

Make a batch on Sunday, and lunch is solved for days. It’s simple cooking with big payoff.

What Makes This Special

Cooking process close-up: Bite-size taco-seasoned chicken breast searing in a wide skillet with a gl

These bowls bring taco-night flavor to your weekday routine without the heavy extras. You get tender, well-seasoned chicken, a hearty base, and crisp toppings that hold up well in the fridge.

They’re built for balance and satiety, not just numbers. Plus, everything cooks in one pan and assembles quickly, which makes meal prep painless.

What You’ll Need

  • 1.5 lbs (680 g) boneless skinless chicken breast, cut into bite-size pieces
  • 1 tbsp olive oil (or avocado oil)
  • 2 tbsp taco seasoning (store-bought or homemade)
  • 1 tsp garlic powder
  • 1 tsp onion powder
  • 1/2 tsp kosher salt (adjust to taste)
  • 1/2 tsp black pepper
  • 1 cup salsa (thick, not watery)
  • 1 red bell pepper, diced
  • 1 small red onion, thinly sliced
  • 2 cups cooked cauliflower rice or cooked brown rice/quinoa
  • 1 can (15 oz) black beans, drained and rinsed
  • 1 cup cherry tomatoes, halved
  • 1 cup corn kernels (frozen, canned, or fresh)
  • 1 avocado, sliced (add fresh the day you eat)
  • Fresh cilantro, chopped
  • Lime wedges, for serving
  • Optional toppers: nonfat Greek yogurt, shredded lettuce, sliced jalapeño, hot sauce

Step-by-Step Instructions

Final meal prep overhead: Four neatly arranged high-protein taco chicken bowls in clear meal-prep co
  1. Prep the base: Cook your cauliflower rice or grain of choice. Keep it plain or squeeze in some lime and a pinch of salt for brightness.
  2. Season the chicken: Pat chicken dry.

    Toss with taco seasoning, garlic powder, onion powder, salt, and pepper until evenly coated.

  3. Sauté the veggies: Heat half the oil in a large skillet over medium-high heat. Cook bell pepper and red onion with a pinch of salt for 3–4 minutes until slightly tender. Remove to a plate.
  4. Cook the chicken: Add remaining oil to the skillet.

    Sear chicken in a single layer for 4–5 minutes, flip, and cook another 3–4 minutes until browned and cooked through.

  5. Add salsa: Stir in salsa and simmer 1–2 minutes to glaze the chicken and keep it juicy. Return peppers and onions to the pan and toss.
  6. Assemble bowls: Divide rice/cauliflower rice into 4 meal prep containers. Add chicken mixture, black beans, and corn.

    Top with cherry tomatoes and cilantro.

  7. Finish and store: Let cool slightly before sealing. Add avocado, yogurt, lettuce, and lime the day you plan to eat to keep everything fresh.

Keeping It Fresh

Store bowls in airtight containers for up to 4 days in the fridge. Keep wet toppings separate: avocado, yogurt, salsa extras, and lettuce are best added right before eating.

Reheat the base (rice, chicken, beans, corn) for 60–90 seconds, then top with fresh items. If freezing, store just the chicken and rice for up to 2 months and add fresh toppings after reheating.

Why This is Good for You

  • High protein: Chicken and beans deliver a solid protein hit that keeps you full longer.
  • Lower calorie: Using cauliflower rice and lean chicken cuts calories while keeping volume.
  • Fiber-rich: Beans, corn, and veggies support digestion and steady energy.
  • Nutrient-dense: Tomatoes, peppers, and cilantro add antioxidants and vitamins without extra calories.

Pitfalls to Watch Out For

  • Watery bowls: Thin salsa can make the chicken soupy. Use a thick salsa or simmer a bit longer.
  • Dry chicken: Don’t overcook.

    Bite-size pieces cook fast—pull them as soon as they’re done.

  • Soggy toppings: Keep avocado, lettuce, and yogurt separate until serving.
  • Hidden sodium: Canned beans and store-bought seasoning can be salty. Rinse beans and taste as you go.

Variations You Can Try

  • Swap the protein: Use ground turkey, extra-lean beef, or tofu crumbles with the same seasoning.
  • Different base: Switch to cilantro-lime brown rice, quinoa, or a bed of shredded lettuce for a lighter, no-reheat bowl.
  • Spice level: Add chipotle powder or diced jalapeños for heat, or keep it mild with a creamy yogurt swirl.
  • Veg boost: Toss in zucchini, mushrooms, or shredded cabbage for extra volume and fiber.
  • Dairy-free creamy: Replace yogurt with mashed avocado or a squeeze of lime plus a drizzle of olive oil.

FAQ

How many calories and protein per bowl?

Approximate per bowl with cauliflower rice: 380–450 calories and 35–40g protein, depending on salsa, beans, and toppings. Using brown rice will add calories; using less corn or a lighter salsa reduces them.

Can I make this with rotisserie chicken?

Yes.

Shred the chicken, warm it in the skillet with taco seasoning and a splash of salsa, then assemble as usual. It’s fast and still flavorful.

How do I keep avocado from browning?

Slice it fresh the day you eat. If prepping ahead, toss slices with lime juice and store tightly wrapped with minimal air exposure.

Is this good for weight loss?

It can be.

The bowls are high in protein and fiber, help control hunger, and are easy to portion. Stick with cauliflower rice and measure add-ons like avocado and cheese if you’re tracking calories.

Can I make it vegetarian?

Absolutely. Swap chicken for extra beans or tofu.

Season and sear tofu until crisp, then glaze with salsa just like the chicken.

Wrapping Up

These High Protein Taco Chicken Meal Prep Bowls are simple, satisfying, and built for busy weeks. They’re big on flavor, easy to scale, and flexible with whatever you have on hand. Prep once, enjoy for days, and feel good about what’s in your lunch.

High Protein Taco Chicken Meal Prep Bowls (Low Cal & Filling) - Simple, Flavor-Packed Lunches

Prep Time 15 minutes
Cook Time 20 minutes
Total Time 35 minutes
Servings 4 servings

Ingredients
  

  • 1.5 lbs (680 g) boneless skinless chicken breast, cut into bite-size pieces
  • 1 tbsp olive oil (or avocado oil)
  • 2 tbsp taco seasoning (store-bought or homemade)
  • 1 tsp garlic powder
  • 1 tsp onion powder
  • 1/2 tsp kosher salt (adjust to taste)
  • 1/2 tsp black pepper
  • 1 cup salsa (thick, not watery)
  • 1 red bell pepper, diced
  • 1 small red onion, thinly sliced
  • 2 cups cooked cauliflower rice or cooked brown rice/quinoa
  • 1 can (15 oz) black beans, drained and rinsed
  • 1 cup cherry tomatoes, halved
  • 1 cup corn kernels (frozen, canned, or fresh)
  • 1 avocado, sliced (add fresh the day you eat)
  • Fresh cilantro, chopped
  • Lime wedges, for serving
  • Optional toppers: nonfat Greek yogurt, shredded lettuce, sliced jalapeño, hot sauce

Instructions
 

  • Prep the base: Cook your cauliflower rice or grain of choice. Keep it plain or squeeze in some lime and a pinch of salt for brightness.
  • Season the chicken: Pat chicken dry.Toss with taco seasoning, garlic powder, onion powder, salt, and pepper until evenly coated.
  • Sauté the veggies: Heat half the oil in a large skillet over medium-high heat. Cook bell pepper and red onion with a pinch of salt for 3–4 minutes until slightly tender. Remove to a plate.
  • Cook the chicken: Add remaining oil to the skillet.Sear chicken in a single layer for 4–5 minutes, flip, and cook another 3–4 minutes until browned and cooked through.
  • Add salsa: Stir in salsa and simmer 1–2 minutes to glaze the chicken and keep it juicy. Return peppers and onions to the pan and toss.
  • Assemble bowls: Divide rice/cauliflower rice into 4 meal prep containers. Add chicken mixture, black beans, and corn.Top with cherry tomatoes and cilantro.
  • Finish and store: Let cool slightly before sealing. Add avocado, yogurt, lettuce, and lime the day you plan to eat to keep everything fresh.

Peanut Butter Banana Protein Overnight Oats for Weight Loss

If mornings feel rushed and you still want a breakfast that keeps you full, this recipe is for you. Peanut Butter Banana Protein Overnight Oats are creamy, satisfying, and ready to eat straight from the fridge. You’ll get steady energy, plenty of protein, and a flavor combo that never gets old.

It’s a simple prep, no cooking required, and perfect for busy weekdays. Make it once, enjoy all week.

What Makes This Special

Overhead shot of a chilled jar of Peanut Butter Banana Protein Overnight Oats just opened from the f
  • Balanced macros: Protein, fiber, and healthy fats work together to keep you full and support weight loss.
  • Meal-prep friendly: Mix it up in 5 minutes and breakfast is set for the next day.
  • Steady energy: Oats and banana provide slow-digesting carbs, so no mid-morning crash.
  • Customizable: Adjust sweetness, texture, and protein to fit your goals and taste.

Ingredients

  • 1/2 cup old-fashioned rolled oats
  • 1/2 to 3/4 cup unsweetened almond milk (or milk of choice)
  • 1/2 medium banana, mashed (save a few slices for topping if you like)
  • 1 scoop vanilla or unflavored protein powder (about 20–25 g protein)
  • 1 tablespoon natural peanut butter (or powdered peanut butter for fewer calories)
  • 1 tablespoon chia seeds or ground flaxseed
  • 1/2 teaspoon vanilla extract (optional)
  • Pinch of cinnamon and a small pinch of salt
  • Sweetener to taste: 1–2 teaspoons maple syrup, honey, or a few drops of stevia (optional)

How to Make It

Close-up, shallow depth-of-field process shot of the oats mixture right after stirring in protein an
  1. Mash the banana: In a jar or bowl, mash half a banana until smooth.
  2. Add wet ingredients: Stir in almond milk, vanilla, and sweetener if using.
  3. Mix in protein: Whisk in the protein powder until no lumps remain. Add a splash more milk if it gets too thick.
  4. Add the rest: Stir in oats, chia or flax, cinnamon, and a pinch of salt.
  5. Swirl in peanut butter: Dollop the peanut butter and gently swirl it through the mixture.
  6. Chill: Cover and refrigerate for at least 4 hours, ideally overnight.
  7. Serve: In the morning, stir, adjust thickness with a bit more milk, and top with a few banana slices if desired.

Storage Instructions

  • Refrigerator: Keeps well for 3–4 days in a sealed jar.
  • Batch prep: Make multiple jars at once; add fresh banana slices right before eating for best texture.
  • Do not freeze: The texture of oats and banana doesn’t hold up well once frozen and thawed.

Why This is Good for You

  • Protein supports fullness: Protein powder and peanut butter help reduce cravings and stabilize appetite.
  • Fiber for steady energy: Oats, chia, and banana offer soluble fiber that slows digestion and supports gut health.
  • Healthy fats: Peanut butter and seeds add fats that make the meal more satisfying and keep you fuller longer.
  • Smart calories: It’s nutrient-dense, making it easier to stick to a calorie deficit without feeling deprived.

Pitfalls to Watch Out For

  • Too much sweetener: Banana already adds sweetness; extra sugar can bump calories quickly.
  • Portion creep: A heavy-handed scoop of peanut butter can add 100+ extra calories.

    Measure it.

  • Low-quality protein: Some powders are high in added sugars. Choose a clean protein with minimal extras.
  • Wrong oats: Instant oats can turn mushy; steel-cut won’t soften enough. Use rolled oats for best texture.

Variations You Can Try

  • Lower-calorie swap: Use powdered peanut butter instead of regular to cut fat and calories.
  • Dairy boost: Use Greek yogurt for extra creaminess and protein.

    Replace 1/4 cup of milk with yogurt.

  • Chocolate twist: Add 1 teaspoon cocoa powder or use chocolate protein powder.
  • Crunch factor: Add a sprinkle of cacao nibs or chopped peanuts in the morning.
  • High-fiber upgrade: Add 1–2 tablespoons of psyllium husk or extra chia (add more milk to balance).
  • Plant-based protein: Use pea or soy protein for a vegan option.

FAQ

Can I make this without protein powder?

Yes. Add 1/3 cup Greek yogurt or an extra tablespoon of peanut butter and chia seeds for more protein. It won’t be as high in protein as with a scoop of powder, but it will still be filling.

How many calories are in a serving?

It depends on your exact ingredients, but a typical jar is around 350–450 calories.

Use powdered peanut butter and a zero-calorie sweetener to bring it to the lower end.

Can I eat this warm?

Yes. Heat gently on the stove or in the microwave with a splash of milk, stirring often. Don’t overheat or it can get gluey.

What’s the best protein powder for this?

A whey isolate mixes smoothly and tastes creamy.

For dairy-free, try a pea protein blend. Choose vanilla or unflavored with no or low added sugar.

Can I prep for the whole week?

You can prep up to four days in advance. For days 3–4, add fresh banana slices right before eating to keep them from browning and getting mushy.

Final Thoughts

Peanut Butter Banana Protein Overnight Oats are a practical, tasty way to stay on track with weight loss.

They’re quick to prep, customizable, and keep you comfortably full for hours. Make a few jars on Sunday, and your weekday mornings just got a lot easier—and a lot more satisfying.

Peanut Butter Banana Protein Overnight Oats for Weight Loss - Easy, Filling, and Delicious

Prep Time 5 minutes
Total Time 5 minutes
Servings 2 servings

Ingredients
  

  • 1/2 cup old-fashioned rolled oats
  • 1/2 to 3/4 cup unsweetened almond milk (or milk of choice)
  • 1/2 medium banana, mashed (save a few slices for topping if you like)
  • 1 scoop vanilla or unflavored protein powder (about 20–25 g protein)
  • 1 tablespoon natural peanut butter (or powdered peanut butter for fewer calories)
  • 1 tablespoon chia seeds or ground flaxseed
  • 1/2 teaspoon vanilla extract (optional)
  • Pinch of cinnamon and a small pinch of salt
  • Sweetener to taste: 1–2 teaspoons maple syrup, honey, or a few drops of stevia (optional)

Instructions
 

  • Mash the banana: In a jar or bowl, mash half a banana until smooth.
  • Add wet ingredients: Stir in almond milk, vanilla, and sweetener if using.
  • Mix in protein: Whisk in the protein powder until no lumps remain. Add a splash more milk if it gets too thick.
  • Add the rest: Stir in oats, chia or flax, cinnamon, and a pinch of salt.
  • Swirl in peanut butter: Dollop the peanut butter and gently swirl it through the mixture.
  • Chill: Cover and refrigerate for at least 4 hours, ideally overnight.
  • Serve: In the morning, stir, adjust thickness with a bit more milk, and top with a few banana slices if desired.

Lemon Pepper Chicken Wraps With Yogurt Sauce

Skip the complicated meal prep and make something that tastes fresh, zesty, and satisfying. These lemon pepper chicken wraps come together quickly and deliver big flavor with minimal effort. A tangy yogurt sauce cools the peppery chicken and keeps everything juicy.

Pack them for lunch, serve them for dinner, or slice into halves for game-day snacks. It’s a simple idea that feels special without being fussy.

What Makes This Special

Close-up detail and cooking process: Sliced lemon-pepper chicken just off the skillet, glistening wi

These wraps lean on simple pantry spices and a lemon to create clean, bright flavor. The yogurt sauce is creamy but light, with a hint of garlic and fresh herbs.

You get crunch from crisp veggies, warmth from toasted tortillas, and a lively citrus kick in every bite. Best of all, it’s quick to make and easy to scale for a crowd.

Shopping List

  • Chicken: 1 pound boneless, skinless chicken breasts or thighs
  • Spices: Lemon pepper seasoning, garlic powder, onion powder, paprika, kosher salt
  • Lemon: 1 large (zest and juice)
  • Olive oil: For marinating and cooking
  • Greek yogurt: 3/4 cup (plain, full-fat or 2%)
  • Fresh herbs: Dill and/or parsley
  • Garlic: 1 small clove, finely grated
  • Honey or maple syrup: 1 teaspoon (optional, for balance)
  • Tortillas or wraps: 4 large flour tortillas or whole-wheat wraps
  • Crisp veggies: Romaine or mixed greens, sliced cucumbers, thinly sliced red onion
  • Extras (optional): Tomato slices, avocado, feta, pickled peppers

Step-by-Step Instructions

Final wrap, tasty top view: Overhead shot of two halved lemon pepper chicken wraps, tightly rolled a
  1. Marinate the chicken. In a bowl, combine 2 tablespoons olive oil, 1 tablespoon lemon pepper seasoning, 1/2 teaspoon garlic powder, 1/4 teaspoon onion powder, a pinch of paprika, the zest of half a lemon, and 1 tablespoon lemon juice. Add 1 teaspoon kosher salt if your lemon pepper isn’t salted.

    Toss with the chicken and let it sit 15–30 minutes (or up to 8 hours in the fridge).

  2. Make the yogurt sauce. Stir together Greek yogurt, 1 tablespoon lemon juice, remaining lemon zest, grated garlic, 1–2 tablespoons chopped dill or parsley, a pinch of salt, black pepper, and honey if using. Taste and adjust. You want bright, tangy, and lightly salty.
  3. Cook the chicken. Heat a large skillet over medium-high and add a drizzle of oil.

    Cook the chicken 4–6 minutes per side (thighs may take longer) until nicely browned and cooked through. Internal temp should reach 165°F (74°C).

  4. Rest and slice. Let the chicken rest 5 minutes, then slice thinly or chop into bite-size pieces. Squeeze a little fresh lemon juice over the top for extra pop.
  5. Warm the tortillas. Toast tortillas in a dry skillet 15–30 seconds per side until pliable.

    This prevents cracking and adds flavor.

  6. Assemble the wraps. Spread a generous layer of yogurt sauce down the center. Add greens, cucumbers, and onions. Pile on the chicken and any extras like avocado or feta.
  7. Roll it up. Fold the sides in, then roll tightly from the bottom up.

    Slice in half if you like.

  8. Serve. Add a final sprinkle of lemon pepper or herbs and a wedge of lemon on the side. Enjoy warm or at room temperature.

Keeping It Fresh

Store cooked chicken in an airtight container for up to 4 days. Keep the yogurt sauce separate, covered, for 3–4 days.

Assemble wraps just before eating so the veggies stay crisp. For make-ahead lunches, layer greens first, then chicken, then add sauce when ready to eat to avoid soggy tortillas.

Why This is Good for You

  • Lean protein from chicken supports muscle repair and keeps you full.
  • Greek yogurt adds calcium and probiotics with less saturated fat than mayo-based sauces.
  • Fresh vegetables contribute fiber, hydration, and micronutrients.
  • Balanced meal with protein, carbs, and fats that won’t weigh you down.

Pitfalls to Watch Out For

  • Over-salting: Many lemon pepper blends contain salt. Taste before adding extra.
  • Dry chicken: Don’t overcook.

    Aim for 165°F and let it rest before slicing.

  • Soggy wraps: Add sauce just before eating, and don’t overload wet veggies.
  • Flat flavor: Use both lemon zest and juice for a bright, layered citrus taste.

Alternatives

  • Protein swaps: Use turkey cutlets, shrimp, tofu, or chickpeas. For plant-based, season crispy tofu or roasted chickpeas with lemon pepper and olive oil.
  • Dairy-free sauce: Swap yogurt for a thick dairy-free yogurt or blend tahini with lemon, garlic, and water.
  • Low-carb option: Wrap in large lettuce leaves or low-carb tortillas.
  • Extra crunch: Add shredded cabbage, radishes, or toasted almonds.
  • Heat lovers: Mix a little hot sauce or crushed red pepper into the yogurt.

FAQ

Can I use rotisserie chicken?

Yes. Toss shredded rotisserie chicken with a little olive oil, lemon juice, and lemon pepper to refresh the flavor, then assemble as usual.

What if I don’t have Greek yogurt?

Use regular plain yogurt and strain it through a paper towel or coffee filter for 20–30 minutes to thicken.

Sour cream works in a pinch, too.

Can I grill the chicken?

Absolutely. Grill over medium-high heat 4–6 minutes per side. The slight char pairs nicely with the lemon and pepper.

How do I keep the wrap from tearing?

Warm the tortilla until pliable, don’t overfill, and roll tightly.

A light smear of sauce helps “glue” the wrap closed.

What sides go well with this?

Try a simple cucumber-tomato salad, roasted potatoes, quinoa, or a fruit salad for a fresh finish.

Wrapping Up

These Lemon Pepper Chicken Wraps with Yogurt Sauce check all the boxes: bright flavor, easy prep, and a satisfying, balanced meal. Keep the components on hand for quick lunches or weeknight dinners. Once you make them, you’ll find endless ways to tweak and enjoy them again and again.

Lemon Pepper Chicken Wraps With Yogurt Sauce - Bright, Fresh, and Weeknight-Friendly

Prep Time 15 minutes
Cook Time 20 minutes
Total Time 35 minutes
Servings 4 servings

Ingredients
  

  • Chicken: 1 pound boneless, skinless chicken breasts or thighs
  • Spices: Lemon pepper seasoning, garlic powder, onion powder, paprika, kosher salt
  • Lemon: 1 large (zest and juice)
  • Olive oil: For marinating and cooking
  • Greek yogurt: 3/4 cup (plain, full-fat or 2%)
  • Fresh herbs: Dill and/or parsley
  • Garlic: 1 small clove, finely grated
  • Honey or maple syrup: 1 teaspoon (optional, for balance)
  • Tortillas or wraps: 4 large flour tortillas or whole-wheat wraps
  • Crisp veggies: Romaine or mixed greens, sliced cucumbers, thinly sliced red onion
  • Extras (optional): Tomato slices, avocado, feta, pickled peppers

Instructions
 

  • Marinate the chicken. In a bowl, combine 2 tablespoons olive oil, 1 tablespoon lemon pepper seasoning, 1/2 teaspoon garlic powder, 1/4 teaspoon onion powder, a pinch of paprika, the zest of half a lemon, and 1 tablespoon lemon juice. Add 1 teaspoon kosher salt if your lemon pepper isn’t salted.Toss with the chicken and let it sit 15–30 minutes (or up to 8 hours in the fridge).
  • Make the yogurt sauce. Stir together Greek yogurt, 1 tablespoon lemon juice, remaining lemon zest, grated garlic, 1–2 tablespoons chopped dill or parsley, a pinch of salt, black pepper, and honey if using. Taste and adjust. You want bright, tangy, and lightly salty.
  • Cook the chicken. Heat a large skillet over medium-high and add a drizzle of oil.Cook the chicken 4–6 minutes per side (thighs may take longer) until nicely browned and cooked through. Internal temp should reach 165°F (74°C).
  • Rest and slice. Let the chicken rest 5 minutes, then slice thinly or chop into bite-size pieces. Squeeze a little fresh lemon juice over the top for extra pop.
  • Warm the tortillas. Toast tortillas in a dry skillet 15–30 seconds per side until pliable.This prevents cracking and adds flavor.
  • Assemble the wraps. Spread a generous layer of yogurt sauce down the center. Add greens, cucumbers, and onions. Pile on the chicken and any extras like avocado or feta.
  • Roll it up. Fold the sides in, then roll tightly from the bottom up.Slice in half if you like.
  • Serve. Add a final sprinkle of lemon pepper or herbs and a wedge of lemon on the side. Enjoy warm or at room temperature.

High Protein Honey Garlic Chicken Meal Prep Bowls – Easy, Flavorful, and Filling

Weekdays feel smoother when your meals are already handled, and these High Protein Honey Garlic Chicken Meal Prep Bowls make that easy. They’re simple to cook, big on flavor, and designed to help you hit your protein goals without fuss. Juicy chicken, garlicky-sweet sauce, and a balanced base keep you full and happy.

Make a batch on Sunday and you’re set for days of satisfying lunches or dinners.

Why This Recipe Works

Close-up cooking process: Bite-size chicken breast pieces sizzling in a large skillet as the honey-g
  • High protein, low hassle: Lean chicken breast packs serious protein with minimal prep.
  • Balanced bowl: A base of rice or quinoa plus veggies gives steady energy and fiber.
  • Big flavor, basic ingredients: Honey, garlic, and soy make a glossy, sticky sauce that tastes like takeout without the mystery.
  • Meal prep friendly: The sauce reheats well, and the texture stays tender for several days.
  • Customizable: Swap grains, veggies, or even the protein to fit your preferences.

What You’ll Need

  • Chicken: 2 pounds boneless, skinless chicken breasts (or thighs for extra juiciness)
  • Honey garlic sauce:
    • 1/3 cup honey
    • 1/4 cup low-sodium soy sauce (or tamari/coconut aminos)
    • 4 cloves garlic, minced
    • 1 tablespoon rice vinegar or apple cider vinegar
    • 1 tablespoon sesame oil (optional but flavorful)
    • 1–2 teaspoons sriracha or red pepper flakes (optional for heat)
    • 1 tablespoon cornstarch mixed with 2 tablespoons water (slurry)
  • Grain base: 3 cups cooked brown rice or quinoa
  • Veggies: 3 cups broccoli florets, 1 red bell pepper (sliced), 1 cup shredded carrots
  • Toppings: 2 green onions (sliced), sesame seeds, lime wedges (optional)
  • Cooking oil: 1–2 tablespoons olive or avocado oil
  • Salt and pepper: To taste

How to Make It

Tasty top view final meal prep: Overhead shot of neatly arranged honey garlic chicken meal prep bowl
  1. Prep the base: Cook brown rice or quinoa according to package directions. Fluff and set aside.
  2. Chop the chicken: Cut chicken into bite-size pieces. Pat dry and season lightly with salt and pepper.
  3. Steam or roast veggies: Steam broccoli until crisp-tender (about 4–5 minutes) or roast at 425°F/220°C for 12–15 minutes.

    Keep peppers and carrots crisp for texture.

  4. Make the sauce: In a bowl, whisk honey, soy sauce, garlic, vinegar, sesame oil, and sriracha if using. Set the cornstarch slurry aside.
  5. Sear the chicken: Heat oil in a large skillet over medium-high. Add chicken in a single layer.

    Cook 5–7 minutes, stirring occasionally, until browned and cooked through.

  6. Glaze it: Pour the sauce into the skillet. Once it simmers, stir in the slurry. Cook 1–2 minutes until the sauce turns glossy and clings to the chicken.
  7. Assemble bowls: Divide grains into 4–5 meal prep containers.

    Add chicken and sauce, then the veggies. Top with green onions and sesame seeds.

  8. Finish: Let everything cool slightly before sealing. Add lime wedges if you like a bright finish.

How to Store

  • Refrigerator: Store in airtight containers for up to 4 days.
  • Freezer: Freeze for up to 2 months.

    For best texture, freeze the veggies separately or use roasted veggies.

  • Reheating: Microwave 1.5–3 minutes, stirring halfway. Add a splash of water to loosen the sauce if needed.
  • On-the-go tip: Pack the lime wedge and sesame seeds separately to add after reheating.

Why This is Good for You

  • Protein-forward: Chicken breast supports muscle repair and satiety without a lot of calories.
  • Smart carbs: Brown rice or quinoa adds fiber for steady energy.
  • Micronutrients: Broccoli, bell pepper, and carrots bring vitamins A, C, and antioxidants.
  • Balanced plate: Protein + complex carbs + colorful veggies make a well-rounded meal.

What Not to Do

  • Don’t overcrowd the pan: Crowding steams the chicken and prevents browning.
  • Don’t skip the slurry: Without it, the sauce won’t cling and will feel watery.
  • Don’t overcook the chicken: Dry chicken ruins the texture. Pull it as soon as it’s cooked through.
  • Don’t pack containers while hot: Trapped steam makes everything soggy and can affect food safety.

Variations You Can Try

  • Swap the grain: Try cauliflower rice for lower carbs or farro for a nutty bite.
  • Change the protein: Use turkey breast, tofu, or shrimp.

    Adjust cooking time as needed.

  • Go spicy: Add extra sriracha, chili crisp, or a pinch of cayenne.
  • Extra veg: Snap peas, zucchini, or edamame work well and reheat nicely.
  • Citrus twist: Stir in orange zest or a squeeze of lime to brighten the sauce.
  • Lower sugar: Cut honey to 3 tablespoons and add more garlic and vinegar for balance.

FAQ

How much protein is in each bowl?

With chicken breast, each bowl typically has around 35–45 grams of protein, depending on portion size and the number of servings.

Can I use frozen chicken?

Yes, but thaw it fully and pat it very dry before cooking so it sears properly and doesn’t water down the sauce.

Is there a gluten-free option?

Use tamari or coconut aminos in place of soy sauce and pair with rice or quinoa. Everything else is naturally gluten-free.

How do I keep the veggies crisp?

Cook them just until crisp-tender and store them separate from the sauce if you’re picky about texture. Add them after reheating the chicken and grains.

Can I make the sauce ahead?

Yes.

Mix the sauce (without the slurry) up to 5 days in advance. Add the cornstarch slurry when you’re ready to cook.

Final Thoughts

These High Protein Honey Garlic Chicken Meal Prep Bowls are everything you want from a weekday meal: fast, tasty, and reliable. They hit the protein target, pack in veggies, and keep well in the fridge.

Make a batch once, eat well for days, and enjoy the peace of having great food ready when you need it.

High Protein Honey Garlic Chicken Meal Prep Bowls - Easy, Flavorful, and Filling

Prep Time 15 minutes
Cook Time 20 minutes
Total Time 35 minutes
Servings 4 servings

Ingredients
  

  • Chicken: 2 pounds boneless, skinless chicken breasts (or thighs for extra juiciness)
  • Honey garlic sauce: 1/3 cup honey
  • 1/4 cup low-sodium soy sauce (or tamari/coconut aminos)
  • 4 cloves garlic, minced
  • 1 tablespoon rice vinegar or apple cider vinegar
  • 1 tablespoon sesame oil (optional but flavorful)
  • 1–2 teaspoons sriracha or red pepper flakes (optional for heat)
  • 1 tablespoon cornstarch mixed with 2 tablespoons water (slurry)
  • Grain base: 3 cups cooked brown rice or quinoa
  • Veggies: 3 cups broccoli florets, 1 red bell pepper (sliced), 1 cup shredded carrots
  • Toppings: 2 green onions (sliced), sesame seeds, lime wedges (optional)
  • Cooking oil: 1–2 tablespoons olive or avocado oil
  • Salt and pepper: To taste

Instructions
 

  • Prep the base: Cook brown rice or quinoa according to package directions. Fluff and set aside.
  • Chop the chicken: Cut chicken into bite-size pieces. Pat dry and season lightly with salt and pepper.
  • Steam or roast veggies: Steam broccoli until crisp-tender (about 4–5 minutes) or roast at 425°F/220°C for 12–15 minutes.Keep peppers and carrots crisp for texture.
  • Make the sauce: In a bowl, whisk honey, soy sauce, garlic, vinegar, sesame oil, and sriracha if using. Set the cornstarch slurry aside.
  • Sear the chicken: Heat oil in a large skillet over medium-high. Add chicken in a single layer.Cook 5–7 minutes, stirring occasionally, until browned and cooked through.
  • Glaze it: Pour the sauce into the skillet. Once it simmers, stir in the slurry. Cook 1–2 minutes until the sauce turns glossy and clings to the chicken.
  • Assemble bowls: Divide grains into 4–5 meal prep containers.Add chicken and sauce, then the veggies. Top with green onions and sesame seeds.
  • Finish: Let everything cool slightly before sealing. Add lime wedges if you like a bright finish.

High Protein Greek Chicken Rice Bowls (Perfect for the Week)

These Greek chicken rice bowls are everything you want in a weekday meal: fast, flavorful, and satisfying. You get juicy marinated chicken, fluffy rice, crisp veggies, and a cool, tangy yogurt sauce in every bite. It’s the kind of meal you can prep once and enjoy for days without getting bored.

Think takeout energy, but fresher and cheaper. If you like balanced, bold flavors with minimal fuss, this is your kind of bowl.

Why This Recipe Works

Cooking process, skillet sear: Close-up of golden-browned Greek yogurt–marinated chicken cutlets s
  • High protein, high satisfaction: Greek yogurt and chicken breast team up for a protein-packed meal that actually keeps you full.
  • Bright, bold flavors: Lemon, garlic, and herbs bring a classic Greek vibe without complicated techniques.
  • Meal prep friendly: The components hold up well in the fridge and reheat beautifully.
  • Flexible base: Swap rice, use different veggies, or add extras like olives or feta without losing the core flavor.

Shopping List

  • Chicken: 1.5–2 lbs boneless, skinless chicken breasts (or thighs)
  • Marinade: 1/2 cup plain Greek yogurt, 3 tbsp olive oil, 3 cloves garlic (minced), juice and zest of 1 lemon, 1.5 tsp dried oregano, 1 tsp ground cumin, 1 tsp kosher salt, 1/2 tsp black pepper
  • Rice: 2 cups uncooked rice (basmati, jasmine, or brown), 1 bay leaf, pinch of salt
  • Toppings: 1 cucumber (diced), 1 pint cherry tomatoes (halved), 1/2 small red onion (thinly sliced), 1 red bell pepper (diced), 1/2 cup Kalamata olives (pitted, sliced), 1/3 cup crumbled feta, fresh parsley or dill
  • Tzatziki-style sauce: 1 cup plain Greek yogurt, 1/2 cucumber (grated and squeezed dry), 1 tbsp olive oil, 1 tbsp lemon juice, 1 small garlic clove (grated), pinch of salt and pepper
  • Optional add-ins: Cooked chickpeas, pepperoncini, avocado, or pickled red onions

Step-by-Step Instructions

Final plated bowl, overhead: Overhead shot of a vibrant Greek chicken rice bowl: fluffy basmati rice
  1. Cook the rice: Rinse rice until water runs clear. Cook according to package directions with a bay leaf and a pinch of salt.

    Fluff and let it cool slightly.

  2. Make the marinade: In a bowl, whisk Greek yogurt, olive oil, garlic, lemon juice and zest, oregano, cumin, salt, and pepper.
  3. Prep the chicken: Slice chicken breasts into cutlets or bite-size pieces for faster cooking. Toss in the marinade. Let it sit at least 20 minutes, or up to 12 hours in the fridge.
  4. Make the sauce: Stir together Greek yogurt, grated cucumber (squeezed dry), olive oil, lemon juice, garlic, salt, and pepper.

    Chill until serving.

  5. Prep the vegetables: Dice cucumber and pepper, slice onions, halve tomatoes, and chop herbs. Keep them chilled and separate for meal prep.
  6. Cook the chicken: Heat a large skillet over medium-high. Add a light drizzle of oil.

    Shake excess marinade off the chicken and sear in batches 3–5 minutes per side until browned and cooked through. Rest 5 minutes, then slice if needed.

  7. Assemble the bowls: Add a scoop of rice, then chicken, veggies, olives, and feta. Spoon on the yogurt sauce.

    Finish with fresh herbs and a squeeze of lemon.

  8. For meal prep: Portion rice and chicken into containers. Keep fresh veggies and sauce separate until serving for best texture.

Storage Instructions

  • Cooked chicken: Refrigerate in an airtight container for up to 4 days. Reheat gently in a skillet or microwave.
  • Cooked rice: Store up to 4 days.

    Sprinkle with a little water before reheating to keep it fluffy.

  • Veggies: Keep separate and dry. Store 3–4 days for best crunch.
  • Yogurt sauce: Refrigerate up to 4 days. Stir before using.
  • Freezing: Freeze chicken and rice (no veggies or sauce) up to 2 months.

    Thaw overnight in the fridge.

Why This is Good for You

  • High-quality protein: Chicken and Greek yogurt support muscle recovery and keep you full.
  • Fiber and micronutrients: Veggies add fiber, vitamin C, potassium, and antioxidants.
  • Balanced macros: Carbs from rice, protein from chicken, and healthy fats from olive oil make a complete meal.
  • Lighter sauce: Yogurt-based dressing delivers creaminess without heavy calories.

What Not to Do

  • Don’t skip the marinade time: Even 20 minutes makes the chicken more tender and flavorful.
  • Don’t crowd the pan: Overcrowding steams the chicken and kills the sear. Cook in batches.
  • Don’t add wet cucumbers to the sauce: Squeeze them dry to avoid a watery tzatziki.
  • Don’t store sauce on the rice: Keep it separate until serving to prevent soggy bowls.

Variations You Can Try

  • Grain swap: Use quinoa, farro, cauliflower rice, or a mix of brown and wild rice.
  • Protein twist: Try turkey, shrimp, tofu, tempeh, or falafel. Use the same marinade for tofu (press it first).
  • Add hummus: A spoonful adds extra protein and creaminess.
  • Spice it up: Add a pinch of red pepper flakes or smoked paprika to the marinade.
  • Make it dairy-free: Use coconut yogurt for the marinade and sauce; skip the feta or use a dairy-free version.

FAQ

Can I use rotisserie chicken?

Yes.

Warm it briefly with a splash of lemon and a pinch of oregano to echo the marinade flavors. It won’t be as tender as marinated chicken, but it’s fast and tasty.

Do I have to use Greek yogurt?

Greek yogurt is best for thickness and protein. If using regular yogurt, strain it first, or expect a thinner marinade and sauce.

What rice works best?

Basmati or jasmine gives a fluffy texture.

Brown rice adds more fiber and holds up well for meal prep. Cauliflower rice works if you want a lower-carb option.

How do I keep red onion from being too sharp?

Slice it thin and soak in cold water with a splash of vinegar for 10 minutes. Drain and pat dry for a milder bite.

Can I grill the chicken?

Absolutely.

Grill over medium-high heat 4–6 minutes per side, depending on thickness, until it reaches 165°F. Rest before slicing.

How many servings does this make?

About 4–6 bowls, depending on appetite and how heavily you load the toppings.

Final Thoughts

These Greek chicken rice bowls hit the sweet spot between healthy and craveable. They’re quick to make, easy to customize, and perfect for meal prep.

Keep the rice and chicken ready to go, pile on fresh toppings, and finish with that cool yogurt sauce. Lunch or dinner all week just got a lot simpler—and a lot tastier.

High Protein Greek Chicken Rice Bowls (Perfect for the Week) - Easy, Fresh, and Filling

Prep Time 15 minutes
Cook Time 20 minutes
Total Time 35 minutes
Servings 4 servings

Ingredients
  

  • Chicken: 1.5–2 lbs boneless, skinless chicken breasts (or thighs)
  • Marinade: 1/2 cup plain Greek yogurt, 3 tbsp olive oil, 3 cloves garlic (minced), juice and zest of 1 lemon, 1.5 tsp dried oregano, 1 tsp ground cumin, 1 tsp kosher salt, 1/2 tsp black pepper
  • Rice: 2 cups uncooked rice (basmati, jasmine, or brown), 1 bay leaf, pinch of salt
  • Toppings: 1 cucumber (diced), 1 pint cherry tomatoes (halved), 1/2 small red onion (thinly sliced), 1 red bell pepper (diced), 1/2 cup Kalamata olives (pitted, sliced), 1/3 cup crumbled feta, fresh parsley or dill
  • Tzatziki-style sauce: 1 cup plain Greek yogurt, 1/2 cucumber (grated and squeezed dry), 1 tbsp olive oil, 1 tbsp lemon juice, 1 small garlic clove (grated), pinch of salt and pepper
  • Optional add-ins: Cooked chickpeas, pepperoncini, avocado, or pickled red onions

Instructions
 

  • Cook the rice: Rinse rice until water runs clear. Cook according to package directions with a bay leaf and a pinch of salt.Fluff and let it cool slightly.
  • Make the marinade: In a bowl, whisk Greek yogurt, olive oil, garlic, lemon juice and zest, oregano, cumin, salt, and pepper.
  • Prep the chicken: Slice chicken breasts into cutlets or bite-size pieces for faster cooking. Toss in the marinade. Let it sit at least 20 minutes, or up to 12 hours in the fridge.
  • Make the sauce: Stir together Greek yogurt, grated cucumber (squeezed dry), olive oil, lemon juice, garlic, salt, and pepper.Chill until serving.
  • Prep the vegetables: Dice cucumber and pepper, slice onions, halve tomatoes, and chop herbs. Keep them chilled and separate for meal prep.
  • Cook the chicken: Heat a large skillet over medium-high. Add a light drizzle of oil.Shake excess marinade off the chicken and sear in batches 3–5 minutes per side until browned and cooked through. Rest 5 minutes, then slice if needed.
  • Assemble the bowls: Add a scoop of rice, then chicken, veggies, olives, and feta. Spoon on the yogurt sauce.Finish with fresh herbs and a squeeze of lemon.
  • For meal prep: Portion rice and chicken into containers. Keep fresh veggies and sauce separate until serving for best texture.

Lemon Dill Yogurt Chicken Salad (Light, Creamy & Meal-Prep Friendly)

This Lemon Dill Yogurt Chicken Salad is bright, creamy, and surprisingly light. It delivers all the comfort of classic chicken salad without the heaviness. Greek yogurt keeps it silky while lemon and dill bring a fresh pop of flavor.

It’s easy to prep ahead, packs well for lunch, and tastes even better the next day. Serve it on toast, in lettuce cups, or stuffed into a pita for a quick, satisfying meal.

Why This Recipe Works

Overhead shot of Lemon Dill Yogurt Chicken Salad being mixed in a large white bowl during the “fol
  • Greek yogurt replaces mayo for a lighter, protein-packed base that’s still creamy.
  • Lemon and dill add brightness that balances the richness of the chicken and yogurt.
  • Crunchy add-ins like celery and red onion give every bite texture and freshness.
  • Flexible prep: use rotisserie chicken, leftover grilled chicken, or poached breasts.
  • Meal-prep friendly: keeps well for days and holds up in sandwiches or bowls.

What You’ll Need

  • 3 cups cooked chicken, chopped or shredded (breast or a mix)
  • 3/4 cup plain Greek yogurt (2% or whole milk for extra creaminess)
  • 2 tablespoons mayonnaise (optional, for classic flavor and silkier texture)
  • 2 tablespoons fresh lemon juice
  • 1 teaspoon lemon zest
  • 2 tablespoons fresh dill, finely chopped (or 2 teaspoons dried)
  • 1 rib celery, finely chopped
  • 1/4 cup red onion, finely minced (or use scallions for milder flavor)
  • 1 teaspoon Dijon mustard
  • 1/2 teaspoon garlic powder
  • 1/2 teaspoon kosher salt, plus more to taste
  • 1/4 teaspoon black pepper
  • Optional add-ins: 1/3 cup diced cucumber, 1/3 cup halved grapes, 2 tablespoons capers, or 1/4 cup toasted sliced almonds
  • To serve: romaine or butter lettuce, whole-grain bread, pitas, or crackers

Step-by-Step Instructions

Final plated presentation of the Lemon Dill Yogurt Chicken Salad stuffed into warm whole-wheat pitas
  1. Make the dressing: In a large bowl, whisk the Greek yogurt, mayonnaise (if using), lemon juice, lemon zest, Dijon, garlic powder, salt, and pepper until smooth.
  2. Add herbs and veggies: Stir in the dill, celery, and red onion. If using cucumber or capers, add them now.
  3. Fold in the chicken: Add the chopped or shredded chicken and gently mix until everything is evenly coated.

    Avoid overmixing to keep the texture light.

  4. Taste and adjust: Add extra salt, pepper, or lemon to taste. If it’s too thick, loosen with a splash of water or a bit more lemon juice.
  5. Chill (optional but recommended): Cover and refrigerate for 20–30 minutes to let the flavors meld.
  6. Serve your way: Spoon into lettuce cups, pile onto toasted bread, tuck into a pita, or serve with crackers and sliced veggies.

Storage Instructions

  • Refrigeration: Store in an airtight container for 3–4 days.
  • Keep it fresh: Stir before serving. Add a squeeze of lemon if flavors dull over time.
  • Avoid sogginess: If adding cucumbers or grapes, mix them in just before serving for best texture.
  • Do not freeze: The yogurt base will separate and turn grainy after thawing.

Why This is Good for You

  • High in protein: Chicken and Greek yogurt provide sustained energy and satiety.
  • Lighter fats: Using yogurt reduces saturated fat compared to full-mayo salads.
  • Fresh herbs and citrus: Dill and lemon add flavor without excess calories or sodium.
  • Balanced meal: Pair with whole grains and greens for fiber, vitamins, and minerals.

Pitfalls to Watch Out For

  • Over-salting: Taste after chilling—the flavors intensify slightly in the fridge.
  • Watery salad: If using cucumbers, deseed and pat dry.

    Don’t add warm chicken to the dressing.

  • Too tangy: If the yogurt-lemon mix is sharp, mellow it with 1–2 teaspoons of mayonnaise or a pinch of sugar.
  • Bland chicken: Season your chicken as it cooks, or toss it with a pinch of salt and pepper before mixing.

Recipe Variations

  • Mediterranean: Add chopped cucumbers, cherry tomatoes, olives, and crumbled feta.
  • Crunch lover’s: Mix in toasted almonds, pumpkin seeds, or chopped walnuts.
  • Sweet-tart: Stir in halved red grapes or diced apples and a handful of parsley.
  • Herb swap: Use tarragon or chives instead of dill for a different vibe.
  • Dairy-free: Use a thick, unsweetened dairy-free yogurt and skip the mayo.
  • Low-carb meal: Serve over a big salad with cucumbers, greens, and avocado.

FAQ

Can I use canned chicken?

Yes. Drain it well and flake with a fork before mixing. Fresh or rotisserie chicken has better texture, but canned works in a pinch.

What kind of yogurt is best?

Use plain Greek yogurt, 2% or whole milk.

Nonfat can be a bit tangy and thin; if using it, add a tablespoon of mayo or olive oil for better mouthfeel.

How can I cook chicken just for this recipe?

Poach chicken breasts in salted water with a lemon slice and bay leaf for 12–15 minutes, then cool and shred. Season lightly before mixing.

Is it safe to pack for work or school?

Yes. Keep it chilled in an insulated bag with an ice pack and eat within 4 hours of removal from the fridge.

Can I make it ahead?

Absolutely.

It tastes even better after a few hours. For best texture, add watery ingredients like cucumber or grapes just before serving.

Wrapping Up

This Lemon Dill Yogurt Chicken Salad is bright, creamy, and easy to love. It’s quick to make, smart for meal prep, and endlessly versatile.

Keep a batch in the fridge and you’ve got lunch solved for days—fresh, light, and full of flavor.

Lemon Dill Yogurt Chicken Salad (Light, Creamy & Meal-Prep Friendly) - Fresh, Tangy, and Satisfying

Prep Time 15 minutes
Total Time 15 minutes
Servings 4 servings

Ingredients
  

  • 3 cups cooked chicken, chopped or shredded (breast or a mix)
  • 3/4 cup plain Greek yogurt (2% or whole milk for extra creaminess)
  • 2 tablespoons mayonnaise (optional, for classic flavor and silkier texture)
  • 2 tablespoons fresh lemon juice
  • 1 teaspoon lemon zest
  • 2 tablespoons fresh dill, finely chopped (or 2 teaspoons dried)
  • 1 rib celery, finely chopped
  • 1/4 cup red onion, finely minced (or use scallions for milder flavor)
  • 1 teaspoon Dijon mustard
  • 1/2 teaspoon garlic powder
  • 1/2 teaspoon kosher salt, plus more to taste
  • 1/4 teaspoon black pepper
  • Optional add-ins: 1/3 cup diced cucumber, 1/3 cup halved grapes, 2 tablespoons capers, or 1/4 cup toasted sliced almonds
  • To serve: romaine or butter lettuce, whole-grain bread, pitas, or crackers

Instructions
 

  • Make the dressing: In a large bowl, whisk the Greek yogurt, mayonnaise (if using), lemon juice, lemon zest, Dijon, garlic powder, salt, and pepper until smooth.
  • Add herbs and veggies: Stir in the dill, celery, and red onion. If using cucumber or capers, add them now.
  • Fold in the chicken: Add the chopped or shredded chicken and gently mix until everything is evenly coated.Avoid overmixing to keep the texture light.
  • Taste and adjust: Add extra salt, pepper, or lemon to taste. If it’s too thick, loosen with a splash of water or a bit more lemon juice.
  • Chill (optional but recommended): Cover and refrigerate for 20–30 minutes to let the flavors meld.
  • Serve your way: Spoon into lettuce cups, pile onto toasted bread, tuck into a pita, or serve with crackers and sliced veggies.

Creamy Greek Yogurt Chicken Salad (High Protein & Fresh) – Easy, Bright, and Satisfying

This chicken salad keeps all the creamy comfort you want but swaps mayo for Greek yogurt, so it’s lighter and protein-packed. It’s the kind of recipe you can meal prep on a Sunday and enjoy all week without getting bored. The flavor is fresh and zesty, with crunchy add-ins that make every bite interesting.

Serve it in lettuce wraps, on toasted sourdough, or over greens for a simple, filling lunch. It’s quick to make, easy to customize, and just feels good to eat.

What Makes This Special

Overhead shot of creamy Greek yogurt chicken salad being mixed in a large ceramic bowl: a silicone s
  • High protein, lower fat: Greek yogurt brings creaminess and 15–20g protein per serving without the heaviness of mayo.
  • Bright, fresh flavor: Lemon, herbs, and crunchy veggies keep it lively and not stodgy.
  • Meal-prep friendly: Holds up well for a few days and tastes even better after chilling.
  • Versatile: Pile it on bread, tuck into a wrap, or spoon over salad greens.
  • Budget-friendly: Uses simple pantry staples and leftover chicken.

Ingredients

  • 3 cups cooked chicken breast, chopped or shredded
  • 1 cup plain 2% or whole-milk Greek yogurt (use thicker yogurt for best texture)
  • 1 tablespoon Dijon mustard
  • 2 tablespoons fresh lemon juice
  • 1 teaspoon lemon zest (optional but brightens everything)
  • 1 tablespoon extra-virgin olive oil (for silkiness)
  • 1 small celery stalk, finely diced
  • 1/4 small red onion, finely minced (or 2 green onions, thinly sliced)
  • 1/3 cup seedless grapes, halved, or 1 small apple, diced (optional for a touch of sweetness)
  • 2 tablespoons chopped fresh dill or parsley (or a mix)
  • 1 small garlic clove, grated (or 1/4 teaspoon garlic powder)
  • 1/4 teaspoon kosher salt, more to taste
  • 1/4 teaspoon black pepper
  • Optional mix-ins: 2 tablespoons chopped toasted almonds or walnuts, 1 tablespoon capers, 1 tablespoon chopped pickles

Instructions

Tasty top view of final plated Greek yogurt chicken salad open-faced on toasted sourdough: generous
  1. Make the dressing: In a large bowl, whisk the Greek yogurt, Dijon, lemon juice, lemon zest, olive oil, garlic, salt, and pepper until smooth.
  2. Add the crunch: Stir in celery, onion, and herbs. If using grapes or apple, fold them in now.
  3. Add chicken: Mix in the shredded or chopped chicken until evenly coated.

    Taste and adjust salt, pepper, and lemon as needed.

  4. Chill: Cover and refrigerate for at least 20–30 minutes. This helps the flavors meld and the yogurt firm up.
  5. Serve: Spoon onto toast, stuff into pita or a wrap, or pile over mixed greens. Add nuts or capers on top for extra texture and flavor.

Storage Instructions

  • Refrigerate: Store in an airtight container for 3–4 days.
  • Keep it fresh: If adding apples, toss them in a little lemon juice first to prevent browning.
  • Avoid sogginess: If serving with greens or bread, assemble right before eating.
  • Do not freeze: Yogurt can separate and turn grainy after thawing.

Why This is Good for You

  • Protein-forward: Chicken and Greek yogurt provide a satisfying protein base that keeps you full.
  • Balanced fats: A touch of olive oil adds heart-healthy monounsaturated fats.
  • Lower calorie than mayo-based salads: You get creaminess without the heaviness.
  • Micronutrients: Herbs, lemon, and crunchy veggies add fiber, vitamin C, and antioxidants.

Pitfalls to Watch Out For

  • Watery texture: Thin yogurt can make the salad runny.

    Use thick Greek yogurt or strain it briefly.

  • Underseasoning: Yogurt needs a little extra salt and acid. Taste and adjust at the end.
  • Overmixing: Shredded chicken can turn mushy if stirred aggressively. Fold gently.
  • Too oniony: Raw onion can overpower.

    Rinse minced red onion under cold water to mellow, or use green onions.

Alternatives

  • Protein swap: Use rotisserie chicken, turkey breast, or canned chicken in a pinch.
  • Dairy-free: Try a thick, unsweetened coconut yogurt or cashew yogurt and adjust lemon and salt.
  • Herb variations: Tarragon, basil, or chives change the vibe quickly.
  • Crunch options: Try cucumber, fennel, or toasted sunflower seeds.
  • Flavor twist: Add curry powder and golden raisins for a curried version, or smoked paprika and pickles for a deli-style take.

FAQ

Can I use nonfat Greek yogurt?

Yes, but the salad will be less creamy and more tangy. Add an extra teaspoon of olive oil and a pinch more salt to balance.

What’s the best way to cook the chicken?

Poach breasts in salted water until just cooked, then cool and shred. Or use leftover roasted chicken or rotisserie chicken for convenience.

How can I make it higher in protein?

Use whole-milk Greek yogurt, add extra chicken, or stir in 1–2 tablespoons of hemp seeds or chopped nuts.

Is this good for meal prep lunches?

Absolutely.

Portion into containers and pair with greens, crackers, or prepped veggies. Keep bread or wraps separate until serving.

How do I make it kid-friendly?

Skip the raw onion, go light on pepper, and use grapes or apple for gentle sweetness.

Can I make it without lemon?

Use 1–2 teaspoons of apple cider vinegar or white wine vinegar instead. A little zest of any citrus also helps brighten.

In Conclusion

This Creamy Greek Yogurt Chicken Salad is fresh, filling, and flexible enough to fit your week.

It delivers big flavor with simple ingredients and keeps well in the fridge for easy meals. Whether you pile it on toast or spoon it over greens, it’s a reliable staple that tastes clean and satisfying every time.

Creamy Greek Yogurt Chicken Salad (High Protein & Fresh) - Easy, Bright, and Satisfying

Prep Time 15 minutes
Total Time 15 minutes
Servings 4 servings

Ingredients
  

  • 3 cups cooked chicken breast, chopped or shredded
  • 1 cup plain 2% or whole-milk Greek yogurt (use thicker yogurt for best texture)
  • 1 tablespoon Dijon mustard
  • 2 tablespoons fresh lemon juice
  • 1 teaspoon lemon zest (optional but brightens everything)
  • 1 tablespoon extra-virgin olive oil (for silkiness)
  • 1 small celery stalk, finely diced
  • 1/4 small red onion, finely minced (or 2 green onions, thinly sliced)
  • 1/3 cup seedless grapes, halved, or 1 small apple, diced (optional for a touch of sweetness)
  • 2 tablespoons chopped fresh dill or parsley (or a mix)
  • 1 small garlic clove, grated (or 1/4 teaspoon garlic powder)
  • 1/4 teaspoon kosher salt, more to taste
  • 1/4 teaspoon black pepper
  • Optional mix-ins: 2 tablespoons chopped toasted almonds or walnuts, 1 tablespoon capers, 1 tablespoon chopped pickles

Instructions
 

  • Make the dressing: In a large bowl, whisk the Greek yogurt, Dijon, lemon juice, lemon zest, olive oil, garlic, salt, and pepper until smooth.
  • Add the crunch: Stir in celery, onion, and herbs. If using grapes or apple, fold them in now.
  • Add chicken: Mix in the shredded or chopped chicken until evenly coated.Taste and adjust salt, pepper, and lemon as needed.
  • Chill: Cover and refrigerate for at least 20–30 minutes. This helps the flavors meld and the yogurt firm up.
  • Serve: Spoon onto toast, stuff into pita or a wrap, or pile over mixed greens. Add nuts or capers on top for extra texture and flavor.

High Protein Creamy Pasta Meal Prep for Bulking (Easy Weeknight Prep) – Comfort Food That Fuels Gains

This recipe hits that sweet spot between comfort food and smart nutrition. It’s creamy, high protein, and easy to scale for several meals. If you’re bulking and want something you’ll actually look forward to eating, this one’s a winner.

The ingredients are simple, the steps are quick, and it reheats beautifully. Make it once, and you’ve got days of satisfying meals ready to go.

What Makes This Recipe So Good

Cooking process, close-up detail: Searing bite-size chicken seasoned with Italian seasoning, smoked
  • Big protein per serving: Greek yogurt, chicken, and a protein-rich pasta base deliver 40–55g protein, depending on portion size.
  • Light but creamy sauce: The combo of stock, Parmesan, and Greek yogurt keeps it rich without heavy cream.
  • Weeknight-friendly: One pan for the sauce, one pot for the pasta. Ready in about 30 minutes.
  • Budget-conscious: Uses pantry staples and affordable proteins.
  • Meal prep friendly: Holds up in the fridge, reheats well, and freezes if needed.

Shopping List

  • 12–16 oz high-protein pasta (chickpea, lentil, or high-protein wheat penne)
  • 1.25–1.5 lb boneless, skinless chicken breasts or thighs (or ground turkey)
  • 1 medium yellow onion, diced
  • 3–4 cloves garlic, minced
  • 2 cups low-sodium chicken stock
  • 1 cup plain nonfat Greek yogurt
  • 3/4 cup finely grated Parmesan (or Grana Padano)
  • 2 tablespoons olive oil
  • 1 tablespoon butter (optional for richness)
  • 1 tablespoon cornstarch (or 2 tablespoons flour) for thickening
  • 2 cups spinach or kale, chopped
  • 1 cup frozen peas (optional)
  • 1 teaspoon Italian seasoning
  • 1/2 teaspoon smoked paprika
  • Red pepper flakes to taste
  • Salt and black pepper
  • Fresh lemon (zest and juice)

How to Make It

Final dish, tasty top view: Overhead shot of creamy high-protein penne pasta tossed with seared chic
  1. Cook the pasta: Boil in salted water until just shy of al dente.

    Reserve 1 cup pasta water, drain, and set aside.

  2. Prep the chicken: Pat dry, season with salt, pepper, Italian seasoning, and smoked paprika. Cut into bite-size pieces.
  3. Sear the chicken: Heat olive oil in a large skillet over medium-high. Cook chicken 5–7 minutes until browned and cooked through.

    Remove to a plate.

  4. Sauté aromatics: In the same pan, add butter (optional), onion, and a pinch of salt. Cook 3–4 minutes. Stir in garlic for 30 seconds.
  5. Build the sauce base: Whisk cornstarch into the chicken stock.

    Pour into the pan, scraping up browned bits. Simmer 2–3 minutes until slightly thickened.

  6. Make it creamy: Reduce heat to low. Stir in Greek yogurt and Parmesan until smooth.

    If too thick, loosen with reserved pasta water. Season with salt, pepper, and a pinch of red pepper flakes.

  7. Add greens and peas: Stir in spinach (and peas if using) until wilted and bright.
  8. Combine: Add chicken and cooked pasta to the sauce. Toss gently over low heat to coat.

    Finish with lemon zest and a squeeze of lemon juice for brightness.

  9. Taste and adjust: Add more salt, pepper, or pasta water to get that silky, glossy texture.
  10. Portion: Divide into 4–5 meal prep containers. Let cool uncovered for 10 minutes before sealing.

Keeping It Fresh

  • Storage: Refrigerate in airtight containers for up to 4 days.
  • Freezing: Freeze up to 2 months. Thaw overnight in the fridge before reheating.
  • Reheating: Microwave with a splash of water or stock, 60–90 seconds at a time, stirring between bursts.

    On the stovetop, reheat gently with a bit of stock.

  • Prevent dryness: Always add a tablespoon of water or stock before reheating to keep it saucy.

Benefits of This Recipe

  • High protein for growth: Supports muscle repair and a calorie surplus during bulking.
  • Balanced macros: Protein, carbs, and some healthy fat for steady energy.
  • Micronutrient boost: Spinach, peas, and lemon add fiber, iron, and vitamin C.
  • Customizable: Swap proteins, add veggies, and adjust portions to your targets.

Common Mistakes to Avoid

  • Curdling the sauce: Add Greek yogurt off the heat or on low. High heat can split it.
  • Overcooking pasta: Keep it slightly under; it will finish in the sauce.
  • Skipping pasta water: The starch helps the sauce cling and stay silky.
  • Under-seasoning: Taste at the end; Parmesan is salty, so adjust gradually.
  • Dry reheats: Always add a splash of liquid before warming leftovers.

Alternatives

  • Protein swaps: Ground turkey or lean beef, shrimp, or extra-firm tofu (pan-seared).
  • Dairy-free: Use a thick, unsweetened dairy-free yogurt and a vegan Parmesan-style cheese.
  • Gluten-free: Choose gluten-free high-protein pasta.
  • Veggie add-ins: Mushrooms, broccoli florets, or roasted red peppers fold in nicely.
  • Higher calories: Drizzle extra olive oil, add sun-dried tomatoes in oil, or top with more cheese.

FAQ

How much protein is in a serving?

A typical serving lands around 40–55g protein, depending on the pasta type and how much chicken you use. Using high-protein pasta and 1.5 lb chicken pushes it to the higher end.

Can I make this without Greek yogurt?

Yes.

Use light cream cheese, cottage cheese blended smooth, or a dairy-free yogurt alternative. Adjust with pasta water for the right consistency.

What pasta shape works best?

Short shapes like penne, rotini, or rigatoni hold the sauce well and pack nicely in meal prep containers. High-protein versions of these work great.

How do I scale this for more meals?

Increase everything by 50% and use a larger skillet.

Don’t crowd the chicken; sear in batches for best flavor and texture.

Will the sauce stay creamy after reheating?

Yes, as long as you reheat gently and add a splash of water or stock. Stir midway to bring the sauce back together.

Can I skip the lemon?

You can, but a little acidity brightens the richness. If you don’t have lemon, a teaspoon of white wine vinegar works.

Wrapping Up

This creamy, protein-packed pasta is built for weeknights and meal prep.

It’s simple, flexible, and satisfying enough to keep you consistent during a bulk. Cook once, portion smart, and you’ve got reliable, tasty fuel ready to go all week. Adjust the protein and pasta to hit your targets, and enjoy every bite.

High Protein Creamy Pasta Meal Prep for Bulking (Easy Weeknight Prep) - Comfort Food That Fuels Gains

Prep Time 10 minutes
Cook Time 20 minutes
Total Time 30 minutes
Servings 4 servings

Ingredients
  

  • 12–16 oz high-protein pasta (chickpea, lentil, or high-protein wheat penne)
  • 1.25–1.5 lb boneless, skinless chicken breasts or thighs (or ground turkey)
  • 1 medium yellow onion, diced
  • 3–4 cloves garlic, minced
  • 2 cups low-sodium chicken stock
  • 1 cup plain nonfat Greek yogurt
  • 3/4 cup finely grated Parmesan (or Grana Padano)
  • 2 tablespoons olive oil
  • 1 tablespoon butter (optional for richness)
  • 1 tablespoon cornstarch (or 2 tablespoons flour) for thickening
  • 2 cups spinach or kale, chopped
  • 1 cup frozen peas (optional)
  • 1 teaspoon Italian seasoning
  • 1/2 teaspoon smoked paprika
  • Red pepper flakes to taste
  • Salt and black pepper
  • Fresh lemon (zest and juice)

Instructions
 

  • Cook the pasta: Boil in salted water until just shy of al dente.Reserve 1 cup pasta water, drain, and set aside.
  • Prep the chicken: Pat dry, season with salt, pepper, Italian seasoning, and smoked paprika. Cut into bite-size pieces.
  • Sear the chicken: Heat olive oil in a large skillet over medium-high. Cook chicken 5–7 minutes until browned and cooked through.Remove to a plate.
  • Sauté aromatics: In the same pan, add butter (optional), onion, and a pinch of salt. Cook 3–4 minutes. Stir in garlic for 30 seconds.
  • Build the sauce base: Whisk cornstarch into the chicken stock.Pour into the pan, scraping up browned bits. Simmer 2–3 minutes until slightly thickened.
  • Make it creamy: Reduce heat to low. Stir in Greek yogurt and Parmesan until smooth.If too thick, loosen with reserved pasta water. Season with salt, pepper, and a pinch of red pepper flakes.
  • Add greens and peas: Stir in spinach (and peas if using) until wilted and bright.
  • Combine: Add chicken and cooked pasta to the sauce. Toss gently over low heat to coat.Finish with lemon zest and a squeeze of lemon juice for brightness.
  • Taste and adjust: Add more salt, pepper, or pasta water to get that silky, glossy texture.
  • Portion: Divide into 4–5 meal prep containers. Let cool uncovered for 10 minutes before sealing.

Protein-Packed Steak & Sweet Potato Meal Prep (Bulking Friendly) – Simple, Satisfying, and Ready for the Week

This steak and sweet potato meal prep hits that sweet spot: big flavor, big portions, and macros that support muscle gain. It’s straightforward to cook, easy to scale, and reheats well without going soggy. You’ll get a balanced mix of protein, complex carbs, and healthy fats, plus a punch of micronutrients.

Whether you’re pushing up the scale or just want a filling lunch you’ll look forward to, this one does the job.

What Makes This Special

Cooking process, close-up detail: Sliced medium-rare steak being basted in a hot cast-iron skillet i
  • High-protein and calorie-dense: Perfect for bulking without resorting to shakes alone.
  • Simple ingredients: Steak, sweet potatoes, and a few pantry staples create a complete meal.
  • Batch-friendly: Cook once, portion four to five meals, and you’re set for the week.
  • Customizable: Adjust cuts of steak, seasonings, and sides to match your taste and macros.
  • Great texture after reheating: Roasted sweet potatoes and pan-seared steak keep their bite.

What You’ll Need

  • 2 to 2.5 lb (900–1,100 g) steak (sirloin, flank, or ribeye for higher calories)
  • 4 large sweet potatoes (about 3.5–4 lb / 1.6–1.8 kg), peeled if you like
  • 1 large red onion, sliced (optional but adds sweetness)
  • 2 bell peppers, sliced (optional for extra color and vitamin C)
  • 2–3 tbsp olive oil or avocado oil
  • 1 tbsp butter (optional, for finishing the steak)
  • 2 tsp smoked paprika
  • 2 tsp garlic powder
  • 1.5 tsp onion powder
  • 1–2 tsp chili powder or cayenne (optional heat)
  • 1–2 tsp dried thyme or rosemary
  • Kosher salt and black pepper
  • Lemon wedges (optional, for a fresh finish)
  • Fresh parsley or chives, chopped (optional garnish)

Step-by-Step Instructions

Final meal prep, tasty top view: Overhead shot of four neatly arranged meal prep containers filled w
  1. Preheat and prep: Heat your oven to 425°F (220°C). Line two sheet pans with parchment.
  2. Cut the sweet potatoes: Dice into 1-inch cubes for even roasting. Thinner wedges cook faster if you’re in a rush.
  3. Season the veg: Toss sweet potatoes, onions, and peppers with 1–2 tbsp oil, smoked paprika, garlic powder, salt, and pepper.

    Spread evenly on pans.

  4. Roast: Bake 25–35 minutes, flipping halfway, until edges are caramelized and centers are tender.
  5. Pat steak dry: While the veg roasts, blot the steak with paper towels. Season both sides generously with salt, pepper, onion powder, and thyme or rosemary.
  6. Sear the steak: Heat a large skillet over medium-high. Add 1 tbsp oil.

    Sear 2–4 minutes per side for medium-rare (time varies by thickness). Add butter in the final minute and baste.

  7. Rest and slice: Transfer steak to a plate and rest 8–10 minutes. Slice against the grain into strips.
  8. Optional boost: Squeeze lemon over the steak and sprinkle with parsley for brightness.
  9. Portion: Divide roasted sweet potatoes and veggies among 4–5 meal prep containers.

    Top with sliced steak.

  10. Cool, then store: Let containers cool uncovered 15–20 minutes before sealing and refrigerating.

Keeping It Fresh

  • Storage: Refrigerate up to 4 days. For longer, freeze steak and potatoes separately for up to 2 months.
  • Reheating: Microwave 90 seconds to 2 minutes, stirring halfway. For best texture, reheat steak and potatoes in a hot skillet with a splash of water or broth.
  • Avoid sogginess: Let food cool before sealing.

    Use vented lids or crack the lid while reheating.

  • Sauce on the side: Pack chimichurri, hot sauce, or yogurt-garlic sauce separately to keep flavors fresh.

Health Benefits

  • Protein for growth: Steak provides complete protein and creatine, supporting strength and muscle repair.
  • Quality carbs: Sweet potatoes deliver complex carbs and fiber for steady energy and better training sessions.
  • Micronutrients: You’ll get iron, zinc, B vitamins from beef; beta-carotene, potassium, and vitamin C from the potatoes and peppers.
  • Healthy fats: Olive oil supports hormone production and nutrient absorption—key for bulking.

Pitfalls to Watch Out For

  • Overcooking the steak: It dries out fast when reheated. Aim for medium-rare to medium during the initial cook.
  • Crowding the pan: Overloaded sheet pans steam instead of roast. Use two pans or roast in batches.
  • Skipping the rest: Cutting steak too soon loses juices.

    Rest at least 8 minutes.

  • Inconsistent sizing: Uneven potato chunks cook unevenly. Keep pieces similar for the best texture.

Variations You Can Try

  • Higher-calorie version: Choose ribeye, add an extra tbsp of oil, and add avocado slices at serving.
  • Lean cut swap: Use top sirloin or flank to reduce fat while keeping protein high.
  • Spice route: Try Cajun seasoning, harissa, or chipotle-lime for a new flavor profile.
  • Add greens: Toss roasted broccoli or sautéed spinach into each container for more volume and fiber.
  • Carb switch: Sub white rice or quinoa if you want faster-digesting carbs around training.
  • Sauce ideas: Chimichurri, garlic-herb yogurt, or a honey-mustard drizzle for sweetness.

FAQ

How many meals does this make?

Expect 4–5 hearty servings, depending on your portion sizes. For a bulk, aim for roughly 6–8 oz cooked steak and 10–12 oz cooked sweet potatoes per container.

Can I grill the steak instead?

Yes.

Grill over high heat 2–4 minutes per side, then rest and slice. Grilling adds a great char and keeps the kitchen cool.

What’s a good budget-friendly cut?

Top sirloin, flank, or flat iron give strong flavor without the ribeye price. Marinate flank for 1–2 hours if you want extra tenderness.

How do I hit higher calories without changing flavor?

Add an extra tablespoon of olive oil across the pans, include a small knob of butter when reheating, or add a side of nuts or avocado.

Can I make it spicy?

Absolutely.

Add cayenne, chili flakes, or a drizzle of hot sauce after reheating. Chipotle powder also pairs perfectly with sweet potato.

Is this meal good post-workout?

Yes. It has fast-access protein and quality carbs to support recovery.

If you train late, keep portions lighter or choose a leaner cut.

In Conclusion

This Protein-Packed Steak & Sweet Potato Meal Prep is simple, filling, and built for growth. It’s easy to cook in bulk, holds up well in the fridge, and tastes great all week. Customize the cut, spices, and sides to fit your goals, then enjoy the consistency that fuels progress.

Protein-Packed Steak & Sweet Potato Meal Prep (Bulking Friendly) - Simple, Satisfying, and Ready for the Week

Prep Time 15 minutes
Cook Time 35 minutes
Total Time 50 minutes
Servings 4 servings

Ingredients
  

  • 2 to 2.5 lb (900–1,100 g) steak (sirloin, flank, or ribeye for higher calories)
  • 4 large sweet potatoes (about 3.5–4 lb / 1.6–1.8 kg), peeled if you like
  • 1 large red onion, sliced (optional but adds sweetness)
  • 2 bell peppers, sliced (optional for extra color and vitamin C)
  • 2–3 tbsp olive oil or avocado oil
  • 1 tbsp butter (optional, for finishing the steak)
  • 2 tsp smoked paprika
  • 2 tsp garlic powder
  • 1.5 tsp onion powder
  • 1–2 tsp chili powder or cayenne (optional heat)
  • 1–2 tsp dried thyme or rosemary
  • Kosher salt and black pepper
  • Lemon wedges (optional, for a fresh finish)
  • Fresh parsley or chives, chopped (optional garnish)

Instructions
 

  • Preheat and prep: Heat your oven to 425°F (220°C). Line two sheet pans with parchment.
  • Cut the sweet potatoes: Dice into 1-inch cubes for even roasting. Thinner wedges cook faster if you’re in a rush.
  • Season the veg: Toss sweet potatoes, onions, and peppers with 1–2 tbsp oil, smoked paprika, garlic powder, salt, and pepper.Spread evenly on pans.
  • Roast: Bake 25–35 minutes, flipping halfway, until edges are caramelized and centers are tender.
  • Pat steak dry: While the veg roasts, blot the steak with paper towels. Season both sides generously with salt, pepper, onion powder, and thyme or rosemary.
  • Sear the steak: Heat a large skillet over medium-high. Add 1 tbsp oil.Sear 2–4 minutes per side for medium-rare (time varies by thickness). Add butter in the final minute and baste.
  • Rest and slice: Transfer steak to a plate and rest 8–10 minutes. Slice against the grain into strips.
  • Optional boost: Squeeze lemon over the steak and sprinkle with parsley for brightness.
  • Portion: Divide roasted sweet potatoes and veggies among 4–5 meal prep containers.Top with sliced steak.
  • Cool, then store: Let containers cool uncovered 15–20 minutes before sealing and refrigerating.