Toffee Pecan Shortbread Cookies – Buttery, Crunchy, and Perfectly Sweet

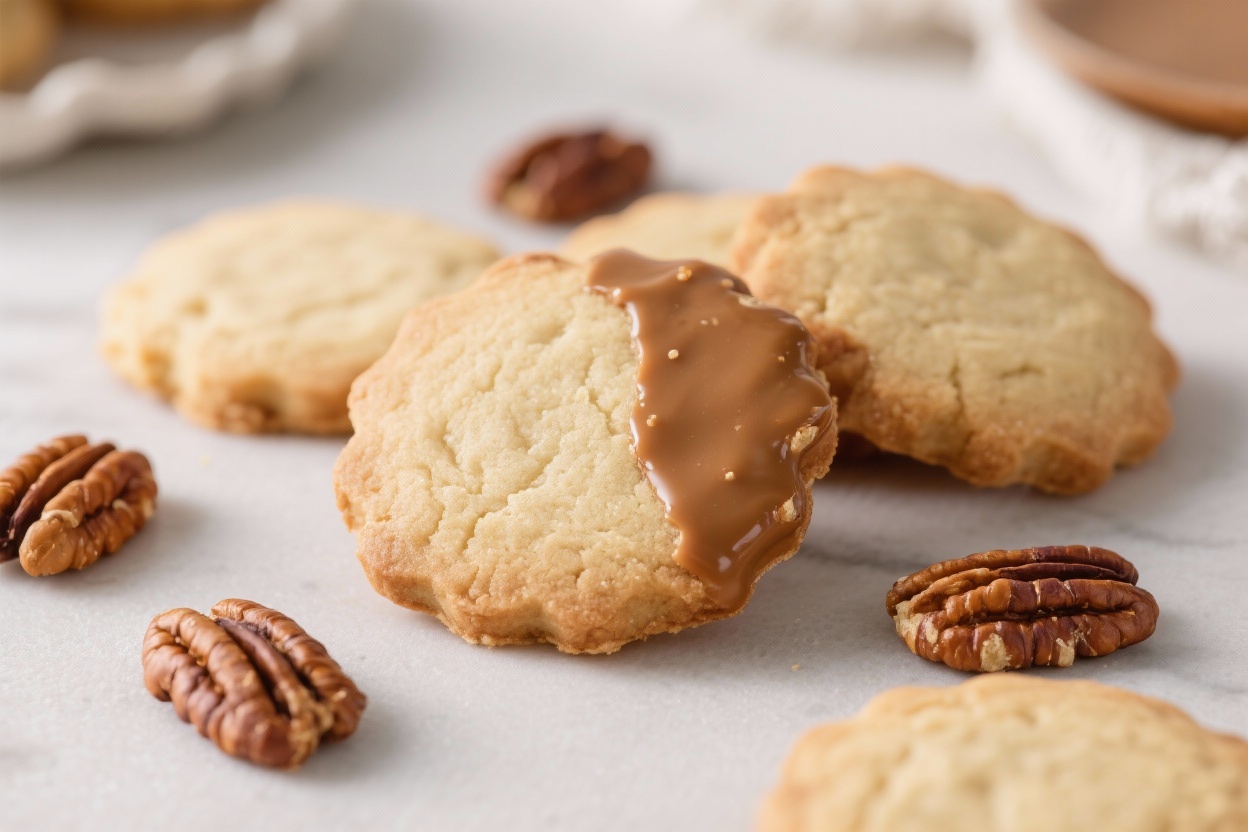
Buttery shortbread meets crunchy pecans and pockets of toffee in a cookie that feels both cozy and a little indulgent. These cookies are simple to make, with a melt-in-your-mouth texture and just the right sweetness. They’re great for holiday tins, coffee breaks, or anytime you want something special without a lot of fuss.

The dough is forgiving, the ingredients are pantry-friendly, and the results are always impressive. If you love caramel notes and nutty crunch, this one’s for you.

What Makes This Special

Close-up detail: Sliced rounds of toffee pecan shortbread just out of the oven on a parchment-lined
  • Classic shortbread base that bakes up tender and buttery, without being overly sweet.
  • Rich toffee bits bring caramel flavor and a little chew, balancing the crisp cookie.
  • Toasted pecans add warmth and crunch, making every bite textured and satisfying.
  • No eggs needed, so the dough stays simple and easy to handle.
  • Freezer-friendly slice-and-bake style—make-ahead dough you can bake on demand.

Ingredients

  • 1 cup (2 sticks) unsalted butter, softened
  • 2/3 cup powdered sugar
  • 1/4 cup granulated sugar
  • 1 teaspoon pure vanilla extract
  • 1/2 teaspoon almond extract (optional but lovely)
  • 2 1/4 cups all-purpose flour
  • 1/2 teaspoon fine sea salt
  • 3/4 cup toffee bits (such as Heath toffee bits; plain, not chocolate-coated)
  • 3/4 cup pecans, toasted and finely chopped

Instructions

Cooking process: Overhead shot of chilled shortbread dough log being cleanly sliced into 1/4-inch ro
  1. Toast the pecans. Heat the oven to 350°F (175°C). Spread pecans on a sheet pan and toast for 6–8 minutes until fragrant.

    Let cool, then finely chop.

  2. Cream the butter and sugars. In a large bowl, beat softened butter with powdered sugar and granulated sugar until smooth and creamy, about 2 minutes. Mix in vanilla and almond extract.
  3. Add dry ingredients. Whisk flour and salt together. Add to the butter mixture and mix on low just until the dough starts to come together.

    It will look a bit crumbly at first—keep mixing gently.

  4. Fold in the mix-ins. Stir in the toffee bits and chopped pecans until evenly distributed. Do not overmix.
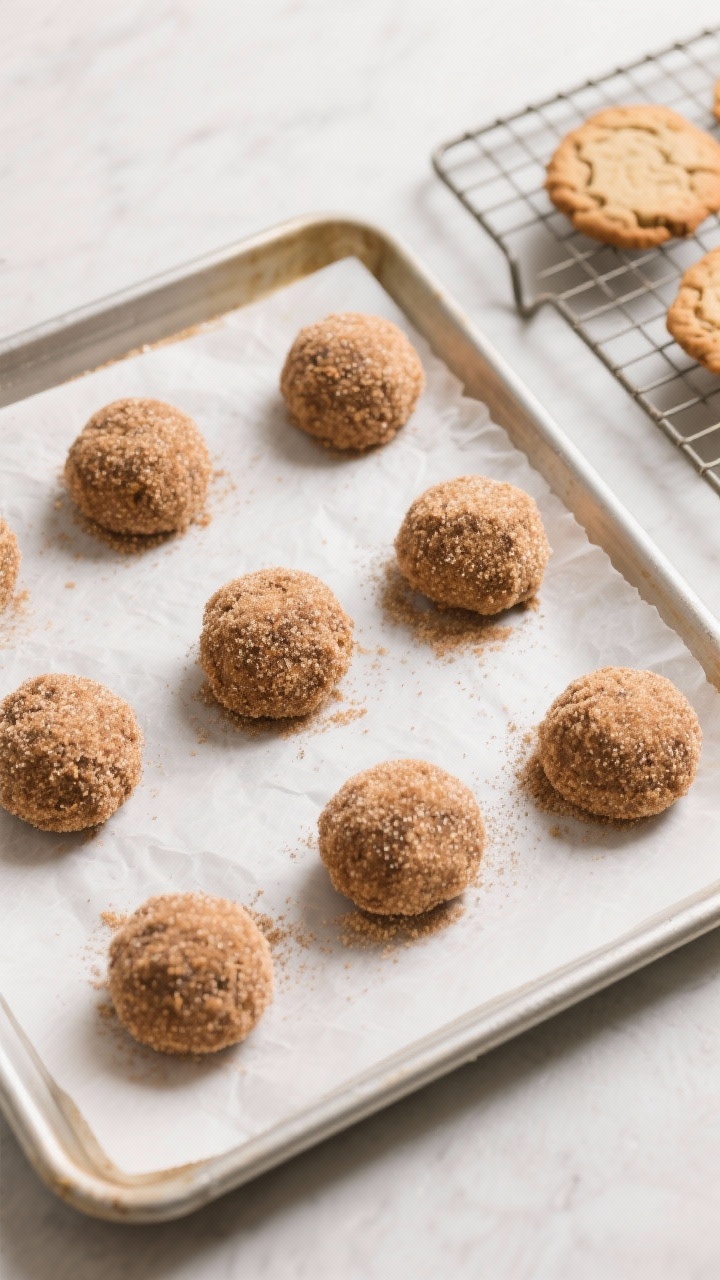
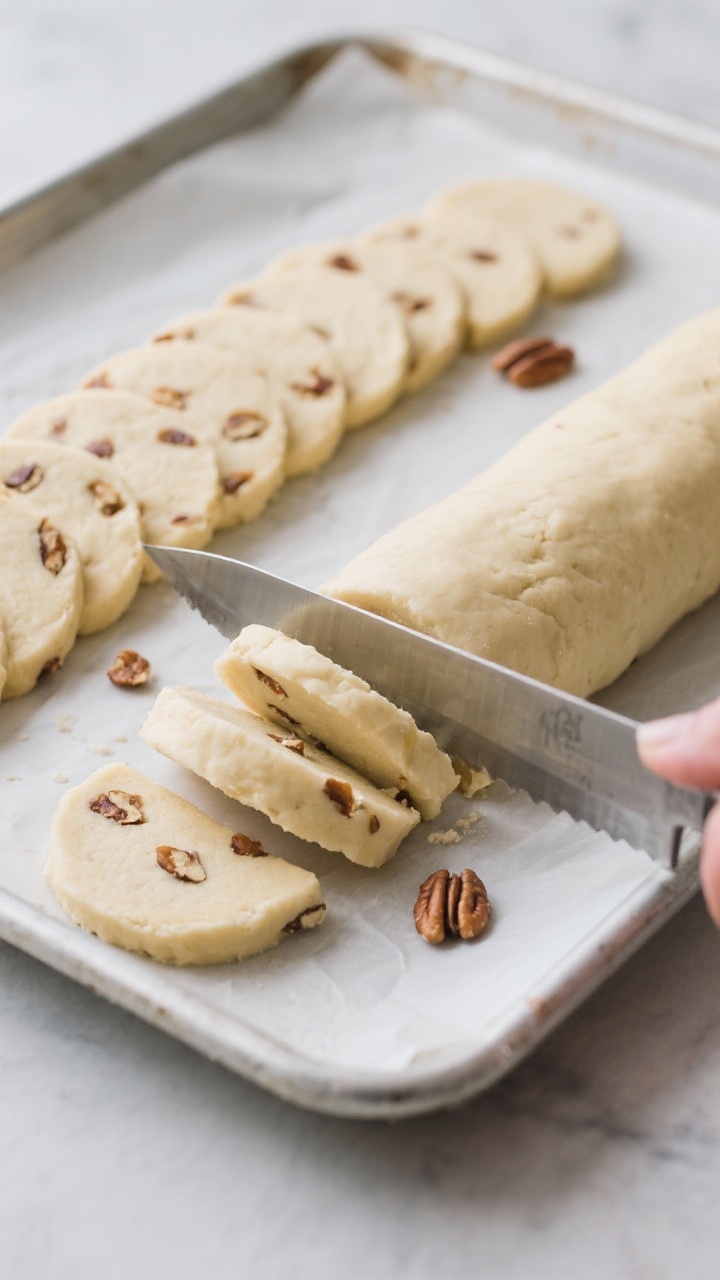
  5. Shape the dough. Divide dough in half. Place each half on a piece of parchment and shape into a log about 2 inches in diameter.

    Wrap tightly and roll to smooth the sides.

  6. Chill. Refrigerate the logs for at least 2 hours, or freeze for 30–45 minutes, until very firm. Cold dough slices cleanly and holds its shape.
  7. Prep for baking. Reduce oven to 325°F (165°C). Line two baking sheets with parchment.
  8. Slice and bake. Using a sharp knife, slice logs into 1/4-inch rounds. Arrange 2 inches apart.

    Bake 13–16 minutes, until edges are just turning golden. Rotate pans halfway through for even baking.

  9. Cool. Let cookies rest on the sheet for 5 minutes, then transfer to a rack to cool completely. They crisp as they cool.

How to Store

  • Room temperature: Store in an airtight container for up to 1 week.

    Add a small piece of parchment between layers to protect the edges.

  • Freezer (baked): Freeze cooled cookies in a zip-top bag for up to 2 months. Thaw at room temp.
  • Freezer (dough): Keep wrapped dough logs frozen for up to 3 months. Slice straight from frozen and add 1–2 minutes to the bake time.
Final dish presentation: Beautifully plated toffee pecan shortbread cookies stacked and fanned on a

Why This is Good for You

  • Built-in portion control: Shortbread is rich, so a couple of cookies satisfy a sweet tooth without overdoing it.
  • Nuts for balance: Pecans bring healthy fats and a bit of fiber, helping these feel more satiating than a sugary cookie alone.
  • Simple ingredients: No artificial flavors needed—real butter, nuts, and toffee deliver big flavor naturally.

Pitfalls to Watch Out For

  • Warm dough spreads: If the dough softens, the cookies can bake flat.

    Keep it cold before slicing and baking.

  • Overbaking: Shortbread should be pale with lightly golden edges. Too dark means dry and crumbly.
  • Rough slicing: Press down gently with a sharp knife. If pieces crumble, re-chill or use a sawing motion.
  • Too much flour: Measure with the scoop-and-level method.

    Packed flour leads to dry, tough cookies.

Variations You Can Try

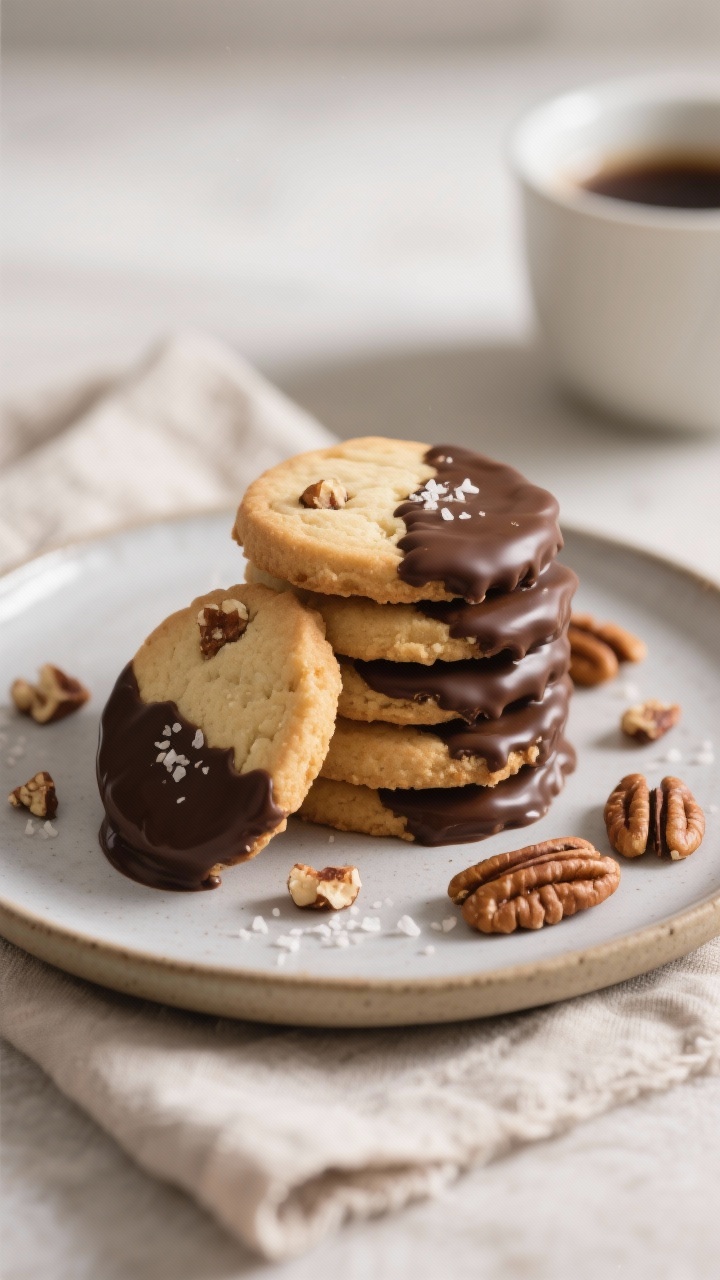
  • Chocolate-dipped: Dip half of each cooled cookie in melted dark chocolate and sprinkle with flaky sea salt.
  • Maple pecan: Swap vanilla for 1 teaspoon maple extract and add a pinch of cinnamon.
  • Espresso toffee: Add 1 teaspoon instant espresso powder to the dough for a subtle coffee note.
  • Gluten-free option: Use a 1:1 gluten-free all-purpose blend and chill thoroughly before slicing.
  • Brown butter twist: Brown the butter, chill until solid, then proceed. Expect deeper, nutty flavor.

FAQ

Can I use salted butter?

Yes. Reduce the added salt to a pinch or omit it.

Taste the dough if you’re unsure—shortbread can handle a light salt note.

Do I have to toast the pecans?

It’s worth it. Toasting boosts flavor and keeps the nuts from tasting flat in the finished cookie.

My cookies are crumbly. What happened?

Likely too much flour or overbaking.

Next time, measure carefully and pull them when the edges just turn golden. They firm up as they cool.

Can I roll and cut these instead of slicing?

Yes. Chill the dough, roll to about 1/4 inch, cut with a cookie cutter, and bake.

Dust the surface lightly with flour to prevent sticking.

What toffee bits should I use?

Plain toffee bits work best. If you only have chocolate-coated ones, reduce other mix-ins and expect a slightly sweeter cookie.

Final Thoughts

Toffee Pecan Shortbread Cookies deliver a perfect mix of buttery crumb, caramel sweetness, and nutty crunch. The dough is easy, the flavor is big, and they store beautifully.

Keep a log in the freezer and you’re always 15 minutes away from a warm, homemade treat. Simple, reliable, and a little luxurious—just the way a great cookie should be.

Chewy Eggnog Snickerdoodle Cookies – Soft, Spiced, and Holiday-Ready

These cookies taste like a holiday party in a bite: warm cinnamon, creamy eggnog, and a hint of nutmeg. They’re soft and chewy in the center with a lightly crisp edge, just like a classic snickerdoodle should be. If you love eggnog, these will be your new favorite.

If you’re on the fence, the flavor here is cozy and subtle, not overpowering. They’re easy to make, perfect for gifting, and disappear fast.

This post may contain Amazon affiliate links. As an Amazon Associate, I earn from qualifying purchases.

What Makes This Special

Close-up detail: A just-baked eggnog snickerdoodle cookie resting on parchment, edges lightly crisp
  • Eggnog in the dough: It adds richness and a gentle holiday flavor without making the cookies cakey.
  • Chewy center, crisp edge: Cream of tartar keeps the classic snickerdoodle tang and texture.
  • Warm spices: Cinnamon and nutmeg boost the eggnog vibe, while vanilla ties it all together.
  • Foolproof for sharing: The dough is sturdy, rolls easily, and bakes evenly.

What You’ll Need

  • 2 3/4 cups all-purpose flour
  • 2 teaspoons cream of tartar
  • 1 teaspoon baking soda
  • 1/2 teaspoon fine sea salt
  • 1 teaspoon ground cinnamon
  • 1/4 teaspoon ground nutmeg (plus more for rolling sugar)
  • 1 cup unsalted butter, softened
  • 1 cup granulated sugar
  • 1/2 cup light brown sugar, packed
  • 1 large egg
  • 1/3 cup eggnog (full-fat is best)
  • 2 teaspoons pure vanilla extract

For Rolling:

  • 1/3 cup granulated sugar
  • 1 teaspoon ground cinnamon
  • 1/8 teaspoon ground nutmeg

How to Make It

Cooking process: Overhead shot of coated dough balls spaced 2 inches apart on a parchment-lined baki
  1. Preheat and prep: Heat the oven to 350°F (175°C). Line two baking sheets with parchment paper.
  2. Mix dry ingredients: In a bowl, whisk flour, cream of tartar, baking soda, salt, cinnamon, and nutmeg.

    Set aside.


  3. Cream butter and sugars: In a large bowl, beat butter, granulated sugar, and brown sugar until light and fluffy, 2–3 minutes.
  4. Add wet ingredients: Beat in the egg, vanilla, and eggnog until smooth. The mixture may look slightly curdled—this is fine.
  5. Combine: Add dry ingredients to the wet in two additions. Mix just until no dry spots remain.

    Do not overmix.


  6. Make the rolling sugar: Stir together the sugar, cinnamon, and nutmeg in a small bowl.
  7. Shape: Scoop dough into 1.5-tablespoon portions (about a heaping tablespoon). Roll into balls, then coat in the spiced sugar.
  8. Bake: Arrange 2 inches apart on baking sheets. Bake 9–11 minutes until edges are set and centers look slightly underbaked.
  9. Set the texture: Let cookies rest on the sheet for 5 minutes to finish setting, then move to a rack to cool.
  10. Optional finish: While warm, lightly dust with a pinch of nutmeg for extra aroma.

Storage Instructions

  • Room temperature: Store in an airtight container for 3–4 days.

    Add a slice of bread to keep them soft.


  • Freezer (baked): Freeze in a zip-top bag up to 2 months. Thaw at room temp.
  • Freezer (dough): Roll into balls, freeze on a tray, then bag. Bake from frozen at 350°F, adding 1–2 minutes.
Final dish presentation: A styled plate of eggnog snickerdoodle cookies stacked and fanned on a matt

Health Benefits

  • Portion control: Smaller cookies satisfy sweet cravings without overdoing it.
  • Homemade advantage: You control the ingredients—no artificial flavors or preservatives.
  • Spice perks: Cinnamon and nutmeg offer natural warmth and may support balanced blood sugar as part of an overall healthy diet.

What Not to Do

  • Don’t skip cream of tartar: It’s key to the signature snickerdoodle tang and chew.
  • Don’t overbake: Pull them when the centers look slightly soft.

    They firm up as they cool.


  • Don’t use cold butter: It won’t cream properly, and the cookies won’t spread evenly.
  • Don’t overmix the dough: Too much mixing develops gluten and makes cookies tough.
  • Don’t drown them in eggnog: More liquid makes them cakey. Stick to the measured amount.

Variations You Can Try

  • Glazed: Drizzle with a simple eggnog glaze (powdered sugar + a splash of eggnog + vanilla).
  • Brown butter: Swap softened butter for browned butter cooled to solid. Adds nutty depth.
  • Cardamom twist: Add 1/4 teaspoon ground cardamom to the dough for a fragrant lift.
  • Cranberry white chocolate: Fold in 1/2 cup dried cranberries and 1/2 cup white chocolate chips.
  • Gluten-free: Use a 1:1 gluten-free flour blend with xanthan gum.

    Chill dough 30 minutes before baking.


FAQ

Can I make these without eggnog?

Yes. Replace eggnog with a mix of milk and a pinch of nutmeg. The flavor will be lighter, but still delicious.

Why did my cookies turn out cakey?

Too much flour or too much liquid can cause cakiness.

Spoon and level the flour, measure eggnog accurately, and avoid overmixing.

Can I chill the dough?

Yes. Chill 30–60 minutes if your kitchen is warm or if you want a thicker cookie. Let sit a few minutes at room temp if it gets too firm to scoop.

How do I keep them soft for days?

Store airtight with a slice of bread or a tortilla in the container.

Replace the slice when it dries out.

Are these safe for kids if they contain eggnog?

Yes, as long as you use pasteurized, non-alcoholic eggnog. The cookies are fully baked and kid-friendly.

Can I double the recipe?

Absolutely. Use a stand mixer if you can, and rotate baking sheets halfway through to ensure even baking.

In Conclusion

These Chewy Eggnog Snickerdoodle Cookies bring classic holiday comfort with a twist.

They’re soft, warmly spiced, and easy to bake for parties, gifts, or a cozy night in. Make a batch, stash some dough in the freezer, and you’re holiday-ready anytime the craving hits.

Soft Gingerbread Cookies With Maple Icing – Cozy, Spiced, and Perfectly Tender

These soft gingerbread cookies taste like the holidays and feel like a warm hug. They’re plush in the center, gently crisp at the edges, and full of molasses, ginger, and warm spices. The maple icing adds a simple, sweet finish that sets just enough to stack.

Whether you’re baking for a cookie swap or a quiet night in, this recipe is easy, forgiving, and always a hit.

What Makes This Recipe So Good

Close-up detail: Freshly baked soft gingerbread cookies cooling on a wire rack, edges gently crisp w
  • Soft and chewy texture: The mix of brown sugar, molasses, and butter keeps the cookies tender and moist.
  • Balanced spice: Ginger, cinnamon, and cloves bring warmth without burning your taste buds.
  • Easy dough: No fancy equipment, and it chills quickly for neat, puffy cookies.
  • Maple icing: Real maple syrup gives the glaze a cozy, caramel-like sweetness.
  • Make-ahead friendly: The dough freezes well, and the baked cookies stay soft for days.

Shopping List

  • All-purpose flour
  • Baking soda
  • Fine sea salt
  • Ground ginger
  • Ground cinnamon
  • Ground cloves (or allspice)
  • Unsalted butter, softened
  • Dark brown sugar
  • Egg
  • Unsulphured molasses (not blackstrap)
  • Pure vanilla extract
  • Granulated sugar (for rolling, optional)
  • Powdered sugar (for icing)
  • Pure maple syrup
  • Milk or cream
  • Pinch of salt (for icing)

Instructions

Tasty top view: Overhead shot of a parchment-lined baking sheet filled with just-baked, puffy ginger
  1. In a medium bowl, whisk 3 cups flour, 1 teaspoon baking soda, 1/2 teaspoon salt, 2 teaspoons ground ginger, 1 1/2 teaspoons cinnamon, and 1/4 teaspoon cloves. Set aside.
  2. In a large bowl, beat 3/4 cup unsalted butter and 1 cup dark brown sugar until creamy and slightly fluffy, about 2–3 minutes.
  3. Add 1 large egg, 1/2 cup molasses, and 1 teaspoon vanilla. Beat until smooth.

    The mixture may look separated at first; it will come together.

  4. Mix in the dry ingredients on low speed just until a soft dough forms. If the dough feels sticky, add up to 2 extra tablespoons flour.
  5. Cover and chill the dough for 45–60 minutes. This helps the cookies hold shape and bake up thick and soft.
  6. Preheat the oven to 350°F (175°C).

    Line two baking sheets with parchment.

  7. Scoop 1 1/2-tablespoon portions, roll into balls, and optionally roll in granulated sugar for a sparkly crust. Place 2 inches apart.
  8. Bake 9–11 minutes until the tops are puffed and just set. The centers should look slightly underbaked—this keeps them soft.
  9. Cool on the sheet for 5 minutes, then move to a rack to cool completely.
  10. Make the maple icing: Whisk 1 cup powdered sugar, 2–3 tablespoons pure maple syrup, 1–2 teaspoons milk or cream, 1/2 teaspoon vanilla, and a tiny pinch of salt until smooth and pourable but not runny.

    Adjust with more powdered sugar or milk as needed.

  11. Drizzle or spread icing over cooled cookies. Let it set 20–30 minutes before stacking.

How to Store

  • Room temperature: Keep iced cookies in an airtight container for 3–4 days. Add a slice of bread to keep them extra soft.
  • Freezer (baked): Freeze in layers between parchment for up to 2 months.

    Thaw at room temperature.

  • Freezer (dough): Scoop, freeze dough balls on a sheet, then bag for up to 2 months. Bake from frozen, adding 1–2 minutes.
Final dish presentation: Beautifully plated gingerbread cookies with set maple icing in a soft matte

Health Benefits

  • Ginger: Known for soothing digestion and offering anti-inflammatory compounds.
  • Molasses: Provides small amounts of iron, potassium, and calcium.
  • Portion-friendly: The cookies are rich, so one or two satisfy a sweet craving without going overboard.

Pitfalls to Watch Out For

  • Overbaking: Pull them when the centers are slightly soft. They firm up as they cool.
  • Using blackstrap molasses: It’s too bitter and can dry out the dough.

    Choose regular unsulphured molasses.

  • Skipping the chill: Warm dough spreads too much and loses that thick, soft texture.
  • Icing too thin: If it runs off the cookie, whisk in more powdered sugar 1 tablespoon at a time.

Variations You Can Try

  • Lemon glaze: Swap maple syrup for lemon juice and zest for a bright, tangy finish.
  • Extra spice: Add a pinch of black pepper or cardamom for a subtle kick.
  • Chocolate-dipped: Dip half the cookie in melted dark chocolate and sprinkle with flaky salt.
  • Gluten-free: Use a 1:1 gluten-free flour blend with xanthan gum and chill a bit longer.
  • Dairy-free: Replace butter with a plant-based stick and use non-dairy milk for the icing.

FAQ

Can I make the dough ahead?

Yes. Chill the dough up to 48 hours, tightly covered. If it’s very firm, let it sit 15 minutes at room temperature before scooping.

How do I keep the cookies soft for days?

Store them airtight with a slice of sandwich bread or a piece of apple peel.

Replace the slice every day or two to maintain moisture.

What if I don’t have dark brown sugar?

Use light brown sugar and add 1 teaspoon molasses to the wet ingredients to deepen the flavor.

Can I cut these into shapes?

Yes, but add 2–3 tablespoons extra flour and chill the dough longer (at least 2 hours). Roll between parchment to 1/4 inch and watch the bake time.

Is the icing supposed to harden completely?

It sets to a soft matte finish that’s stackable but not rock hard. For a firmer set, add more powdered sugar and a touch less milk.

Wrapping Up

These soft gingerbread cookies bring classic spice, cozy molasses flavor, and a maple-kissed finish that feels special without extra fuss.

They’re simple enough for a weeknight and festive enough for a party. Bake a batch, share a few, and keep some tucked away—you’ll want another with tomorrow’s coffee.

Classic Brown Butter Sugar Cookies with Cinnamon Glaze – Cozy, Crisp, and Perfectly Spiced

These cookies taste like a warm afternoon in a bakery. They’re buttery and crisp at the edges, tender in the center, and finished with a light cinnamon glaze that sets into a shiny, sweet crust. Browning the butter brings out deep, nutty flavors that make a simple sugar cookie feel special.

The dough is easy to handle, the bake is quick, and the glaze comes together in minutes. If you’re craving a cookie that feels classic yet a little elevated, this is it.

What Makes This Recipe So Good

Close-up detail: A just-baked brown butter sugar cookie cooling on a wire rack, crisp, lightly golde
  • Brown butter adds a toasted, nutty flavor you can’t get from regular creamed butter.
  • Balanced texture: crisp edges, soft centers, and a delicate glazed top.
  • Simple pantry ingredients with a bakery-style result.
  • Just-sweet-enough glaze with cinnamon that boosts the cookie without overpowering it.
  • Make-ahead friendly: the dough chills well and the cookies freeze beautifully.

What You’ll Need

  • For the cookies:
    • 1 cup (227 g) unsalted butter
    • 1 cup (200 g) granulated sugar
    • 1/2 cup (110 g) light brown sugar, packed
    • 1 large egg + 1 large egg yolk
    • 2 teaspoons vanilla extract
    • 2 1/4 cups (270 g) all-purpose flour
    • 1/2 teaspoon baking powder
    • 1/2 teaspoon baking soda
    • 3/4 teaspoon fine sea salt
    • Optional: 2 tablespoons granulated sugar for rolling
  • For the cinnamon glaze:
    • 1 cup (120 g) powdered sugar
    • 1/2 teaspoon ground cinnamon
    • Pinch of fine salt
    • 2–3 tablespoons milk or cream
    • 1/2 teaspoon vanilla extract

Step-by-Step Instructions

Cooking process: Overhead shot of freshly baked sugar-coated cookie balls just out of the oven on pa
  1. Brown the butter. Add butter to a light-colored saucepan over medium heat. Cook, stirring, until it foams, then turns golden with brown bits on the bottom and smells nutty, 5–7 minutes.

    Transfer to a bowl, scraping in the browned bits. Cool 15–20 minutes until just warm.

  2. Whisk dry ingredients. In a bowl, whisk flour, baking powder, baking soda, and salt. Set aside.
  3. Mix sugars and butter. In a large bowl, whisk the granulated and brown sugars into the cooled brown butter until combined and glossy.
  4. Add eggs and vanilla. Whisk in the egg, egg yolk, and vanilla until smooth and slightly thickened.
  5. Combine with dry ingredients. Use a spatula to fold in the flour mixture until no dry streaks remain.

    The dough will be soft.

  6. Chill. Cover and refrigerate 30–45 minutes until scoopable. This helps the cookies bake thick with chewy centers.
  7. Preheat and prep. Heat oven to 350°F (175°C). Line two baking sheets with parchment.

    If rolling in sugar, pour the sugar into a shallow bowl.

  8. Portion. Scoop 1 1/2 tablespoons of dough per cookie. Roll into balls. If using, roll in sugar to coat lightly.
  9. Bake. Arrange on sheets, spacing 2 inches apart.

    Bake 9–11 minutes, until edges are set and lightly golden and centers look slightly underbaked. They’ll firm up as they cool.

  10. Cool. Let cookies rest on the sheet 5 minutes, then transfer to a rack to cool completely before glazing.
  11. Make the glaze. Whisk powdered sugar, cinnamon, salt, vanilla, and 2 tablespoons milk. Add more milk a few drops at a time until it’s thick but pourable.
  12. Glaze. Spoon or drizzle glaze over cooled cookies.

    Let sit 20–30 minutes to set.

Keeping It Fresh

  • Room temperature: Store glazed cookies in an airtight container for 3–4 days. Place parchment between layers.
  • Freeze baked: Freeze unglazed cookies up to 2 months. Thaw, then glaze.
  • Freeze dough: Scoop, freeze until solid, then bag.

    Bake from frozen, adding 1–2 minutes.

Final presentation: Beautifully plated stack of Classic Brown Butter Sugar Cookies with Cinnamon Gla

Benefits of This Recipe

  • Elevated flavor from brown butter without extra steps during baking.
  • Foolproof texture: chilling and the extra yolk keep them tender and chewy.
  • Flexible finish: glaze, sugar-roll, or both.
  • Great for gifting thanks to the pretty glazed tops and sturdy crumb.

What Not to Do

  • Don’t skip cooling the brown butter. Hot butter can scramble the egg and make greasy dough.
  • Don’t overbake. Pull them when the centers still look soft; they set as they cool.
  • Don’t over-flour. Weigh flour if possible. Too much flour = dry, cakey cookies.
  • Don’t glaze warm cookies. The glaze will melt and turn runny.

Variations You Can Try

  • Maple twist: Swap half the milk in the glaze for pure maple syrup.
  • Spice blend: Add 1/2 teaspoon cardamom or chai spice to the dough.
  • Brown sugar forward: Use 3/4 cup brown sugar and 3/4 cup granulated for deeper flavor.
  • Sparkle sugar: Roll dough balls in coarse turbinado sugar for crunch.
  • Citrus note: Add 1 teaspoon orange or lemon zest to the dough or glaze.

FAQ

Can I use salted butter?

Yes. Reduce the added salt to 1/4 teaspoon to balance the dough.

Do I have to chill the dough?

Chilling isn’t strictly required, but it helps prevent spreading and improves texture and flavor.

Even 20–30 minutes makes a difference.

How do I know the butter is properly browned?

Look for golden-brown milk solids on the bottom, a toasty aroma, and a deepened color. Remove from heat as soon as the bits turn chestnut brown—black means burned.

Can I make these gluten-free?

Use a 1:1 gluten-free all-purpose flour with xanthan gum. The texture will be a bit more delicate but still tasty.

What if my glaze is too thick or thin?

If it’s too thick, add milk a few drops at a time.

If too thin, whisk in a tablespoon of powdered sugar until it coats the spoon and slowly drips.

Why did my cookies turn cakey?

Too much flour or overbaking. Weigh your flour and pull the cookies while the centers look slightly underdone.

Final Thoughts

These Classic Brown Butter Sugar Cookies with Cinnamon Glaze take a timeless favorite and give it a cozy, bakery-worthy finish. They’re easy enough for a weeknight and pretty enough for a party.

Keep a batch of dough in the freezer, and you’re never far from warm, fragrant cookies that make any day feel special.

Red Velvet Cream Cheese Stuffed Cookies – Soft, Sweet, and Simply Irresistible

Red velvet and cream cheese were made for each other, and these cookies prove it with every bite. Imagine a soft, cocoa-kissed red velvet cookie wrapped around a creamy cheesecake center. They’re rich without being heavy, festive without extra fuss, and perfect for sharing.

Whether you’re baking for a holiday, a birthday, or just because, these cookies bring a little wow-factor to the table.

What Makes This Recipe So Good

Close-up detail: A just-baked red velvet cream cheese stuffed cookie cracked open to reveal the tang
  • Soft and chewy texture: The cookie base stays tender, with just enough chew to feel satisfying.
  • Velvety cream cheese center: A tangy, smooth filling balances the sweetness and adds a surprise in every bite.
  • Eye-catching color: That classic red hue makes these cookies a standout on any dessert plate.
  • Make-ahead friendly: Both the filling and the dough can be prepped ahead for easy baking later.
  • Freezer-friendly: Bake now, enjoy later—these freeze beautifully.

What You’ll Need

  • For the cream cheese filling:
    • 8 oz cream cheese, softened
    • 1/3 cup powdered sugar
    • 1/2 teaspoon vanilla extract
    • Pinch of salt
  • For the red velvet cookie dough:
    • 1/2 cup unsalted butter, softened
    • 3/4 cup granulated sugar
    • 1/4 cup light brown sugar, packed
    • 1 large egg
    • 1 teaspoon vanilla extract
    • 1 1/2 cups all-purpose flour
    • 1/4 cup unsweetened cocoa powder (natural or Dutch-process)
    • 1 teaspoon cornstarch
    • 1/2 teaspoon baking soda
    • 1/4 teaspoon baking powder
    • 1/4 teaspoon salt
    • 1–1 1/2 tablespoons red food coloring (liquid or gel)
    • 2–3 teaspoons milk, as needed for consistency
  • Optional for rolling: 1/4 cup granulated sugar

How to Make It

Cooking process: Assembling the cookies—deep-red, chilled dough disc being wrapped around a frozen
  1. Make the filling: Beat cream cheese, powdered sugar, vanilla, and a pinch of salt until smooth. Scoop into teaspoon-size mounds (about 16) onto a parchment-lined plate. Freeze 30–45 minutes until firm.
  2. Cream the butter and sugars: In a large bowl, beat butter, granulated sugar, and brown sugar until light and fluffy, 2–3 minutes.
  3. Add egg and vanilla: Mix in the egg and vanilla until combined.

    Stir in red food coloring to reach a deep red shade.

  4. Whisk dry ingredients: In a separate bowl, whisk flour, cocoa, cornstarch, baking soda, baking powder, and salt.
  5. Combine: Add dry ingredients to the wet mixture. Mix on low just until a soft dough forms. If dough feels stiff or crumbly, add milk 1 teaspoon at a time until pliable.
  6. Chill: Cover and chill the dough for 30–45 minutes.

    This makes shaping easier and prevents spreading.

  7. Preheat oven: Set oven to 350°F (175°C). Line baking sheets with parchment.
  8. Assemble cookies: Scoop about 2 tablespoons of dough. Flatten into a thick disc.

    Place a frozen cream cheese mound in the center, then wrap dough around it, sealing the edges. Roll into a smooth ball. If desired, roll in sugar.

  9. Bake: Place on the sheet 2 inches apart.

    Bake 10–12 minutes, until the edges look set and tops are slightly cracked but centers still look soft.

  10. Cool: Let cookies rest on the sheet for 10 minutes, then transfer to a rack to cool completely. The filling sets as they cool.

Storage Instructions

  • Room temperature: Keep in an airtight container up to 1 day.
  • Refrigerator: Store up to 5 days for best freshness.
  • Freezer (baked): Freeze in a sealed container up to 2 months. Thaw in the fridge, then bring to room temp.
  • Freezer (unbaked): Freeze assembled dough balls on a tray, then transfer to a bag.

    Bake from frozen at 350°F, adding 1–2 minutes.

Tasty top view: Overhead shot of a platter of finished red velvet cream cheese stuffed cookies with

Benefits of This Recipe

  • Balanced flavor: Tangy cream cheese cuts through the sweet, cocoa-rich dough.
  • Special-occasion ready: Festive color without complicated decorating.
  • Flexible timing: Make components ahead for stress-free baking.
  • Reliable results: Chilled dough and frozen filling help keep shape and texture.

Common Mistakes to Avoid

  • Skipping the chill: Warm dough spreads too much and can leak filling.
  • Overbaking: Pull them when edges set. The centers finish on the sheet.
  • Too much flour: Spoon and level flour to avoid dry, crumbly dough.
  • Under-sealing: Pinch seams well so the filling stays inside.
  • Cold butter: Softened butter creams properly and creates tender cookies.

Alternatives

  • Chocolate chips: Fold 1/2 cup mini chips into the dough for extra richness.
  • Stuffing swap: Add lemon zest to the cream cheese for a bright twist, or a teaspoon of raspberry jam on top of the cream cheese before sealing.
  • Color-free: Skip red coloring and enjoy them as cocoa cream cheese cookies.
  • Gluten-free: Use a 1:1 gluten-free flour blend with xanthan gum.
  • Cream cheese glaze: Drizzle with a quick glaze (cream cheese, powdered sugar, milk) after cooling.

FAQ

Can I use beet powder instead of food coloring?

Yes. Use 1–2 tablespoons beet powder.

The color will be more muted, but it adds a natural tint without changing flavor much.

Why did my filling leak out?

It’s usually from warm dough, a soft filling, or gaps in the seam. Make sure the filling is frozen, the dough is chilled, and seal any cracks before baking.

Can I make the dough ahead?

Absolutely. Chill for up to 48 hours.

Let it sit at room temperature 10–20 minutes if it’s too firm to scoop.

Do I need both baking soda and baking powder?

Yes. The combo supports lift and a soft texture, especially with the cocoa and added moisture.

How do I know when they’re done?

Edges will look set, and the tops will be slightly cracked but still soft. If they’re puffed and no longer glossy, pull them—overbaking dries them out.

Wrapping Up

Red Velvet Cream Cheese Stuffed Cookies bring bakery-style flair with simple pantry ingredients.

They’re soft, striking, and full of creamy goodness. Keep a batch in the freezer, and you’ll always have a show-stopping dessert ready to bake.

White Chocolate Cranberry Oatmeal Cookies – Chewy, Sweet, and Perfectly Festive

These cookies are everything you want in a bite: chewy oats, sweet white chocolate, and tart cranberries. They’re simple to make, bake up beautifully, and feel a little special without any fuss. You don’t need a mixer, just a couple of bowls and a baking sheet.

They’re great for holiday trays, weekday treats, or a quick dessert to share. If you like your cookies soft in the center with lightly crisp edges, this recipe is for you.

Why This Recipe Works

Close-up detail: Freshly baked white chocolate cranberry oatmeal cookie just off the sheet, edges li
  • Oats add chew and structure without drying the cookie out, giving that classic oatmeal cookie texture.
  • Brown sugar brings moisture and caramel notes, keeping centers soft.
  • White chocolate balances the tart cranberries, so every bite hits sweet and tangy.
  • Chilling the dough (even briefly) prevents spreading and deepens flavor.
  • Just the right amount of salt and vanilla makes the flavors pop without overpowering the mix-ins.

Ingredients

  • 1 cup (2 sticks) unsalted butter, softened
  • 3/4 cup packed light brown sugar
  • 1/2 cup granulated sugar
  • 2 large eggs, room temperature
  • 2 teaspoons pure vanilla extract
  • 1 3/4 cups all-purpose flour
  • 1 teaspoon baking soda
  • 1/2 teaspoon baking powder
  • 3/4 teaspoon fine sea salt
  • 2 1/2 cups old-fashioned rolled oats
  • 1 cup dried cranberries
  • 1 cup white chocolate chips or chopped white chocolate
  • Optional: 1/2 teaspoon ground cinnamon or orange zest for a citrus twist

Step-by-Step Instructions

Cooking process: Chilled scoops of cookie dough (golf ball size, studded with rolled oats, white cho
  1. Preheat and prepare: Heat the oven to 350°F (175°C). Line two baking sheets with parchment paper.
  2. Cream the butter and sugars: In a large bowl, beat softened butter with brown and granulated sugar until smooth and slightly fluffy, about 2 minutes by hand or 1 minute with a mixer.
  3. Add eggs and vanilla: Mix in the eggs one at a time until fully incorporated.

    Stir in vanilla.

  4. Whisk dry ingredients: In a separate bowl, whisk flour, baking soda, baking powder, and salt. If using cinnamon, add it here.
  5. Combine wet and dry: Add the dry ingredients to the wet mixture and stir just until no dry streaks remain.
  6. Fold in oats and mix-ins: Stir in the oats, dried cranberries, and white chocolate until evenly distributed. Avoid overmixing.
  7. Chill (recommended): Cover and chill the dough for 20–30 minutes.

    This helps control spreading and improves texture.

  8. Scoop: Use a 1 1/2-tablespoon scoop (about golf ball size) to portion dough onto the prepared sheets, spacing 2 inches apart.
  9. Bake: Bake 10–12 minutes, until edges are set and lightly golden but centers look slightly underdone.
  10. Finish on the pan: Let cookies rest on the sheet for 5 minutes to firm up, then transfer to a rack to cool.
  11. Optional flourish: While warm, press a few extra white chocolate chips or cranberries on top for a bakery look.

How to Store

  • Room temperature: Store in an airtight container for up to 4 days. Slip in a slice of bread to keep cookies soft.
  • Freezer (baked): Freeze cooled cookies in a zip-top bag for up to 2 months. Thaw at room temperature.
  • Freezer (dough): Scoop dough into balls, freeze on a tray, then bag.

    Bake from frozen at 350°F, adding 1–2 minutes.

Tasty top view final presentation: Overhead shot of a rustic plate piled with White Chocolate Cranbe

Benefits of This Recipe

  • Balanced sweetness: White chocolate is creamy, while cranberries add brightness.
  • Great texture: Oats create chew without heaviness.
  • Reliable for sharing: Dough is sturdy and bakes evenly, perfect for gifting or parties.
  • Flexible add-ins: Easy to customize with nuts, seeds, or spices.

What Not to Do

  • Don’t skip the salt: It keeps the sweetness in check and boosts flavor.
  • Don’t overbake: Pull them when centers look slightly soft; they’ll set as they cool.
  • Don’t use quick oats: They can make the cookies dry and crumbly. Stick with old-fashioned rolled oats.
  • Don’t overmix: Too much stirring can toughen the cookies.
  • Don’t overload with mix-ins: More than 2 cups total can cause spreading and uneven baking.

Alternatives

  • Flavor swaps: Try orange zest, almond extract (1/4 teaspoon), or a pinch of cardamom.
  • Mix-in variations: Use chopped pistachios or pecans, or sub half the cranberries with chopped dried cherries.
  • Chocolate options: Replace white chocolate with milk or dark chocolate chips if you prefer less sweetness.
  • Gluten-free: Use a cup-for-cup gluten-free flour blend and certified gluten-free oats.
  • Dairy-free: Use plant-based butter sticks and dairy-free white chocolate.
  • Less sweet: Reduce white chocolate to 3/4 cup and use 1/3 cup granulated sugar.

FAQ

Can I use fresh or frozen cranberries?

Fresh or frozen cranberries release too much moisture and can make the cookies soggy. Stick to dried cranberries for the best texture.

Do I have to chill the dough?

It’s not mandatory, but chilling for 20–30 minutes leads to thicker, chewier cookies with less spread.

It’s worth the short wait.

How do I make the cookies thicker?

Chill longer (up to 1 hour) and slightly mound the dough balls. You can also add 2–3 tablespoons more flour if your dough feels very soft.

Why are my cookies dry?

They were likely overbaked or used quick oats. Bake until edges are set and centers are a touch soft, and use rolled oats for the right chew.

Can I halve or double the recipe?

Yes.

Halve all ingredients as written, or double and bake in batches. If doubling, chill the dough to keep the shape consistent.

Final Thoughts

These White Chocolate Cranberry Oatmeal Cookies offer that perfect mix of cozy and bright—chewy oats, creamy sweetness, and a pop of tart fruit. They’re easy enough for a weekday bake but special enough for a cookie swap.

Keep a stash of dough balls in the freezer, and you’ll always be 12 minutes away from warm, home-baked cookies. Enjoy them with coffee, tea, or a cold glass of milk.

Molten Hot Chocolate Cookies With Marshmallow Centers – Gooey, Cozy, and Easy

These cookies taste like a mug of hot chocolate in dessert form—warm, gooey, and nostalgic. The edges are soft and chewy, while the center hides a melty marshmallow that oozes when you break them open. They’re simple enough for a weeknight treat but special enough for a holiday platter.

If you love hot cocoa, these will be your new favorite cookie to share—or keep for yourself.

Why This Recipe Works

Close-up detail: A freshly baked molten hot chocolate cookie torn open to reveal the gooey, melty ma

These cookies use a mix of cocoa powder and melted chocolate for a deep, hot chocolate flavor. Chilling the dough helps it firm up, so it wraps around the marshmallow without melting too fast. A touch of cornstarch keeps the crumb tender, while brown sugar adds moisture and chew.

The result is a bakery-style cookie with a gooey center and a rich, cozy taste.

Ingredients

  • 1/2 cup (113 g) unsalted butter, melted and slightly cooled
  • 4 oz (115 g) semi-sweet chocolate, chopped or chips
  • 3/4 cup (150 g) brown sugar, packed
  • 1/4 cup (50 g) granulated sugar
  • 1 large egg, room temperature
  • 1 large egg yolk, room temperature
  • 1 1/2 tsp vanilla extract
  • 1 cup (125 g) all-purpose flour
  • 1/3 cup (30 g) unsweetened cocoa powder (natural or Dutch-process)
  • 1 tsp cornstarch
  • 1/2 tsp baking soda
  • 1/2 tsp fine sea salt
  • 12 large marshmallows, halved crosswise (or 24 mini marshmallows)
  • Optional: 1/2 cup mini chocolate chips, flaky salt for finishing

Instructions

Cooking process: Shaped cookie dough balls on parchment-lined baking sheet, each wrapped completely
  1. Melt the chocolate: In a heatproof bowl, microwave the butter and semi-sweet chocolate in 20–30 second bursts, stirring between each, until smooth. Let cool 5 minutes.
  2. Whisk wet ingredients: Add brown sugar, granulated sugar, egg, egg yolk, and vanilla to the chocolate mixture. Whisk until glossy and combined.
  3. Combine dry ingredients: In a separate bowl, whisk flour, cocoa powder, cornstarch, baking soda, and salt.
  4. Make the dough: Stir dry ingredients into wet until just combined.

    Fold in mini chocolate chips if using. The dough will be soft.

  5. Chill: Cover and refrigerate for 45–60 minutes until scoopable but not rock hard. This prevents marshmallows from bursting out.
  6. Prep marshmallows: Halve large marshmallows crosswise.

    Line two baking sheets with parchment and heat oven to 350°F (175°C).

  7. Shape cookies: Scoop about 2 tablespoons of dough (a heaping medium cookie scoop). Flatten into a disc, place a marshmallow half in the center, and wrap dough fully around it, sealing seams well. Place seam-side down on the sheet, spacing 2 inches apart.
  8. Bake: Bake one sheet at a time for 9–11 minutes, until edges are set and tops look slightly crackly.

    Don’t overbake; centers should feel soft.

  9. Finish: Sprinkle with a pinch of flaky salt if you like. Let cookies cool on the sheet for 10 minutes to set before moving to a rack. Serve warm for maximum gooeyness.

Keeping It Fresh

  • Room temperature: Store cooled cookies in an airtight container for 2–3 days.

    The marshmallow stays soft.

  • Reheat: Microwave one cookie for 8–10 seconds to revive the molten center.
  • Freeze baked: Freeze in a single layer, then bag for up to 2 months. Thaw at room temp and warm briefly.
  • Freeze unbaked: Shape and stuff the dough, freeze balls on a tray, then bag. Bake from frozen at 350°F, adding 1–2 minutes.
Final dish top view: Overhead shot of a cozy serving scene with a small stack of finished molten hot

Benefits of This Recipe

  • Big flavor, simple steps: Pantry ingredients create a rich, hot chocolate taste.
  • Show-stopping center: The marshmallow surprise makes them memorable without fancy tools.
  • Make-ahead friendly: Dough chills well and bakes beautifully from frozen.
  • Kid-approved and party-ready: Perfect for cookie swaps, movie nights, or snow days.

Pitfalls to Watch Out For

  • Marshmallow leakage: If seams aren’t sealed, marshmallow can ooze out.

    Pinch dough closed and bake seam-side down.

  • Overbaking: Pull them when edges set but centers look soft. Overbaking dries the cookie and hardens the marshmallow.
  • Dough too warm: If dough gets sticky, chill for 10–15 minutes before shaping.
  • Too little salt: A small amount of salt boosts chocolate flavor. Don’t skip it.

Alternatives

  • Hot cocoa mix twist: Replace 2 tablespoons of cocoa powder with your favorite hot cocoa mix for a nostalgic flavor.
  • Peppermint version: Add 1/2 teaspoon peppermint extract and roll dough balls in crushed candy canes.
  • Dark chocolate lovers: Use 70% chocolate and Dutch-process cocoa for a deeper, less sweet cookie.
  • Mini marshmallows: Use 2 mini marshmallows per cookie if that’s what you have.
  • Gluten-free: Substitute a 1:1 gluten-free flour blend with xanthan gum; bake time may vary by 1–2 minutes.

FAQ

Can I use cocoa powder only and skip the melted chocolate?

Yes, but the flavor and texture won’t be as rich.

If skipping melted chocolate, add 2 more tablespoons butter and an extra tablespoon of cocoa powder, and expect a slightly less fudgy cookie.

Why add an extra egg yolk?

The yolk makes the cookies chewier and richer. It helps mimic that molten brownie texture without making the dough too runny.

My marshmallows keep bursting out. What can I do?

Chill the dough, fully enclose the marshmallow with no gaps, and bake seam-side down.

If your oven runs hot, lower the temperature to 340°F and add a minute.

How do I know they’re done?

The edges will look set and the tops slightly crackly, but the centers should still feel soft when gently touched. They’ll continue to set on the pan as they cool.

Can I make them smaller?

Yes. Use 1 tablespoon of dough and one mini marshmallow.

Bake 7–9 minutes and keep a close eye on them.

In Conclusion

Molten Hot Chocolate Cookies with Marshmallow Centers bring all the comfort of a cozy mug to a handheld treat. They’re rich, gooey, and easy enough for any day of the week. With a few smart tips—chilled dough, sealed seams, and the right bake time—you’ll get perfect results every time.

Make a batch, warm them up, and enjoy the oozy center while it lasts.

Double Chocolate Peppermint Crinkle Cookies – Festive, Fudgy, and Minty

These cookies taste like a winter evening wrapped in a cozy sweater. They’re fudgy in the middle, crisp at the edges, and dusted with a snowy coat of powdered sugar. A touch of peppermint brightens the rich chocolate, making every bite feel festive without being over the top.

If you love classic crinkle cookies, this double chocolate twist with peppermint might become your new holiday favorite.

Why This Recipe Works

Close-up detail: Freshly baked double chocolate peppermint crinkle cookies just out of the oven, sho

Two types of chocolate—cocoa powder and chocolate chips—create deep, brownie-like richness. Oil and brown sugar keep the centers soft and moist, even a day or two after baking. Rolling the dough in granulated sugar first helps the powdered sugar stay bright and snowy. And a measured amount of peppermint extract adds cool flavor without overpowering the chocolate.

Ingredients

  • 1 cup (120 g) all-purpose flour
  • 1/2 cup (45 g) unsweetened cocoa powder (Dutch-process preferred for deeper flavor)
  • 1 teaspoon baking powder
  • 1/4 teaspoon baking soda
  • 1/4 teaspoon fine salt
  • 1/2 cup (100 g) granulated sugar
  • 1/2 cup (110 g) packed brown sugar
  • 1/3 cup (80 ml) neutral oil (canola or vegetable)
  • 2 large eggs, room temperature
  • 1 teaspoon pure vanilla extract
  • 1/2 teaspoon peppermint extract (adjust to taste; see FAQs)
  • 3/4 cup (130 g) semi-sweet chocolate chips or chopped chocolate
  • 1/3 cup (65 g) granulated sugar for rolling
  • 1 cup (120 g) powdered sugar for rolling
  • Optional: 2 tablespoons finely crushed peppermint candies for garnish

Instructions

Cooking process: Chilled dough balls being rolled first in granulated sugar then generously in powde
  1. Whisk the flour, cocoa powder, baking powder, baking soda, and salt in a medium bowl until well combined.
  2. In a large bowl, whisk granulated sugar, brown sugar, and oil until sandy and cohesive.

    Add eggs, one at a time, whisking until smooth. Whisk in vanilla and peppermint extract.

  3. Stir the dry ingredients into the wet just until no dry streaks remain. Fold in the chocolate chips.

    The dough will be thick and sticky.

  4. Cover and chill for at least 1 hour (up to 24 hours). Chilling helps the dough firm up and develop flavor, and it creates better crinkles.
  5. Preheat oven to 350°F (175°C). Line two baking sheets with parchment.
  6. Scoop 1 1/2-tablespoon portions (a small cookie scoop works well).

    Roll each portion into a ball.

  7. Roll each ball in granulated sugar, then generously in powdered sugar, coating all sides.
  8. Arrange on prepared sheets, spacing about 2 inches apart. If using crushed peppermint, sprinkle a tiny pinch on top now.
  9. Bake for 10–12 minutes, until the cookies are puffed, cracked, and just set at the edges. Centers should look slightly soft.
  10. Cool on the sheet for 5 minutes, then transfer to a rack.

    They’ll firm up as they cool but stay fudgy inside.

Keeping It Fresh

Store cooled cookies in an airtight container at room temperature for 3–4 days. To maintain softness, add a slice of bread or a few marshmallows to the container. For longer storage, freeze baked cookies in a single layer, then bag them for up to 2 months.

Thaw at room temperature. You can also freeze scooped, unbaked dough balls for fresh-baked cookies anytime—roll in sugars just before baking.

Tasty top view final presentation: Overhead shot of a plate piled with double chocolate peppermint c

Health Benefits

  • Cocoa provides flavonoids, which have antioxidant properties.
  • Dark or semi-sweet chocolate offers a bit more cocoa content and slightly less sugar than milk chocolate.
  • Portion control is built in—one cookie satisfies a chocolate craving without overdoing it.

These are still a treat, but small tweaks—like using a darker chocolate and keeping portions modest—make them a smarter indulgence.

What Not to Do

  • Don’t skip chilling. Warm dough spreads too much and won’t crinkle nicely.
  • Don’t overbake. If you wait for a dry center, you’ll lose the fudgy texture.
  • Don’t overload the peppermint. Too much extract can taste medicinal.
  • Don’t skimp on the powdered sugar coat. A thin coat melts and looks patchy.
  • Don’t use old baking powder. Stale leavening means fewer cracks and less lift.

Variations You Can Try

  • Mint chocolate chunks: Swap half the chips for chopped peppermint bark.
  • Extra dark: Use all Dutch-process cocoa and 70% chocolate for a bolder taste.
  • Gluten-free: Use a 1:1 gluten-free baking flour blend; chill well before baking.
  • Mocha crinkle: Add 1 teaspoon instant espresso powder with the dry ingredients.
  • White chocolate swirl: Mix in 1/3 cup white chocolate chips for contrast.

FAQ

Can I use peppermint oil instead of extract?

Yes, but it’s much stronger. Use about one-fourth the amount.

Start with 1/8 teaspoon, taste the dough, and adjust carefully.

Why roll in granulated sugar before powdered sugar?

The granulated sugar creates a barrier that helps the powdered sugar stay bright and not melt into the cookie surface during baking.

My cookies didn’t crack. What happened?

Likely reasons are warm dough, old leavening, or overmixing. Make sure the dough is cold, your baking powder is fresh, and you mix just until combined.

Can I reduce the sugar?

You can cut the granulated sugar in the dough by 2–3 tablespoons without major texture issues.

Keep the powdered sugar coating as written for the classic look.

How do I make them chewier?

Use all brown sugar in the dough, bake on the shorter end of the time range, and let them rest on the baking sheet a minute longer before moving to a rack.

Wrapping Up

Double Chocolate Peppermint Crinkle Cookies bring together rich cocoa, melty chocolate, and cool mint in a soft, crinkled package. They’re simple to make, freezer-friendly, and crowd-pleasing. Keep a batch on hand for gifting, sharing, or satisfying that late-night chocolate craving with a festive twist.

High-Protein Chickpea and Roasted Veggie Meal Prep Bowls – Easy, Flavorful, and Filling

These bowls make weekday lunches a no-brainer. Roasted veggies, spiced chickpeas, and a bright lemon-tahini sauce come together in under an hour. You get big flavor and steady energy without fuss.

Everything holds up well in the fridge, so you can prep once and eat well all week. It’s simple, satisfying, and budget-friendly.

What Makes This Recipe So Good

Close-up detail: Crispy roasted chickpeas fresh from the oven scattered over caramelized sweet potat
  • Protein-packed and plant-based: Chickpeas and quinoa or brown rice give you complete, filling meals.
  • Hands-off roasting: Most of the work happens in the oven, so cleanup and effort stay low.
  • Customizable: Swap veggies, grains, or sauce based on your taste and what’s in your pantry.
  • Great for meal prep: Stays tasty for 4–5 days and reheats beautifully.
  • Bright, balanced flavors: Smoky spices, creamy tahini, and fresh lemon keep each bite interesting.

Shopping List

  • Chickpeas: 2 cans (15 oz each), drained and rinsed; or 3 cups cooked
  • Grain base: 2 cups dry quinoa or brown rice
  • Vegetables for roasting: 1 large sweet potato, 1 red onion, 1 red bell pepper, 1 zucchini, 1 head broccoli
  • Leafy greens (optional): 5 cups baby spinach or arugula
  • Spices: Smoked paprika, ground cumin, garlic powder, chili powder, salt, black pepper
  • Olive oil: For roasting and dressing
  • Lemon: 1–2 fresh lemons
  • Tahini: 1/3 cup
  • Maple syrup or honey: 1–2 teaspoons (optional, for the sauce)
  • Fresh add-ins (optional): Parsley, cilantro, cherry tomatoes, cucumber, avocado
  • Crunch (optional): Pumpkin seeds or toasted almonds

Step-by-Step Instructions

Cooking process: Overhead shot of roasted veggie and grain bowl assembly in progress—fluffy quinoa
  1. Cook the grain: Rinse quinoa or rice. Cook according to package directions.

    Fluff and set aside.

  2. Prep the oven: Heat to 425°F (220°C). Line two sheet pans with parchment for easy cleanup.
  3. Chop the veggies: Cut sweet potato into 1/2-inch cubes. Slice onion into wedges.

    Chop bell pepper and zucchini into bite-size pieces. Break broccoli into small florets.

  4. Season the veggies: Toss with 2–3 tablespoons olive oil, 1 teaspoon smoked paprika, 1 teaspoon cumin, 1/2 teaspoon garlic powder, 1/2 teaspoon chili powder, 1 teaspoon salt, and black pepper.
  5. Roast: Spread evenly on sheet pans without crowding. Roast 20–25 minutes, stirring halfway, until tender with caramelized edges.
  6. Crisp the chickpeas: Pat chickpeas dry with a towel.

    Toss with 1 tablespoon olive oil, 1/2 teaspoon smoked paprika, 1/2 teaspoon cumin, 1/4 teaspoon garlic powder, salt, and pepper. Roast on a separate pan (or one side of a pan) for 15–20 minutes until slightly crisp.

  7. Make the lemon-tahini sauce: In a bowl, whisk 1/3 cup tahini, juice of 1 lemon, 1 tablespoon olive oil, 2–4 tablespoons warm water to thin, a pinch of salt, and 1–2 teaspoons maple syrup or honey if desired. Adjust thickness until pourable.
  8. Assemble bowls: Divide grains among 4–5 containers.

    Add roasted veggies and chickpeas. If using greens, tuck a handful into each bowl. Drizzle with sauce or pack it separately.

  9. Finish with fresh elements: Add chopped herbs, halved cherry tomatoes, sliced cucumber, avocado, and a squeeze of lemon if you like.

    Sprinkle pumpkin seeds for crunch.

Storage Instructions

  • Refrigeration: Store in airtight containers for up to 5 days. Keep sauce in a separate small container to prevent sogginess.
  • Reheating: Warm grains, veggies, and chickpeas in the microwave for 60–90 seconds, then add fresh toppings and sauce.
  • Freezing: You can freeze the grains and roasted veggies (up to 2 months). Add fresh greens and sauce after reheating.
Final dish presentation: Restaurant-quality plated High-Protein Chickpea and Roasted Veggie Bowl—q

Health Benefits

  • High protein and fiber: Chickpeas and whole grains deliver steady energy, support satiety, and help digestive health.
  • Micronutrient-rich: Sweet potatoes, broccoli, and peppers bring vitamins A, C, K, and antioxidants.
  • Heart-healthy fats: Olive oil and tahini provide unsaturated fats that support cardiovascular health.
  • Balanced macros: A smart mix of complex carbs, plant protein, and healthy fats helps stabilize blood sugar.

Pitfalls to Watch Out For

  • Soggy veggies: Don’t overcrowd the pan.

    Give vegetables space so they roast instead of steam.

  • Bland results: Season generously and taste the sauce. Citrus, salt, and spices make a big difference.
  • Mushy chickpeas: Dry them well before roasting for better texture.
  • Thick, pasty sauce: Whisk in warm water a little at a time until silky and drizzle-able.
  • Greens wilting: Pack sauce separately and add delicate greens right before eating if you prefer them crisp.

Alternatives

  • Protein swaps: Use lentils, marinated tofu, tempeh, or grilled chicken if you eat meat.
  • Grain options: Try farro, couscous, cauliflower rice, or barley.
  • Veggie variations: Brussels sprouts, cauliflower, carrots, or asparagus roast beautifully.
  • Sauce ideas: Greek yogurt-herb sauce, pesto, harissa yogurt, or a simple olive oil–lemon vinaigrette.
  • Spice profiles: Go Mediterranean (oregano, sumac), Indian-inspired (garam masala, turmeric), or Mexican-style (chipotle, coriander).

FAQ

How much protein is in each bowl?

Each bowl typically provides 18–25 grams of protein, depending on portion sizes and whether you use quinoa or add extras like seeds or tofu.

Can I make this oil-free?

Yes. Roast veggies on parchment with a splash of vegetable broth or lemon juice and increase spices.

Use an oil-free tahini sauce by thinning with water and lemon only.

Is this recipe gluten-free?

It is naturally gluten-free when made with quinoa, rice, or other gluten-free grains. Check labels on tahini and spices to be safe.

How do I keep the chickpeas crispy?

Dry them thoroughly, roast at high heat, and store them separately if you want maximum crunch. Add to bowls just before eating.

Can I eat it cold?

Absolutely.

These bowls taste great cold or at room temperature, especially with fresh herbs and extra lemon.

What’s a good make-ahead timeline?

Roast and cook grains on Sunday, store the sauce separately, and assemble. You’ll have grab-and-go lunches through Friday.

In Conclusion

These High-Protein Chickpea and Roasted Veggie Meal Prep Bowls are simple, flexible, and seriously satisfying. With bold seasoning, a creamy lemon-tahini drizzle, and plenty of plants, they make healthy eating feel easy.

Prep once, mix up the add-ins, and enjoy fresh, flavorful lunches all week.

Spicy Tuna Salad Lettuce Wraps With Crunchy Veggies – Fresh, Fast, and Satisfying

These spicy tuna salad lettuce wraps are the kind of meal you can throw together in minutes and still feel great about. They’re cool, crisp, and full of bright flavor, with just enough heat to keep things interesting. Think creamy, zesty tuna tucked into crunchy lettuce leaves and topped with fresh veggies for snap and color.

It’s weeknight-friendly, lunchbox-ready, and surprisingly filling. If you want a lighter meal that doesn’t taste like “diet food,” this is it.

What Makes This Recipe So Good

Close-up detail: A generous scoop of spicy tuna salad freshly mixed in a ceramic bowl, showing flaky
  • Big flavor, minimal effort: Pantry tuna meets a quick, punchy sauce—no cooking required.
  • Fresh crunch in every bite: Lettuce, cucumbers, carrots, and peppers keep it crisp and satisfying.
  • Customizable heat: Adjust the chili sauce, sriracha, or jalapeño to match your spice comfort level.
  • Light but filling: Protein-packed tuna and creamy sauce make it satisfying without feeling heavy.
  • Meal-prep friendly: Mix the tuna ahead and assemble the wraps right before eating.

What You’ll Need

  • Canned tuna: 2 cans (5 ounces each), drained well; solid or chunk, in water or olive oil.
  • Greek yogurt or mayonnaise: 1/3 cup (use all yogurt for lighter, mayo for richer, or a 50/50 mix).
  • Sriracha or chili-garlic sauce: 1–2 tablespoons, to taste.
  • Rice vinegar or lime juice: 1–2 teaspoons for brightness.
  • Sesame oil: 1 teaspoon for a toasty flavor (optional but great).
  • Soy sauce or tamari: 1–2 teaspoons for salt and depth.
  • Green onion: 2 tablespoons, finely sliced.
  • Celery: 1 stalk, finely diced for extra crunch.
  • Jalapeño: 1 small, minced (optional for extra heat).
  • Lettuce leaves: 8–12 sturdy leaves; butter lettuce, romaine hearts, or iceberg wedges.
  • Crunchy veggies for topping: Thinly sliced cucumber, shredded carrot, and red bell pepper.
  • Fresh herbs: Cilantro or parsley, roughly chopped.
  • Toasted sesame seeds: 1 tablespoon for garnish (optional).
  • Black pepper: To taste; salt if needed.

Instructions

Tasty top view: Overhead shot of assembled lettuce wraps arranged in a loose circle on a matte white
  1. Prep the lettuce and veggies: Rinse and pat dry the lettuce leaves. Slice cucumber and bell pepper, and shred the carrot.

    Set aside.

  2. Mix the sauce: In a bowl, whisk yogurt or mayo with sriracha, rice vinegar or lime, sesame oil, and soy sauce until smooth.
  3. Build the tuna salad: Add drained tuna, green onion, celery, and jalapeño to the bowl. Fold gently to keep some texture. Taste and adjust heat, acidity, and salt.
  4. Assemble the wraps: Spoon a generous scoop of spicy tuna onto each lettuce leaf.

    Top with cucumber, carrot, and bell pepper.

  5. Finish and serve: Sprinkle with herbs, sesame seeds, and a crack of black pepper. Serve immediately while the lettuce is crisp.

How to Store

  • Tuna salad: Keep in an airtight container in the fridge for up to 3 days.
  • Lettuce and toppings: Store separately in sealed containers with a paper towel to absorb moisture. Assemble just before eating.
  • Meal prep tip: Pack tuna in one container and lettuce/veggies in another.

    Assemble at lunch to avoid soggy leaves.

Final dish presentation: Restaurant-quality plating of three romaine “boats” filled with spicy t

Health Benefits

  • High-quality protein: Tuna helps keep you full and supports muscle recovery.
  • Omega-3 fats: Tuna provides heart-friendly fats that can support brain and joint health.
  • Veggie fiber: Crisp veggies add fiber for digestion and steady energy.
  • Lighter dressing options: Greek yogurt cuts calories and adds probiotics while staying creamy.
  • Low-carb, gluten-free friendly: Using lettuce instead of tortillas keeps carbs low and avoids gluten.

Pitfalls to Watch Out For

  • Watery tuna salad: Drain tuna thoroughly. If using yogurt, use a thick variety to avoid a runny mix.
  • Soggy lettuce: Dry leaves well and don’t assemble too early. Serve right away for best crunch.
  • Too salty: Taste before adding extra salt—soy sauce already brings plenty.
  • Overpowering heat: Add spice gradually.

    You can always drizzle more sriracha on top.

  • Mercury concerns: Use light tuna more often than albacore if you eat tuna regularly.

Alternatives

  • Protein swap: Use canned salmon, cooked shredded chicken, or mashed chickpeas for a vegetarian twist.
  • Dressing twist: Try gochujang, chili crisp, or harissa for a different heat profile.
  • Lettuce options: Butter lettuce for delicate wraps, romaine for sturdy boats, or cabbage leaves for extra crunch.
  • Add-ins: Avocado slices, pickled onions, or radishes for brightness and bite.
  • Dairy-free: Use mayo or a dairy-free yogurt. For paleo/Whole30, skip soy sauce and use coconut aminos.
  • Extra carbs if you want them: Spoon the tuna over rice or wrap in nori for a sushi-inspired bowl or roll.

FAQ

Can I make the tuna salad ahead of time?

Yes. The tuna salad keeps well for up to 3 days in the fridge.

Add fresh herbs and toppings right before serving for best texture.

What kind of tuna is best?

Light tuna (skipjack) has a milder flavor and typically lower mercury. Albacore is firmer and richer but higher in mercury. Use what you prefer and rotate options if you eat tuna often.

How do I make it less spicy?

Use less sriracha, skip the jalapeño, and add extra yogurt or mayo to mellow the heat.

A squeeze of lime also softens the spice.

Can I use canned salmon instead?

Absolutely. Drain it well and remove any skin or bones. The same dressing works perfectly with salmon.

What can I serve with these wraps?

Try a simple side of edamame, miso soup, fruit salad, or a small bowl of rice for a more filling meal.

In Conclusion

Spicy tuna salad lettuce wraps are fresh, fast, and endlessly customizable.

With minimal prep and maximum crunch, they make an easy lunch or light dinner that never feels boring. Keep the tuna salad ready in the fridge, stack your veggies, and assemble in minutes whenever the craving hits. Simple, bright, and satisfying—exactly what a weeknight meal should be.